Decarbing - Before and After Rotor Pics
 01-12-2013, 02:40 PM
#1
Registered
Thread Starter
iTrader: (2)

Join Date: Oct 2007
Location: Pacific Northwest
Posts: 16,684
Likes: 0
Received 239 Likes
on
109 Posts
Decarbing - Before and After Rotor Pics
A recent topic hotly debated is the benefit or costs of seafoaming, or any other type of decarbing. So I bought a USB borescope, a can of seafoam, a gallon of distilled water, some ingestion tubing, and borrowed my wife's laptop.
I pulled the Leading plugs and took a bunch of pics of each rotor face through the plug socket, then got the engine nice and hot and ran half a can of seafoam (6oz of a 12oz can, which people typically do, splitting the can between the two rotors) through the front rotor via the LIM service ports with the engine running, keeping the RPMs up to avoid stalling. Then I repeated with the same amount in distilled water through the rear rotor. I did not just submerge the tip of the hose into the liquid and let it suck as much through as possible, as it's nearly impossible to keep the engine running when doing that, plus it's probably not as effective as it would be flash cooling the rotors and not allowing them to heat back up much. What I did is just keep skimming the surface with the tip, which foamed up the seafoam and misted up the water as they were getting pulled through the hose.
I let everything cool down and took some more pics.
Note, my borescope cam couldn't focus on the leading side of the rotor, it was simply too close. But, it could focus well on the trailing side, so these pics are all of the trailing side of the rotor. I have the leading side pics too, but they are quite fuzzy. I was also not quite consistent enough with taking pics at the same point, so these pics are in series of a single face where I had good before and after. Obviously I have no idea if these are exactly the same faces for each, however for each rotor, each face does show the same amount of carbon before vs after. I could not find any rotor face that differed substantially from any other face within the same rotor. Anyone that wants a zip file of every pic I took, just send me a PM with your email address and I will sent it to you.
Here they are in side-by-side.

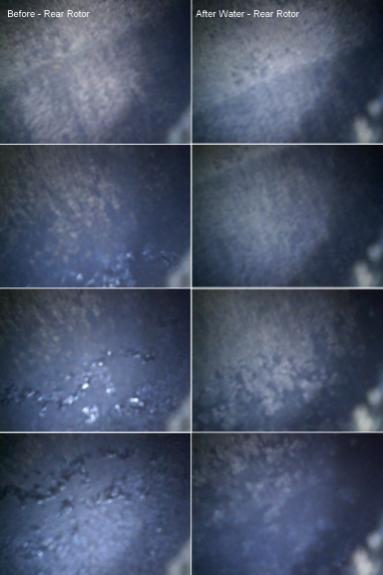
Water vs Seafoam: They appear to remove carbon about equally well for the low volume, but obviously not a complete clean. The larger deposits get stripped more readily than the caked on, but some progress there too.
Now I'm going to run the rest of the gallon of distilled water through the rear rotor and take some more pics.
I pulled the Leading plugs and took a bunch of pics of each rotor face through the plug socket, then got the engine nice and hot and ran half a can of seafoam (6oz of a 12oz can, which people typically do, splitting the can between the two rotors) through the front rotor via the LIM service ports with the engine running, keeping the RPMs up to avoid stalling. Then I repeated with the same amount in distilled water through the rear rotor. I did not just submerge the tip of the hose into the liquid and let it suck as much through as possible, as it's nearly impossible to keep the engine running when doing that, plus it's probably not as effective as it would be flash cooling the rotors and not allowing them to heat back up much. What I did is just keep skimming the surface with the tip, which foamed up the seafoam and misted up the water as they were getting pulled through the hose.
I let everything cool down and took some more pics.
Note, my borescope cam couldn't focus on the leading side of the rotor, it was simply too close. But, it could focus well on the trailing side, so these pics are all of the trailing side of the rotor. I have the leading side pics too, but they are quite fuzzy. I was also not quite consistent enough with taking pics at the same point, so these pics are in series of a single face where I had good before and after. Obviously I have no idea if these are exactly the same faces for each, however for each rotor, each face does show the same amount of carbon before vs after. I could not find any rotor face that differed substantially from any other face within the same rotor. Anyone that wants a zip file of every pic I took, just send me a PM with your email address and I will sent it to you.
Here they are in side-by-side.
Water vs Seafoam: They appear to remove carbon about equally well for the low volume, but obviously not a complete clean. The larger deposits get stripped more readily than the caked on, but some progress there too.
Now I'm going to run the rest of the gallon of distilled water through the rear rotor and take some more pics.
Last edited by RIWWP; 01-12-2013 at 04:37 PM.


The following users liked this post:
Jastreb (09-23-2019)
 01-12-2013, 03:55 PM
#5
Registered
Thread Starter
iTrader: (2)
Join Date: Oct 2007
Location: Pacific Northwest
Posts: 16,684
Likes: 0
Received 239 Likes
on
109 Posts
Agreed. If you have an idea of how I could take pictures of the points that ARE the issues, I'm more than happy to hear it.
Since I can only easily get the faces from what I'm aware of, it is simply a test to see what the decarbing methods actually do for removing carbon.
Without seeing the entire housing surface or behind the seals, I can only guess at what might be happening there, and chances are everyone will disagree with everyone else on those guesses.
So this is simply what it is:
a look at how water and seafoam affects carbon removal when applied in this manner.
It's still a holy war of opinions from there.
I don't believe the seals are really getting anything from that small quantity. The area of the rotor faces to either side of the apex seal is by far the worst looking area, trailing or leading. The seals themselves are polished from sweeping against the housing, so my picture attempts there have failed, see attached with what the pic looks like untitled_37 is before, untitled_99 is after, both are rear rotor. Unknown if they are the same seal. Turning down the brightness of the lights just makes everything else but the seal impossible to make out.
How close everything is to the camera doesn't help. The first pic is with the camera barely in the plug hole at all, just staying almost entirely on wire tension alone. The second is about a quarter inch closer.
Since I can only easily get the faces from what I'm aware of, it is simply a test to see what the decarbing methods actually do for removing carbon.
Without seeing the entire housing surface or behind the seals, I can only guess at what might be happening there, and chances are everyone will disagree with everyone else on those guesses.
So this is simply what it is:
a look at how water and seafoam affects carbon removal when applied in this manner.
It's still a holy war of opinions from there.
How close everything is to the camera doesn't help. The first pic is with the camera barely in the plug hole at all, just staying almost entirely on wire tension alone. The second is about a quarter inch closer.
Last edited by RIWWP; 01-12-2013 at 03:58 PM.

 01-12-2013, 04:03 PM
#7
Registered
Thread Starter
iTrader: (2)
Join Date: Oct 2007
Location: Pacific Northwest
Posts: 16,684
Likes: 0
Received 239 Likes
on
109 Posts
I noted the procedure in the first post. It is with the engine running, ingesting each fluid via intake low pressure, managing the throttle to keep the engine from stalling.
I do not believe that letting it sit for a while does anything effective. If enough people disagree I'll take my old plugs (currently used for this) and submerge them in seafoam for 24hrs, taking periodic pics to show how little carbon is being removed by sitting there. A light film from the surface of the plugs is pretty much all that gets removed, with clear carbon deposits left.
Possibly given several months of sitting, it might disolve all of the carbon, but I don't think anyone wants to take several months to decarb their engine.
I used this method because it was the closest you can get to a water injection system that fires in a controlled manner under load.
Note, I did not just submerge the end of the hose completely in the liquid, but hovered it next to the surface and the air pulling the smaller quantity in basically foamed up the seafoam and misted the water, which I am taking a guess is more effective than just bulk dumping it into the engine.
01-12-2013, 05:46 PM
#8
Registered
Thread Starter
iTrader: (2)
Join Date: Oct 2007
Location: Pacific Northwest
Posts: 16,684
Likes: 0
Received 239 Likes
on
109 Posts
I just finished the gallon through the rear rotor. Takes a while when you aren't just hosing it with as much as you can. Probably should have found some sort of fitting that would restrict the amount of flow through the tube and then just dropped the end in.
Will take pics once things cool off sufficiently.
I was watching STFT and AFRs while doing it, and as expected it shows crazy lean (17-18s) and adds up to 25% more fuel. Going to take a look at the front rotor also to see if that rich on the front rotor undid any decarbing there.
Will see if I can get reasonable pics of the apex seals as well. I have an idea to try there.
(Kinda waiting for someone to get the wrong idea and assume I stuck a funnel in the LIM and poured a gallon of water into the engine)
Last edited by RIWWP; 01-12-2013 at 05:49 PM.
01-12-2013, 08:06 PM
#9
Rockie Mountain Newbie

Had I know you were planning an experiment like this, I could have sent you a #35 pilot jet from a motorcycle carburetor. Would have allowed you to just drop the end of the hose with the jet in it into the gallon of water, and you could have sat there with your foot easily controlling the throttle to keep the engine running.
BC.
BC.
01-12-2013, 08:18 PM
#10
my point is this; seeing carbon removal off the rotor face is insignificant if it's not correlated with some type of measurable physical improvement in engine integrity. Nobody ever said it did absolutely nothing. The argument has always been that it doesn't contribute to the engine having any significant improvement regarding internal sealing. Yes, it will remove some of the buildup off a rotor face or piston crown. No, it doesn't make any noticeable improvement in piston ring or rotor seal sealing. That is what people are trying to use it for, which is for naught.
01-12-2013, 08:38 PM
#11
Registered
Thread Starter
iTrader: (2)
Join Date: Oct 2007
Location: Pacific Northwest
Posts: 16,684
Likes: 0
Received 239 Likes
on
109 Posts
I have to disagree with you on this point. 9k specifically has been very vocal about it not doing anything.
Examples I pulled up quickly:
And plenty of people agree with him...
So you would have to agree that it removes carbon, but would insist that removing or restricting carbon buildup does not have any benefit?
Note that I as of my last post I did not disagree with you about removing carbon around the seals. 6oz is simply not enough. However, water injection setup keeps carbon clear completely (reference RX7club) so there has to be a point between the two extremes that is reachable using this method. How feasible, how effective, etc... is what I set out to see.
I DO agree that it will not restore lost compression due to seals that are worn from carbon buildup. It simply can't replace lost material. However, keeping that carbon down can indeed have long term preventative gains. Note, I'm not saying it would prevent all wear either. Simply slow it down.
After a gallon of water though, it is clear that it DOES keep stripping carbon, including around the seals, and given enough time and volume I entirely believe that it would actually remove all carbon from the rotor, and from the seals themselves. Probably from the housing as well, though I don't have any chance at confirming that without a tear-down.
This is one complete rotor face after 1 gallon of water (top-down in each column, then move to the top of the next column)
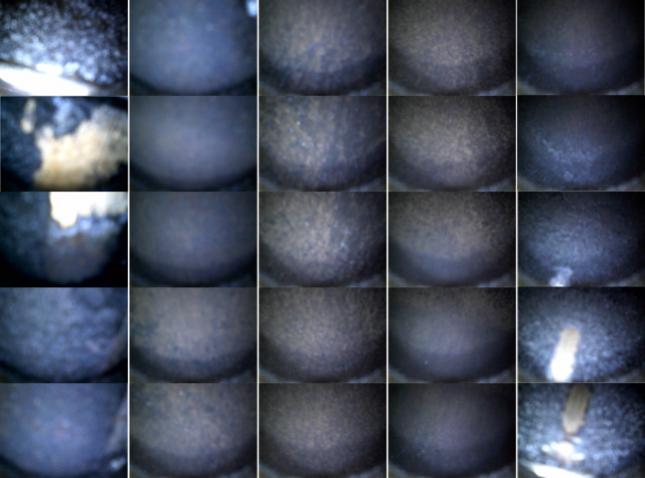
If the water can indeed remove carbon from right against the seal itself, then it is reaching all of the critical points. Carbon will form where the combustion gases can get to, and steam from water cleaning will get everywhere combustion gases can. Equal points of reach, and we can see that the steam will indeed remove carbon. Extrapolate from there.
Would someone take it as far as needed to completely clean all carbon from both rotors? Probably not. Almost certainly not.
But is it devoid of benefit? Certainly not. Even surface carbon removal from the housing WILL slow down compression less due to seal wear.
Examples I pulled up quickly:
My advice has been posted already, have you read the threads on this subject? The "decarb" process is horse **** and does nothing beneficial. The smoking people see is just Zoom Zoom cleaner or Seafoam burning, that is it.
Anyone that has torn a Renesis engine apart will tell you how difficult carbon is to remove from the engine with elbow grease, many hours, a wire brush, and solvent so there is no way in hell a trickle of cleaner is going to get rid of any of it. I know because I have seen inside of my engine that was "decarbed". Waste of money.
Anyone that has torn a Renesis engine apart will tell you how difficult carbon is to remove from the engine with elbow grease, many hours, a wire brush, and solvent so there is no way in hell a trickle of cleaner is going to get rid of any of it. I know because I have seen inside of my engine that was "decarbed". Waste of money.
So you would have to agree that it removes carbon, but would insist that removing or restricting carbon buildup does not have any benefit?
Note that I as of my last post I did not disagree with you about removing carbon around the seals. 6oz is simply not enough. However, water injection setup keeps carbon clear completely (reference RX7club) so there has to be a point between the two extremes that is reachable using this method. How feasible, how effective, etc... is what I set out to see.
I DO agree that it will not restore lost compression due to seals that are worn from carbon buildup. It simply can't replace lost material. However, keeping that carbon down can indeed have long term preventative gains. Note, I'm not saying it would prevent all wear either. Simply slow it down.
After a gallon of water though, it is clear that it DOES keep stripping carbon, including around the seals, and given enough time and volume I entirely believe that it would actually remove all carbon from the rotor, and from the seals themselves. Probably from the housing as well, though I don't have any chance at confirming that without a tear-down.
This is one complete rotor face after 1 gallon of water (top-down in each column, then move to the top of the next column)
If the water can indeed remove carbon from right against the seal itself, then it is reaching all of the critical points. Carbon will form where the combustion gases can get to, and steam from water cleaning will get everywhere combustion gases can. Equal points of reach, and we can see that the steam will indeed remove carbon. Extrapolate from there.
Would someone take it as far as needed to completely clean all carbon from both rotors? Probably not. Almost certainly not.
But is it devoid of benefit? Certainly not. Even surface carbon removal from the housing WILL slow down compression less due to seal wear.
Last edited by RIWWP; 01-12-2013 at 08:54 PM.
01-12-2013, 08:59 PM
#12
Registered
Thread Starter
iTrader: (2)
Join Date: Oct 2007
Location: Pacific Northwest
Posts: 16,684
Likes: 0
Received 239 Likes
on
109 Posts
Additional, note this thread: Steam Cleaning Engine via UIM - RX7Club.com
Specifically post #4
To insist that this does nothing beneficial for sealing is to say that the Renesis is so completely different from the 13b-REW that either carbon buildup no longer matters, carbon removal no longer matters, or our engines seal completely differently.
None of which are true.
Specifically post #4
To insist that this does nothing beneficial for sealing is to say that the Renesis is so completely different from the 13b-REW that either carbon buildup no longer matters, carbon removal no longer matters, or our engines seal completely differently.
None of which are true.
Last edited by RIWWP; 01-12-2013 at 09:12 PM.
01-12-2013, 09:36 PM
#14
Registered
Thread Starter
iTrader: (2)
Join Date: Oct 2007
Location: Pacific Northwest
Posts: 16,684
Likes: 0
Received 239 Likes
on
109 Posts
"can't" is a pretty strong word...
Is there is a point in digging up my exact compression scores as recorded by the dealer ~3 years ago, where I scored in the high 4s, low 5s, they did a decarb and handed the car back to me, 3 days later I repeated and scored in the low 7s...?
I suppose you will say I fabricated those too...
NYCGPS,
Still got your compression tester? Doing anything this weekend?

 01-12-2013, 10:00 PM
#16
Registered
Thread Starter
iTrader: (2)
Join Date: Oct 2007
Location: Pacific Northwest
Posts: 16,684
Likes: 0
Received 239 Likes
on
109 Posts
Here we go... So I was remembering the numbers slightly off...
April 6th 2010 @ 56,439 miles
Compression scores were
5.1, 5.2, 5.2 (250rpm normalized to: 6.0, 6.1, 6.1)
5.3, 5.1, 5.2 (250rpm normalized to: 6.2, 6.0, 6.1)
@196rpm
Decarb performed, compression scores tested immediately again:
5.0, 5.0, 4.9 (250rpm normalized to: 5.8, 5.8, 5.7)
4.8, 5.0, 5.1 (250rpm normalized to: 5.6, 5.8, 5.9)
@ 198rpm
Likely a slight drop due to heat saturation
April 8th 2010 @ 56,577 miles (2 days and 138 miles later)
6.2, 6.4, 6.6 @ 221rpm (250rpm normalized to: 6.8, 7.0, 7.2)
6.6, 6.7, 6.8 @ 225rpm (250rpm normalized to: 7.2, 7.3, 7.4)
June 19th 2010 @ 61,649 (72 days and 5,072 miles later)
8.3, 8.3, 8.4
7.9, 8.0, 8.0
No RPM noted, presumed in the 270rpm range as I had just replaced the starter with a new one. With that assumption, they normalize to:
250rpm normalized to: 8.1, 8.1, 8.2
250rpm normalized to: 7.7, 7.8, 7.8
Scanned dealer sheets attached. Normalization done with the factory compression calculator, here: http://foxed.ca/index.php?page=rotarycalc
Last edited by RIWWP; 01-13-2013 at 09:59 AM.


 Well done sir!
01-13-2013, 10:21 AM
Well done sir!
01-13-2013, 10:21 AM
#21

RIWWP, not sure if ASH is the best person to ask about this, but since it is along the same topic...
I assume that you ingested water using the vac nipples on the LIM. On the S2, those ports are now used by lines -> T fitting -> oil filler neck (as opposed to the S1 where the oil filler neck plumbed to the intake. I assume if I wanted to recreate your test on an S2, i would need to disconnect one of those lines to the LIM, cap it to prevent a vac leak, and then proceed?
I assume that you ingested water using the vac nipples on the LIM. On the S2, those ports are now used by lines -> T fitting -> oil filler neck (as opposed to the S1 where the oil filler neck plumbed to the intake. I assume if I wanted to recreate your test on an S2, i would need to disconnect one of those lines to the LIM, cap it to prevent a vac leak, and then proceed?
01-13-2013, 10:24 AM
#22
Registered
Thread Starter
iTrader: (2)
Join Date: Oct 2007
Location: Pacific Northwest
Posts: 16,684
Likes: 0
Received 239 Likes
on
109 Posts
I would imagine that unplugging those is certainly the right way to go, however I wouldn't think you need to worry about capping the lines since you have a pretty significant vacuum leak already just from the tube for the ingestion. You can clearly hear it hissing away before you start ingesting fluid. The other side is the upstream side, and it's normally there to suck crankcase fumes through, now you just have it open to atmosphere for the duration of the test. If the crankcase pressurizes I imagine you could get some oil coming out of those, so maybe wrap them in a rag to prevent it from making a mess? I doubt there is much to worry about there.

 01-13-2013, 10:33 AM
#25
Registered
Thread Starter
iTrader: (2)
Join Date: Oct 2007
Location: Pacific Northwest
Posts: 16,684
Likes: 0
Received 239 Likes
on
109 Posts
This was with 15,000 miles on my reman, premixed most of that time and upped oil injection from the AP tune. I imagine those are factors in the carbon buildup rate, though plus or minus would be debatable.
I'm probably going to buy a water/meth injection kit for my MSM in the very near future, and I'd like to find someone relatively local with >10,000 miles since the last decarb to repeat this test on, only using my injection kit and water injection as the cleaning method. My 8 gets ~100 miles a month, if that, right now.
I'm probably going to buy a water/meth injection kit for my MSM in the very near future, and I'd like to find someone relatively local with >10,000 miles since the last decarb to repeat this test on, only using my injection kit and water injection as the cleaning method. My 8 gets ~100 miles a month, if that, right now.