When you click on links to various merchants on this site and make a purchase, this can result in this site earning a commission. Affiliate programs and affiliations include, but are not limited to, the eBay Partner Network.
I'm slowly but surely getting the bits and Missing pieces put on my car. I got her jacked up and resting on some jackstands and I'm rolling around underneith looking at the stupidity of the previous owner taking off the rock guards (And not telling me) *Yeah I should have caught that but who does stuff like this. Anyhow I've got some oil dripping out after running it for a while and got up close and see that one of the hoses on the left oil cooler is cracked and leaking when the car warms up. I think there is oil seeping out from around the oil pan as well. I can't tell for sure but it looks like they used fish tank glue to attach it. Anyway - back to the oil hose / connector. I tried to find replacements and OH MY **** $318?! You have got to be kidding me... For $318 I would expect to be able to buy the supplies to make a box of these things. Is there something ANYTHING special about these hoses that makes them that expensive? Does anyone know of someplace that would have this part for a more reasonable price? *Maybe I'm just looking at the rip off joints. Or (Don't laugh - I know I don't know what I'm talking about) Can I just cut the line and get some kind of splice adaptor type thing? Paying this kind of dough for a hose just seems insane. I'm also looking for someplace that has the oilpan rock guard. I've gone back and forth a few times on the parts manual but I'm missing it. Anyhow I don't knew what previous owner had against all this stuff or the guy that did the engine swap but... Its just depressing. Sorry for my continued lame *** questions. I did a half days of Googling but you know how sometimes you just don't hit on the right thing.
$318 sounds like a deal to me! Had the $432 4-line Mishimoto set installed a few weeks ago because that was the best priced set I could find and I don't have the tech capability to build my own. Paid local Mazda dealer 4 hours of labor to do it. Have taken it back twice for minor leaking (which persists), but might just live with it versus having the fragile little oil seals get anymore damaged.
The $318 was for used parts. I'm frugal and I don't want to pay a lot to put junk in my car. Cat Dude why do you spend time posting stuff like "you need another car?" Bored? I mean its no big deal to me. I don't care what you do with your time. Mishimoto eh? Thanks I checked that out. That looks pretty nice. Anyone have experience with Racing Beat? I'm looking at something that looks like a better then stock replacement and its ONLY $475 to replace all the oil lines. Oil Line Set for 04-08 RX-8 Manual Trans - Racing Beat
I decided to go with the racing beat oil lines replacement package. It looks great and simplifies things. I don't understand why Mazda did this with 9 connectors *Not counting the connections to the engine and the oil coolers. Probably to make it easier to mass produce on the assembly line. A buddy redid everything under the hood with this type of hose and the anodized connectors. It was like a work of art. Then he sells it for next to nothing?! Some kind of reverse midlife crisis I think. My swapping out all the bolts I remove with stainless is (I think) a good idea. Wow... Some of the bolts are nothing but wishful thinking. I saw an interesting way to get rusty bolts loose. Heat the bottom and on the opposite end push in a candle (Like you would do if the candle was solder) It sucks up into the threads and with a little bit of jiggling you get the bolt out rather then twisting the head off!
*Note the candle trick didn't do squat. The Chris Fix (Youtube guy) who mixed up some combo of chemicals did work. I really like that kid he is nearly as obsessive as I am.
I decided to go with the racing beat oil lines replacement package. It looks great and simplifies things. I don't understand why Mazda did this with 9 connectors *Not counting the connections to the engine and the oil coolers. Probably to make it easier to mass produce on the assembly line. A buddy redid everything under the hood with this type of hose and the anodized connectors. It was like a work of art. Then he sells it for next to nothing?! Some kind of reverse midlife crisis I think. My swapping out all the bolts I remove with stainless is (I think) a good idea. Wow... Some of the bolts are nothing but wishful thinking. I saw an interesting way to get rusty bolts loose. Heat the bottom and on the opposite end push in a candle (Like you would do if the candle was solder) It sucks up into the threads and with a little bit of jiggling you get the bolt out rather then twisting the head off!
E-bay has good prices. Also, there's an Rx-8 classified group on Facebook. Good stuff gets sold fairly cheap on there many times.
The oil cooler lines are prone to rusting and if one buys stock replacement lines, they will need the fittings as well as the retaining clips. I've installed a new o.e. set for a customer that had rotten lines on his 07. Th replacement parts were on the high side I'll agree but Mazda has been consistent with their higher pricing on oil cooling parts since the 80's. As a long time rotary owner, I expect to get bent over on things like this. What got me was the price for a passenger side airbag cover at over $400 for a piece of plastic, lol. Oh well.
Glad you got your car back together. Feel free to post some pics if you took any during the install!
Just an update. I had some difficulty getting the new fittings on the engine for oil in/out. Saw a great yourtube video made by some Russian guys that solved my problem. I just needed a socket extention that was crazy long. Sadly I neglected to put the copper washers on (SIGH) so today that all comes out and I will be trying this again.
I probably need therapy but I'm bit by bit piece by piece taking out everything rusted and using a wire wheel to grind it down to bare metal, using a rust converter and painting everything with 3 or 4 coats of primer.
The Coil plate. A disgusting looking piece of rust.
My OCD solution on a couple of the parts so that looking under the hood doesn't make me vomit.
Here is what it looks like on my work bench with the new plug wires from Racingbeats. Stainless steel nuts. I filled the indented text with some white paint using a Krylon Paint Pen from an Art supply store. Maybe its overkill but I think its cool.
I'm looking for some words of wisdom on this. I don't know how well this shows but the L(eading) plug in this pix seems to be screwed into some kind of sleeve that extends the plug out. If you look at the trailing plug this is the norm for both plugs on the second rotor. Can anyone tell me if this is normal? And if not what in the hell am I seeing? I don't think its a stripped threads kit because the part that extends is smooth (No threads) I would seriously love some feedback.
Its kind of hard to tell what the sleeve is. Do you have any pics of it with the plug removed? Also, what is that writing on the rear iron? Have you had a reman engine installed in your 8 at some point or possibly a boneyard engine?
FWIW, I like the idea of labeling the coil bracket. Makes for easy identification at a quick glance.
Thanks Man. I was kinda worried posting my "artistic" thing would bring the men in the white coats to haul me away. I bought my RX-8 from a younger gent who had been spending a bunch of money on the engine. I'm afraid the details (Which I should have gotten) got lost with the phone number of the man who did the engine work. Its a high millage car and the work was expensive. So it might have been a rebuild but looking at it leads me to think this is just a boneyard engine (Which might explain the blinking cel) In any event I will try to reset the NVRAM when I get everything down.
I appreciate your help on figuring out this spark plug mistery. I'll remove the plug and see if I can get a picture of it to figure out just what the heck is going on. It bothers me not knowing whats going on with that.
A super dumbass question but since I've got you online the copper washers are supposed to have silicone put on them. *Or so the racing beats instruction says. I didn't detect any sign of *what to call it??? Head gasket Goop when I took them out. Are they talking about something more liquid like do you think? If it wasn't Sunday I would just call beats but today is spectacularly warm (for Minnesota) so I would like to try and get that done and maybe get to the point of cranking the engine. Oh! I understand that since all the oil has been drained that its important to crank the engine without fuel. I see some people pull the fuse to the fuel pump. Others are doing something else which I don't follow. Or actually don't understand.
FWIW, I install copper crush washers dry. No need for silicone. Their job is to seal the area between the banjo bolt and the cooler or against the iron itself. You can use some Indian Head if that makes you feel better but its not really needed. I installed mine dry on my 8 when I put the engine in and torqued them to spec and they do not leak one drop.
I do however use a product called "Sil Glyde" when installing o-rings. Something like that is needed to help them seal.
If you're concerned about starting the engine after draining it, you can pull the 20A fuel pump fuse and crank the engine until the oil pressure light goes out or stop after about 10 seconds. It can't hurt to be honest. Did you drain the oil coolers as well? A standard oil change is 3.7 quarts. You may want to recheck the oil level once you let i run for a bit if the coolers were completely drained just to be sure that the level is full.
I had to do a load of other non Car related stuff so I haven't done any updates. I spoke to a friend in NJ who is a absolute genius at writing low level software is also (To my surprise) a complete and total motor head. He looked at my Spark Plug pix and told me that this is a commonly done thing that helps a plug fire. Wish I could remember what its called but he told me to "chill the **** out - this is ok" *I did mention he is from Jersey right? Anyhow that got me motivated to take out the oil lines and put the washers in with some blue goo silicone. I started putting the oil coolers back on and found this white crust that made putting in the new stainless steel bolts in difficult so I OCDed that mess up by cleaned the corroded parts on the wheel and painting everything. I put in the coil rack (Looks Good!) I wired the plugs and it really is nice to see the silly white lettering I did so I don't hook things up wrong and blow up the new(er) engine. I've been saving all the nuts and bolts that I've swapped with stainless steel parts. I threw in a couple heads that I snapped off.
Some of the rusty #8 nuts and bolts I've replaced with stainless steel. Included are a couple of the snapped off heads. The others I threw as far as I could over the neighbor's roof. I know stainless costs more but why don't car makers try to do something to avoid this? Paint?, Grease?, zinc chromate? Anything!
Here is one part of the project that really had me freaking out. The bar had surface rust all along its length and looking into the engine compartment made me feel sick. Its not perfect but here is a before photo
Nothing rusted through (Yet) it just looks like crap.
I decided on a design modification. The 4th bolt that holds the AC compressor that has zero space to get a wrench into (or turn) has been left out. I don't expect to have to take the compressor out again but the gigantic pain in the *** this bolt was to get out won't ever need to be repeated and for that I'll sleep better. I "think" I see this missing on the "Russian Duded working on RX-8 clips on Youtube but I think they were wrenching on right hand drive versions.
So I found (and lost a tube of the gasket in a tube that I found in my old old drawer of car stuff so I'm going to just get a new one and slap the "restored" oil pan back on. Here is the GOD awful before pix. No splash guard = this mess. Whoever last put this on had some of the bolts finger tight and others wrenched down to near breaking level. It leaked (to say the least) a lot.
Maybe a better before view.
I wasn't sure this would be fixable but I'm frugal and I gave it a shot.
This is it after wire brushing the largest chunks off. I used a chemical treatment that converts rust after more of this to be a little more sure there wasn't already a hole in the pan. I was half inclined to just get a new and possibly improved oil pan but here the next Pix is how it looked after a lot more work.
Looking a bit nicer. I ran out of stainless steel bolts and was a little worried about the sizes of the originals being a bit smaller so I cleaned them up and painted them so I'll remember which ones are original #8s *Plus I thought it looked kind of cool to people I might be driving over the car with. JUST KIDDING!
Just an update. I had some difficulty getting the new fittings on the engine for oil in/out. Saw a great yourtube video made by some Russian guys that solved my problem. I just needed a socket extention that was crazy long. Sadly I neglected to put the copper washers on (SIGH) so today that all comes out and I will be trying this again.
I probably need therapy but I'm bit by bit piece by piece taking out everything rusted and using a wire wheel to grind it down to bare metal, using a rust converter and painting everything with 3 or 4 coats of primer.
The Coil plate. A disgusting looking piece of rust.
My OCD solution on a couple of the parts so that looking under the hood doesn't make me vomit.
Here is what it looks like on my work bench with the new plug wires from Racingbeats. Stainless steel nuts. I filled the indented text with some white paint using a Krylon Paint Pen from an Art supply store. Maybe its overkill but I think its cool.
I'm looking for some words of wisdom on this. I don't know how well this shows but the L(eading) plug in this pix seems to be screwed into some kind of sleeve that extends the plug out. If you look at the trailing plug this is the norm for both plugs on the second rotor. Can anyone tell me if this is normal? And if not what in the hell am I seeing? I don't think its a stripped threads kit because the part that extends is smooth (No threads) I would seriously love some feedback.
I think what I'm seeing the leading plug #1 screwed into is called a Non-Fouler. I'm not finding a lot of info on it so next time I see the parts place guy thats been kind enough to help me I'll see what he thinks. If anyone can comment on this it would be appreciated. Anyway I'm told its some trick to keep the plugs from fouling. I am thinking the car will need an NVRAM clearing so the ECU will map the new engine. Which "Might" be the cause of the CEL misfires. I tried to find the plugs I pulled out but no luck. Tomorrow assuming I don't freeze solid to the garage floor the oil pan goes back in. I've got a tube of the stuff my Motor head friend says is the best product for the job. Getting closer to refilling the fluids and starting it.
Its been suggested I pull the crank sensor and turn it over to get the oil spread to all the components (And this will help me fit it to the proper amount of oil) Am wondering if that stops the fuel pump and plugs from firing? I don't want to flood it.
Nice job on the oil pan. The Mazda brand grey RTV works amazing for sealing oil pans. I work for Toyota, so on the last engine I installed in my 8, I used Toyota's FIPG or form in place gasket sealer. Stuff has yet to spring so much as seepage.
Thanks man... I appreciate the kind words on the oil pan project. A new one wouldn't break the bank but I didn't want to toss it unless it really was "broken" and for me right now my time is less valuable then cash on hand. *And I need to recharge my skills. I really haven't done much work under a car in??? many years...
Well I got into a big hassle with the Mrs. She said I was spending too much time with my midlife crisismobile so I put aside things for a while. She lost her mind when she saw how much effort I was putting into thinks like sanding down the coil bracket and painting the indented text. Like I'm not obsessive???
So - I got the oil pan back in and ended up tossing some of the bolts I cleaned up. I forget what they call the type of bolt they use for mass production where the end part of the bolt they insert is not threaded so that automation can drop it in and auto wrench it in but the bone head that put the pan in munged some of the threads so I used some of the standard bolts that have threads going full length to get it all together right. I was really bumming out thinking I would need to retap for a larger size or something but that doesn't appear to be needed. My torque wrench is gummed up (SIGH) so I did everything by best guess after hand tightening things in a star pattern (Like when you do a tire back and forth) At least the black silicone I was sold seems to be coming out evenly. *Its GOT to be better then what it was. What a mess.
BTW did you guys know that cat litter cleans up oil stains from the garage floor pretty well? Someone told me this and I honestly didn't believe them buts its true!
I had to pull the radiatior to get the fan assembly off. One of the fans was "wired" by having some loose clips from the broken connector shoved loosely on the pins. Some of the work done on my car is really pissing me off and its not just because I'm a perfectionist or OCD whatever... After a lot of cursing and one broken bolt that is going to have to be a project for springtime I got the radiator / fan assembly out. Cleaned everything up and replaced the connector with one of the GM water proof ones I have a box of. I know its not "stock" but in this case I don't want to replace a fan because of a roached connector thats not really that great to start with. *Speaking of which this radiator overflow tube that empties on the connectors for the powering steering is not the greatest design (In my opinion) I'm going to get a longer overflow hose and extend it down so if it does need to dump coolant it won't knock out my power steering (Again) That was fricking intense. I'm old enough to have driven cars that didn't have power steering but its a shock when your car just suddenly doesn't have it when your trying to park someplace.
All the connectors really ought to be water tight as well but I think thats "maybe" an upgrade for Spring time as well. Amazingly the wires to the roached connector were not corroded very far in so I was able to splice in my new stuff and heat shrink it. The black tape that holds the harness together has for the most part dried up or fused into a solid mass so its either concrete or just wishfull thinking holding it all together. I think I'm going to use that cable dressing stuff instead of more black electrician tape. I've got some thats red which makes it stand out nicely. This probably sounds better then it is but at least its better then it was. Which would be hard to NOT be better but... Oh well. I am having a lot of fun getting under the hood and making this car make sense to me.
Oh and for the guy who PMed me I did decide to use only three bolts to hold the AC compressor back on. That fourth one is just about nearly impossible to get at and takes so much "F"ing with to get it out (With the steering wheel linkage pressing up against it) that I made up my mind its just going to be a three bolter. If nothing else the veins on my head won't explode if I determine I need to take it off for the 4th? or 5th? Lost track time...
I'm a little confused on how to nail down the loose oil collant hoses. Racing beats has pretty good doc but I'm too dense to get this as fast as I should. Temps today are COLD... I picked up a propane garage heater. Its like a bon fire in a can. Pretty nice and way better then I had even hoped. Anyway - The next post I hope to have the crank sensor off and on and have all the fluids topped off and will see how it sounds when I lite this candle off again for the first time in a months!
Here's hoping that the cranks sensor isn't frozen in place. If so you'll want to start soaking it in some penetrating oil now. The last one I had was frozen and I destroyed it getting it out. Luckily I had a spare.
Here's hoping that the cranks sensor isn't frozen in place. If so you'll want to start soaking it in some penetrating oil now. The last one I had was frozen and I destroyed it getting it out. Luckily I had a spare.
Glad you told me that. I was going to try to get her started today but had to finish some ebay stuff (My current day job) I'll for sure do that! BTW I learned of a interesting replacement for stock penetrating oil. Half Transmission fluid and have aceatone. I tried it when I was getting bolt happy and it seems to work better then the stuff I bought at the local parts store.
Now.... If I can just FIND the crank sensor! btw would pulling the fuse to the fuel pump be possible solution to this? And sorry if this is a dumb question.
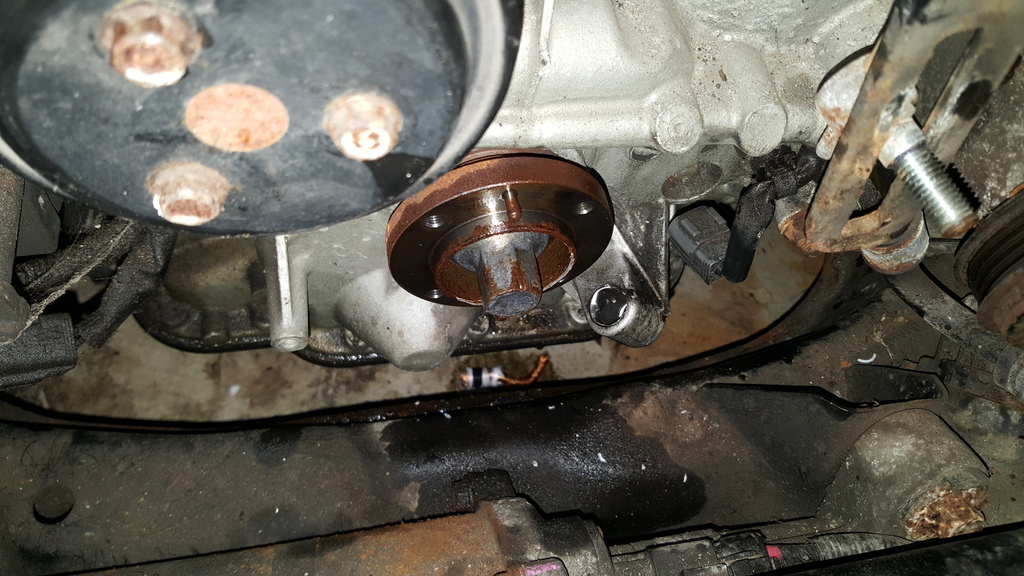
The eccentric shaft position sensor is located on the front cover to the left of the eccentric shaft's main pulley. The pushes into its slot from the bottom and must be removed from the bottom. Here's a pic of the last on that I fought with to replace. I removed the main pulley and you can see the sensor caved in a little in the pic:
Well its stopped raining everyday and its above 60 degrees so I went out to look at my project. It was minus something and I had just finished putting in the oil lines and.... found two washers that were supposed to be on the Engine. My Significant other was ready to have me put into the mental ward for working outside in that weather anyway. So today I went on the great search for missing washers and of course they were right in the middle of the work bench. I know I'm dumb but sometimes I'm really dumb. So I had a talk with my nieces boy friend who is supposed to be a full time auto mechanic and mentioned the goo I used on the washers. He informed me that this was an awful idea and that the new lines would certainly leak. SIGH. If true (I don't know if he has any experience or its just opinion) I need to undo everything which will be that loud cursing sound you will hear echoing from Minnesota. I'm tempted to put the engine side washers "dry" as he insists and leave the other ones with the goo to see if it makes any difference at all. I expect nothing to happen.
I kind of forgot what all I was supposed to do to first start the engine. I looked up a pretty detailed list of things to do when putting in the battery back in (Pumping the brake 20 times) turning the steering wheel all the way left then right. Idle time etc.
I "think" I'm just going to pull the fuse to the fuel pump and turn the key for a while (Any ideas on how long or how many times to crank it?) so as to get the fluids into all the empty spaces and then top off everything.
Oh! I ended up taking out the radiators and the large one is giving me fits putting it back exactly right. I wrenched on the bolts on top that look like they ought to be something to release the radiator but that was wrong.
Anyway I got a lot of help here and I want to thank you all for hanging in there with me as I muddle through the worlds longest repair job.
C r a p
I undid the compressor (For the 5th??) time and got at the new oil line connector and undid it and.... Its not the line with the missing washers. So I'm loosing my mind wondering if I want to try to get into the tiny space where the other connection to the engine or just put the compressor back on and put the car together and just start it. The washers on the engine connection are copper looking and the "extra" parts are more silver looking which leads me to think these were for on of the oil radiators. Oh... I learned yet another thing the previous owner neglected to do. No rock guards for the oil coolers. SIGH... I sure wish I could figure out how to find the schmo who replaced the engine so I could ask for all the "rest" of the car but...
So anyhow. I'll try to take some pix of reassembly of quite possibly the slowest ever RX8 project. At least I'm learning how to get at things without too much head scratching although I'm sure my technique is probably not the SOP.
Unscrew A to be able to reach down and unscrew B which gives you access to C. Or something along those lines.
I need to replace a leaky cooler line. Do you remember the size of the banjo bolt? 22mm is too small and 24mm is too big so I'm buying a 23 mm (genius, huh?). Seriously, is it a metric bolt or imperial?
 10-03-2016, 08:59 PM


 Some of the work done on my car is really pissing me off and its not just because I'm a perfectionist or OCD whatever... After a lot of cursing and one broken bolt that is going to have to be a project for springtime I got the radiator / fan assembly out. Cleaned everything up and replaced the connector with one of the GM water proof ones I have a box of. I know its not "stock" but in this case I don't want to replace a fan because of a roached connector thats not really that great to start with. *Speaking of which this radiator overflow tube that empties on the connectors for the powering steering is not the greatest design (In my opinion) I'm going to get a longer overflow hose and extend it down so if it does need to dump coolant it won't knock out my power steering (Again) That was fricking intense. I'm old enough to have driven cars that didn't have power steering but its a shock when your car just suddenly doesn't have it when your trying to park someplace.
 btw would pulling the fuse to the fuel pump be possible solution to this? And sorry if this is a dumb question.


 sound you will hear echoing from Minnesota. I'm tempted to put the engine side washers "dry" as he insists and leave the other ones with the goo to see if it makes any difference at all. I expect nothing to happen.
 No rock guards for the oil coolers. SIGH... I sure wish I could figure out how to find the schmo who replaced the engine so I could ask for all the "rest" of the car but...
