Jesse A's GReddy Turbo Build
 09-17-2010, 09:30 PM
#51
Rx-8 the protege
iTrader: (1)

Join Date: May 2009
Location: Bronx ''NY"
Posts: 460
Likes: 0
Received 0 Likes
on
0 Posts
Hay rotory maniac rx, great build so far! It will be very helpful this winter! Quick question did the heatshield come with the kit or did u buy seperate if so where!
 09-17-2010, 10:06 PM
#52
^ So your saying the hose provided with the GReddy kit for the Wastegate actuator is good enough for the turbo oulet heat? Yeah I tapped an 1/8" barbed fitting into my turbo oulet for Fix #2. I eventually would like to run an EBC but am not going to off the bat.
For the life of me I cannot get on that top right nut on the DP, I think my sockets are too thick of walls to get on the nut or something because I can get damn close but not right onto it (had ratchet, extension, swivel, extension, swivel, socket combination). Here are some more pics... I'll take a picture of the wastgate actuator hose I got later as well.
For the life of me I cannot get on that top right nut on the DP, I think my sockets are too thick of walls to get on the nut or something because I can get damn close but not right onto it (had ratchet, extension, swivel, extension, swivel, socket combination). Here are some more pics... I'll take a picture of the wastgate actuator hose I got later as well.
Use 1/4 drive/extensions/swivel/socket. 3/8 is to big for that location.
Last edited by SC-ed; 09-17-2010 at 10:15 PM.
09-18-2010, 02:34 PM
#53
SPOOLN8
Thread Starter
iTrader: (1)

Join Date: Nov 2008
Location: Edmonton, Alberta, Canada
Posts: 2,225
Received 208 Likes
on
156 Posts
Okay thanks SC I'll have to go buy a 1/4" swivel to reach that b!tch.... I don't think the GReddy provided line is silicon is it? As soon as I get this top DP bolt I think it should be smooth sailing for the rest.
Also I sheared the head off of the 10mm bolt connecting the air pump hose to the DP (the top one)... I could probably work the rest of the bolt out of the threads but I'm going to see if I can get away without the top bolt; I think it should be good to go though as the bottom bolt is holding the line pretty solid. If I get a cel I'll know what it is anyway.
@Mr. West; the heat sheilding comes with the kit... but it wouldnt hurt to buy some more to have for extra sheilding.
Last edited by RotaryMachineRx; 09-18-2010 at 10:44 PM.
09-18-2010, 09:36 PM
#54
SPOOLN8
Thread Starter
iTrader: (1)
Join Date: Nov 2008
Location: Edmonton, Alberta, Canada
Posts: 2,225
Received 208 Likes
on
156 Posts
So I got to the DP with a 1/4 swivel/extention combo and got the DP on. Got the motor mount back in and the compressor inlet and outlet pipes bolted on. Moving on to the intercooler...
Also attached is a pic of where I sheared my air hose to the DP bolt off; lemme know if you guys think that that will be fine if I leave it like this for now (half of the bolt is still in the DP threads); Thanks!
Also attached is a pic of where I sheared my air hose to the DP bolt off; lemme know if you guys think that that will be fine if I leave it like this for now (half of the bolt is still in the DP threads); Thanks!
Last edited by RotaryMachineRx; 09-18-2010 at 10:43 PM.
09-19-2010, 05:16 AM
#55
SPOOLN8
Thread Starter
iTrader: (1)
Join Date: Nov 2008
Location: Edmonton, Alberta, Canada
Posts: 2,225
Received 208 Likes
on
156 Posts
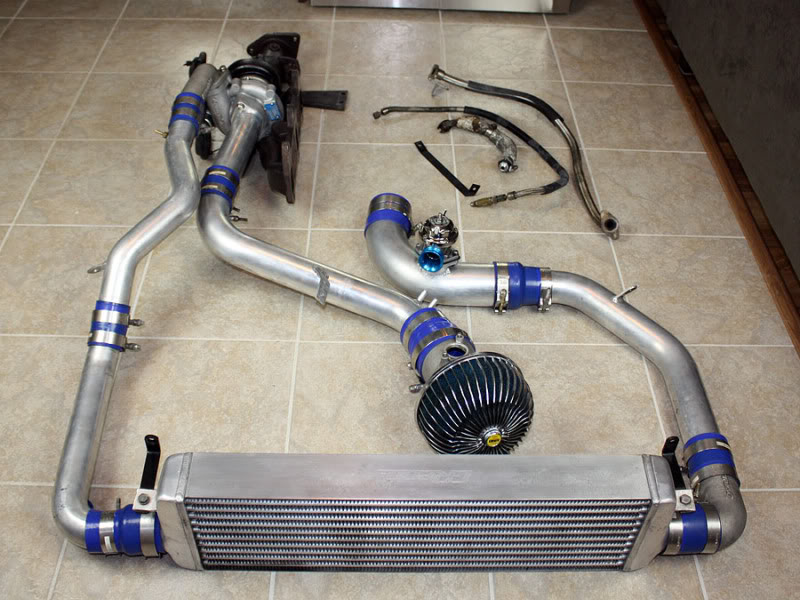
4am update..... Finished everything I could; seems to me like this IC outlet pipe may be the wrong one?? I'll have to talk to Charles about it but it says in the instructions that it should be 60mm diameter when this one measures 50mm diameter.
All that is left is waiting for my greddy oil filter adapter to feed the turbo with oil, my BHR midpipe and gauge install (getting a friend to do the gauges).
The last few pic is just an engine bay pic cuz it looks oooh so sexy now! I'm super proud of how this has come along as I have never done any work to this extent on an engine and I managed to do it all on my back and alone! (with great help from all you other Rx8 Clubbers )
)
All that is left is waiting for my greddy oil filter adapter to feed the turbo with oil, my BHR midpipe and gauge install (getting a friend to do the gauges).
The last few pic is just an engine bay pic cuz it looks oooh so sexy now! I'm super proud of how this has come along as I have never done any work to this extent on an engine and I managed to do it all on my back and alone! (with great help from all you other Rx8 Clubbers
)
09-19-2010, 07:25 AM
#56
That pipe (pic 1,2) is definitely wrong. It should be 60mm and 90 degree.
Oil restrictor on the turbo oil inlet?
Consider new intake and BOV recirculated or you will have trouble tuning the car. Catch can is also very good thing. You can't imagine what the pipes looked inside when I got my used greddy kit. Mud, oil ... Ugly...
Oil restrictor on the turbo oil inlet?
Consider new intake and BOV recirculated or you will have trouble tuning the car. Catch can is also very good thing. You can't imagine what the pipes looked inside when I got my used greddy kit. Mud, oil ... Ugly...
Last edited by SC-ed; 09-19-2010 at 07:36 AM.

 09-19-2010, 01:05 PM
#58
SPOOLN8
Thread Starter
iTrader: (1)
Join Date: Nov 2008
Location: Edmonton, Alberta, Canada
Posts: 2,225
Received 208 Likes
on
156 Posts
^ I would except I bought this kit brand new from BHR so I'm sure Charles will send me the proper peice free of charge, thanks though.
For the oil restrictor question; I was reading old build threads and people were saying that they had to add an oil restrictor to the feed line as it was supplying too much oil to the turbo.... but I believe the new GReddy kits have this issue fixed with a built in restrictor on the new feed lines.
As for Recirc I am going to try and run withough it for now as I have heard from numerous people that with the SSQV it is a non-issue.
The catch can may be a good Idea I haven't really looked into one yet though and my car will only be driving for another month and a half before it is parked for the winter; so might save it till next spring to buy.
Last edited by RotaryMachineRx; 09-19-2010 at 02:40 PM.
 09-20-2010, 12:34 PM
#61
SPOOLN8
Thread Starter
iTrader: (1)
Join Date: Nov 2008
Location: Edmonton, Alberta, Canada
Posts: 2,225
Received 208 Likes
on
156 Posts
^ yeah I havent heard back from Charles yet but I'm sure he'll get it corrected, hopefully can send me the piece with my midpipe.
If for some reason he can't well I'll just have to buy the one from nuke as I'd rather have the correct pieces for the kit rather than the piece I have; plus the elbow I have is like a 120deg elbow and doesn't properly fit between the intercool and the pipe going to the intake pipe.
If for some reason he can't well I'll just have to buy the one from nuke as I'd rather have the correct pieces for the kit rather than the piece I have; plus the elbow I have is like a 120deg elbow and doesn't properly fit between the intercool and the pipe going to the intake pipe.
09-20-2010, 12:59 PM
#62
^ yeah I havent heard back from Charles yet but I'm sure he'll get it corrected, hopefully can send me the piece with my midpipe.
If for some reason he can't well I'll just have to buy the one from nuke as I'd rather have the correct pieces for the kit rather than the piece I have; plus the elbow I have is like a 120deg elbow and doesn't properly fit between the intercool and the pipe going to the intake pipe.
If for some reason he can't well I'll just have to buy the one from nuke as I'd rather have the correct pieces for the kit rather than the piece I have; plus the elbow I have is like a 120deg elbow and doesn't properly fit between the intercool and the pipe going to the intake pipe.

 09-20-2010, 04:11 PM
#65
SPOOLN8
Thread Starter
iTrader: (1)
Join Date: Nov 2008
Location: Edmonton, Alberta, Canada
Posts: 2,225
Received 208 Likes
on
156 Posts
^ You mean if I would have ran a line from the wastegate actuator to the chargepipe my BOV is mounted to? haha a little late for that now but I'm sure this will work fine.
09-20-2010, 04:25 PM
#67
SPOOLN8
Thread Starter
iTrader: (1)
Join Date: Nov 2008
Location: Edmonton, Alberta, Canada
Posts: 2,225
Received 208 Likes
on
156 Posts
Really?!? I didn't know there was that much of a pressure drop in the system. Well in that case it may be worth my effort to put a vacuum cap on that nipple and tap a brass barb into the charge pipe then. A question about this then, will I only need to drill a hole into the charge pipe and the brass fitting will thread right in or would I need to tap it as well? It's pretty thin so thought I would ask. Thanks for the advice!
Last edited by RotaryMachineRx; 09-20-2010 at 04:52 PM.
 09-20-2010, 05:58 PM
#69
Really?!? I didn't know there was that much of a pressure drop in the system. Well in that case it may be worth my effort to put a vacuum cap on that nipple and tap a brass barb into the charge pipe then. A question about this then, will I only need to drill a hole into the charge pipe and the brass fitting will thread right in or would I need to tap it as well? It's pretty thin so thought I would ask. Thanks for the advice!
Later Greddy charge pipes actually have connection welded into that tube for the jet air and you can tee off that .
If you dont have that you could stick with how you have done it and tweek the actuator rod instead as explained here ....https://www.rx8club.com/series-i-major-horsepower-upgrades-93/getting-most-out-your-greddy-turbo-without-breaking-bank-172542/ Do it that way and you can save yourself the expense (and risk) of a boost controller as well
there is more than one way to achieve a decent result .....
Last edited by Brettus; 09-20-2010 at 06:00 PM.
09-20-2010, 08:39 PM
#70
SPOOLN8
Thread Starter
iTrader: (1)
Join Date: Nov 2008
Location: Edmonton, Alberta, Canada
Posts: 2,225
Received 208 Likes
on
156 Posts
^ Yeah I read your tweek the actuator arm posts before, just shorten it I believe is the trick... Teeing into the Jet air could be a simple option (Just to clarify; and I'm sure I have this right but Jet air was the hose that was mounted the highest on the stock intake, the hose has a white marking on it I believe); just need to buy a reducing tee and some more hose now....
I want to eventually buy a BC but I'm back in school now and I have spent all the money I can afford to on my car until I work next summer again.
I want to eventually buy a BC but I'm back in school now and I have spent all the money I can afford to on my car until I work next summer again.
09-20-2010, 10:23 PM
#71
^ Yeah I read your tweek the actuator arm posts before, just shorten it I believe is the trick... Teeing into the Jet air could be a simple option (Just to clarify; and I'm sure I have this right but Jet air was the hose that was mounted the highest on the stock intake, the hose has a white marking on it I believe); just need to buy a reducing tee and some more hose now....
I want to eventually buy a BC but I'm back in school now and I have spent all the money I can afford to on my car until I work next summer again.
I want to eventually buy a BC but I'm back in school now and I have spent all the money I can afford to on my car until I work next summer again.
09-21-2010, 12:08 AM
#72
SPOOLN8
Thread Starter
iTrader: (1)
Join Date: Nov 2008
Location: Edmonton, Alberta, Canada
Posts: 2,225
Received 208 Likes
on
156 Posts
Yeah that's the plan.. except I'm still gonna buy a Tee and plumb my wastegate signal into the jet air hose.... So I did have it right? top hose from the stock intake with the white mark on it is the Jet air hose? I am like 99.9% sure but at the same time I want to be 100% sure things didnt get moved around when I had the car apart.
Edit: Haha Brettus; on a side not I was reading your "Where did you plumb your boost controller into ? UIM is no good !" thread and got some good laugh because you and MM never seem to get along. Seems like it shouldn't be an issue with my SSQV (but I don't want to start up a whole topic on it in this thread; just got a good giggle from it!)
Edit: Haha Brettus; on a side not I was reading your "Where did you plumb your boost controller into ? UIM is no good !" thread and got some good laugh because you and MM never seem to get along. Seems like it shouldn't be an issue with my SSQV (but I don't want to start up a whole topic on it in this thread; just got a good giggle from it!)
Last edited by RotaryMachineRx; 09-21-2010 at 12:17 AM.
09-21-2010, 12:39 AM
#73
Yeah that's the plan.. except I'm still gonna buy a Tee and plumb my wastegate signal into the jet air hose.... So I did have it right? top hose from the stock intake with the white mark on it is the Jet air hose? I am like 99.9% sure but at the same time I want to be 100% sure things didnt get moved around when I had the car apart.
!)
!)
not sure but do me a favour and test it out if you do fit a boost controller
09-21-2010, 02:01 AM
#74
SPOOLN8
Thread Starter
iTrader: (1)
Join Date: Nov 2008
Location: Edmonton, Alberta, Canada
Posts: 2,225
Received 208 Likes
on
156 Posts
Will do, plans as they sit now are:
1) Get the car back together and tuned once the rest of my parts arrive
For next summer:
2) Install GReddy Profec II BC
3) Koni Yellows
4) AEM/MS CAI
5) BHR Ignition
I'll keep this thread updated as soon as my parts arrive and will update the first few reserved posts to represent my entire build