forbidden's Molex Thread
#1
resU deretsigeR
Thread Starter
Join Date: Jan 2006
Location: Jacksonville, FL
Posts: 743
Likes: 0
Received 0 Likes
on
0 Posts
forbidden's Molex Thread
This was copied from the12volt.com w/ forbidden's permission.
This tutorial is to aid you when you are faced with the dreaded door molex and how to get your speaker wires past it. This install was done on a 2006 Mazda 3. This is becoming more and more common these days so expect to see it in your new car, be it a Mazda or a Jeep.
Here is a great picture of what not to do. I should point out that this method is done frequently by installers who are lazy, or for customers that do not want to pay to have the job done properly. Notice as well the rust starting below where he drilled. This is from the installer not cleaning up his metal shards after drilling. I should also point out, that this customer, a friend of mine in a different city, went for the "deal" and not the quality. He was also told by four local shops, 2 big box and two specialty shops that this is also the only way that they will do this work. Here is the list of excuses he was given.
(1) It voids warranty.
(2) The wire does not fit.
(3) The wire will get cut when the door opens and closes.
(4) The wire will chaff in the molex.
(5) The electrical switches will no longer work.
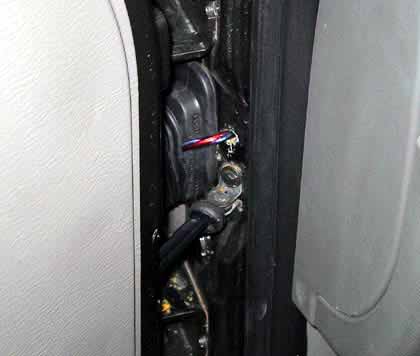
Here is a picture of the suspected offender. Putting your fingers onto the boot where it makes contact with the door, you should be able to feel the plastic molex housing underneath.

The first thing to do is to peel back the protective rubber boot to expose the molex and to see how it is locked into the door. Use a pick tool or a small common screwdriver to help you here if you cannot get your fingers in the area. If you are going to be putting your fingers into this area, take great care not to move the door as when it swings it might try and cut your fingers off as it swings past.

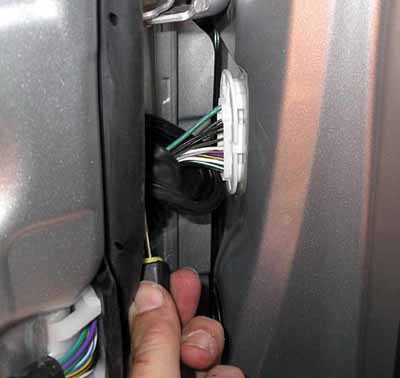
Next is the picture of the molex a little closer. If you look closely at the plug, you will see the press down lock tabs in the four corners. Use a pick tool and push the tab down while you pry that corner. Next push the other matching top (or bottom) tab down. Either the top or the bottom of them molex should now be free from the door. Now do the other 2 tabs to release the entire molex and pull it out of the mounting hole. Expect it to be fairly deep so be carefull as to how you pull it out. The metal in the door jamb is sharp, so be carefull not to chaff the factory wires on it!
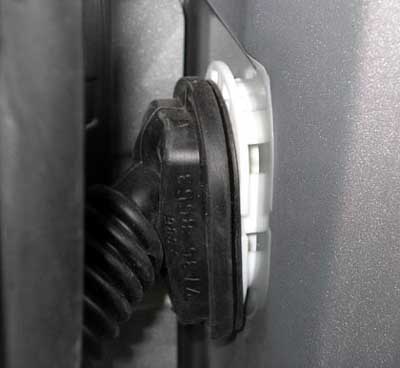
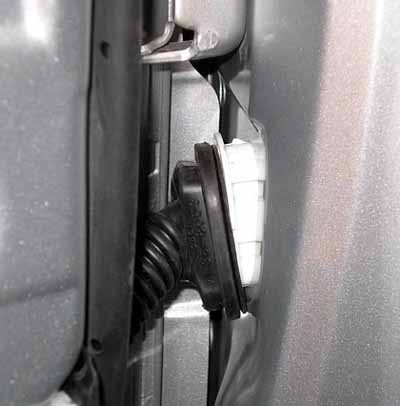
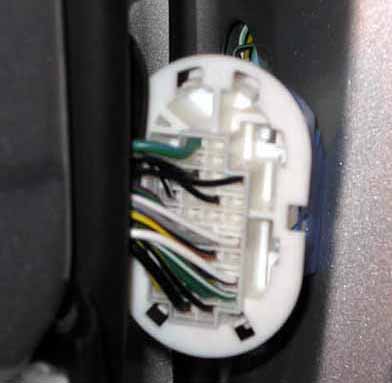
Now for the first look at what you can do. If you notice in the last picture all the unused holes (holes with no wires going into the molex). That is where we shall be running our new wires. You need to look at both the front and the backside of the molex as there very well may be factory wires in the back molex that do not come through on the front side (depending on options in your vehicle).

The above picture is the back half of the molex after it has been unsnapped from the front.

The above picture is the front half of the offensive foul beast that we are soon to torture. The next picture below in this case is where the new wires must enter the boot from on the drivers door.
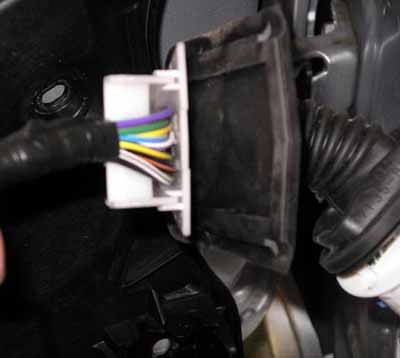
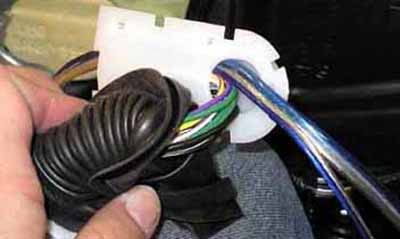
The second picture above is the boot removed from the protective plastic shroud that the factory wires are in. As I am installing components in this car, I have two runs of 18 gauge speaker wire to pass through to the vehicle. The next picture below shows an alternative method (vehicle dependent) of passing a wire through a molex. If the molex has side holes as this one does, then it is a easy method to pass the wires through. It does not require drilling of either front or back molex to pass through. In this vehicle, I chose not to do this method.
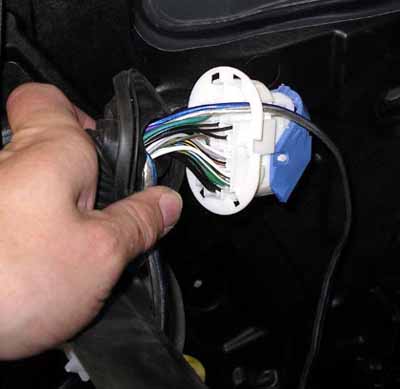
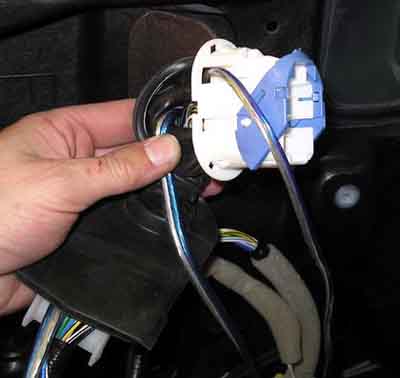
Now onto the business end. There are two ways to drill a molex. One way is to separate the two molex's and drill each indipendent. I generally choose a drill bit that is just under the size of the hole that is there for a factory wire to pass into. As there is no factory wire in the way, it is easy to check. The drill bit size also needs to be just larger than the size of the wire you are trying to pass through. This next picture shows me drilling the front molex from the backside (doorside). The other way to drill the molex is to snap it back together into one large molex and drill from the front to the back. This is my preferred method however, you must be carefull when the drill bit approaches the backside that it does not bind on any factory wires.

The next picture shows a before and after shot of the rear molex.


Next you need to split your speaker wire down the center. Pass the wire through the front molex as you see in the next picture.

Now pass the wire through the rear molex as well. Slowly push the molex's together while you pull the extra speaker wire out.

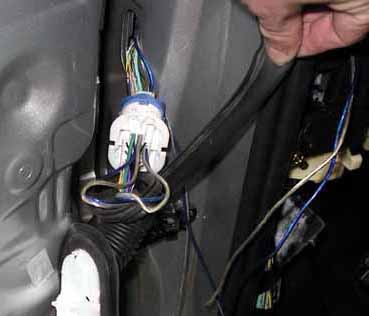
Now you should be able to reconnect your molex together, wires ran through it and put the molex back into it's deep dark hole from whenst it came. Take care to secure your speaker wires on both sides of the molex so that the wire cannot move around.
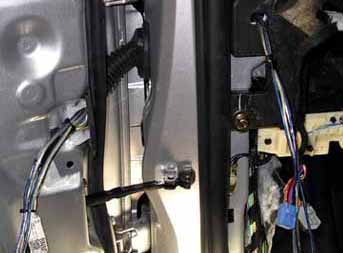
Now you have a new set of speaker wires ran through a molex, properly and with a guage of wire adequate to carry all of that power that new amp of yours is set to give you.
___________________________________________
Forbidden Audio Ltd. now for sale due to impending career change.
Rob @ Forbidden Audio Ltd.
Courtenay, BC, Canada
This tutorial is to aid you when you are faced with the dreaded door molex and how to get your speaker wires past it. This install was done on a 2006 Mazda 3. This is becoming more and more common these days so expect to see it in your new car, be it a Mazda or a Jeep.
Here is a great picture of what not to do. I should point out that this method is done frequently by installers who are lazy, or for customers that do not want to pay to have the job done properly. Notice as well the rust starting below where he drilled. This is from the installer not cleaning up his metal shards after drilling. I should also point out, that this customer, a friend of mine in a different city, went for the "deal" and not the quality. He was also told by four local shops, 2 big box and two specialty shops that this is also the only way that they will do this work. Here is the list of excuses he was given.
(1) It voids warranty.
(2) The wire does not fit.
(3) The wire will get cut when the door opens and closes.
(4) The wire will chaff in the molex.
(5) The electrical switches will no longer work.

Here is a picture of the suspected offender. Putting your fingers onto the boot where it makes contact with the door, you should be able to feel the plastic molex housing underneath.

The first thing to do is to peel back the protective rubber boot to expose the molex and to see how it is locked into the door. Use a pick tool or a small common screwdriver to help you here if you cannot get your fingers in the area. If you are going to be putting your fingers into this area, take great care not to move the door as when it swings it might try and cut your fingers off as it swings past.


Next is the picture of the molex a little closer. If you look closely at the plug, you will see the press down lock tabs in the four corners. Use a pick tool and push the tab down while you pry that corner. Next push the other matching top (or bottom) tab down. Either the top or the bottom of them molex should now be free from the door. Now do the other 2 tabs to release the entire molex and pull it out of the mounting hole. Expect it to be fairly deep so be carefull as to how you pull it out. The metal in the door jamb is sharp, so be carefull not to chaff the factory wires on it!


Now for the first look at what you can do. If you notice in the last picture all the unused holes (holes with no wires going into the molex). That is where we shall be running our new wires. You need to look at both the front and the backside of the molex as there very well may be factory wires in the back molex that do not come through on the front side (depending on options in your vehicle).

The above picture is the back half of the molex after it has been unsnapped from the front.

The above picture is the front half of the offensive foul beast that we are soon to torture. The next picture below in this case is where the new wires must enter the boot from on the drivers door.


The second picture above is the boot removed from the protective plastic shroud that the factory wires are in. As I am installing components in this car, I have two runs of 18 gauge speaker wire to pass through to the vehicle. The next picture below shows an alternative method (vehicle dependent) of passing a wire through a molex. If the molex has side holes as this one does, then it is a easy method to pass the wires through. It does not require drilling of either front or back molex to pass through. In this vehicle, I chose not to do this method.


Now onto the business end. There are two ways to drill a molex. One way is to separate the two molex's and drill each indipendent. I generally choose a drill bit that is just under the size of the hole that is there for a factory wire to pass into. As there is no factory wire in the way, it is easy to check. The drill bit size also needs to be just larger than the size of the wire you are trying to pass through. This next picture shows me drilling the front molex from the backside (doorside). The other way to drill the molex is to snap it back together into one large molex and drill from the front to the back. This is my preferred method however, you must be carefull when the drill bit approaches the backside that it does not bind on any factory wires.

The next picture shows a before and after shot of the rear molex.


Next you need to split your speaker wire down the center. Pass the wire through the front molex as you see in the next picture.

Now pass the wire through the rear molex as well. Slowly push the molex's together while you pull the extra speaker wire out.


Now you should be able to reconnect your molex together, wires ran through it and put the molex back into it's deep dark hole from whenst it came. Take care to secure your speaker wires on both sides of the molex so that the wire cannot move around.

Now you have a new set of speaker wires ran through a molex, properly and with a guage of wire adequate to carry all of that power that new amp of yours is set to give you.
___________________________________________
Forbidden Audio Ltd. now for sale due to impending career change.
Rob @ Forbidden Audio Ltd.
Courtenay, BC, Canada
#2
resU deretsigeR
Thread Starter
Join Date: Jan 2006
Location: Jacksonville, FL
Posts: 743
Likes: 0
Received 0 Likes
on
0 Posts
Here are a couple of things that helped me out.
1. With the tight area between the door and the body, I found it easier to put the 2 halves of molex back together then run the speaker wires through.
2. Be sure to put the rubber back on the molex before putting it back into the body.
3. Don't forget to re-seat your door weatherstripping.
Thanks for letting me copy this over here forbidden!!
Last edited by jstkilntim; 01-03-2007 at 08:10 PM.
#6
Deals on wheels
It may be just me. But those pics make it look alot easier than it was for the 8. I found it to be much easier to remove the doors so i could get the leverage to run it though the molex. I also didn't have to drill there was plenty of space on the side to run a 16 AWG wire through.
and yes, this should be a sticky.
and yes, this should be a sticky.
#7
resU deretsigeR
Thread Starter
Join Date: Jan 2006
Location: Jacksonville, FL
Posts: 743
Likes: 0
Received 0 Likes
on
0 Posts
It does look like there is more room on the Mazda 3. At first I considered taking the door off, but thought against it pretty quickly since if you don't disconnect the molex first, you will be standing there w/ a heavy *** door in your hands that is still connected by wires.
After going back inside to read the thread again, it wasn't hard at all to remove. My only problem is that I had trouble getting the 2 halves back together after the wire was installed so I had to pull the wires, connect the plug and run them again.
Then after the molex was reinstalled into the body, I couldn't get the rubber boot back on straight so I had to pull it back out and install the rubber boot first.
I literally think the the driver's side (if there are 2 open spaces) will take less than 15 minutes once the door panel is off.
#8
Registered User
Join Date: Apr 2005
Location: CFB Comox, BC, Canada
Posts: 544
Likes: 0
Received 0 Likes
on
0 Posts
^^^^^WD40 is your friend when it comes putting molex's back together or running wires through them. Having the years behind me that I do when it comes to install, well yes to me it is a fairly easy task. That said, you noob's had better be ready for skinned knuckles and slipped tool marks etc. It is never easy the first time around, so slow down and take your time.
#13
resU deretsigeR
Thread Starter
Join Date: Jan 2006
Location: Jacksonville, FL
Posts: 743
Likes: 0
Received 0 Likes
on
0 Posts
I finally got around to doing the driver's side yesterday. Maybe 15 minutes was wishful thinking. There were extra holes so I didn't need to remove any wires. It actually took about 45 minutes including taking the door panel off.
#17
resU deretsigeR
Thread Starter
Join Date: Jan 2006
Location: Jacksonville, FL
Posts: 743
Likes: 0
Received 0 Likes
on
0 Posts
Originally Posted by rx8guy86
What is the largest gauge wire that you could uses for this??
#21
Registered User
Join Date: Apr 2005
Location: CFB Comox, BC, Canada
Posts: 544
Likes: 0
Received 0 Likes
on
0 Posts
Unless you will be pulling 50 amps of current into that door speaker, there is absolutely no need for 12 gauge. The only reason I use 14 and 18 gauge wire is to easily identify my tweeter wire from my mid wire. Otherwise I would run it all as 16 guage.
#22
Purveyor of fine bass
#23
Why waste a day of frustration on this process? You will have plenty of other frustrations doing the install. You're putting in a 6.5" speaker and a tweeter. How many watts can you really feed such a small speaker?
Thread
Thread Starter
Forum
Replies
Last Post


