Swishing White Vinegar in Headlights?
 09-05-2009, 12:53 PM
#1
Felix "The Man" Wankel
Thread Starter
iTrader: (9)
Join Date: Jan 2006
Location: I am a resident of Cincinnati, OH
Posts: 128
Likes: 0
Received 0 Likes
on
0 Posts
Swishing White Vinegar in Headlights?
Ok I searched on here and have read up a bit, but there is no clear answer. I would rather not bake my headlights to clean the inside so could I use white vinegar in them and just work it around in there like the tail lights??
I have some weird build up on the inside of the headlights and I would like to get it off.
Any quick input would be great, I have xenon headlights if anyone needs to know that for some reason.
I have some weird build up on the inside of the headlights and I would like to get it off.
Any quick input would be great, I have xenon headlights if anyone needs to know that for some reason.
 09-05-2009, 01:03 PM
#2
whines all the way home
iTrader: (2)

Join Date: Oct 2004
Location: Towson/Baltimore, MD
Posts: 7,402
Likes: 0
Received 2 Likes
on
2 Posts
huh, never heard of this technique before, I imagine that it would work somewhat to clean the lenses the only thing I would worry about is what the vinegar would do to the painted areas of the housing,,, Baking the headlights is not difficult at all you should just dive right in,,,
09-05-2009, 01:07 PM
#3
Felix "The Man" Wankel
Thread Starter
iTrader: (9)
Join Date: Jan 2006
Location: I am a resident of Cincinnati, OH
Posts: 128
Likes: 0
Received 0 Likes
on
0 Posts
haha Idk I am real nervous about baking them bc I dont have $600 laying around. I would gladly pay someone to do this for me haha but I have no one around me to do it.
I am not sure if it would do anything to the painted areas....idk I am a neeewb in this area
I am not sure if it would do anything to the painted areas....idk I am a neeewb in this area
09-05-2009, 01:47 PM
#4
Registered
iTrader: (2)

Join Date: Jun 2009
Location: Hampton Roads, VA
Posts: 50
Likes: 0
Received 0 Likes
on
0 Posts
Baking them open really is easy. I'd be nervous about cleaning the inside though.
Shakeyourbrakes got paint particles on the inside of his housing lenses and used wet sanding to get rid of it, you might want to PM him.
Shakeyourbrakes got paint particles on the inside of his housing lenses and used wet sanding to get rid of it, you might want to PM him.
Well here we go, I got up the *****, and split open my expensive HID headlights. Everyones been talking about it, so I figured Id jump in. Steps and pics follow..
1. Remove the headlights..bumper first then 3 -10mm bolts
2. Unplug the main harness and remove the blinker bulb.
3. Remove all bulbs..Definitely dont forget the the HID one!!!!
4. Take the three small screws out of the back which help to secure the lens to the housing. Youll see them
4. Preheat oven to 220 degrees ( I tested a few, this was the magic number) tuck up all wires, lie down some aluminum foil and place the headlight in there for 6-8 minutes. Dont worry about the Ballast, It took the heat without an issue..I did a lot of research on this first
5. Take the light out and slide a butter knife around the edges, working the silicone and prying a little, but obviously not too much to crack anything
6.Keep repeating heating and opening the edges, and eventually youll get the lens off the front. (Much easier than I expected.)
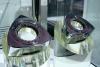
7.Dissasemble the light into the parts shown
8. I used adhesive promoter, matched car paint, then gloss. When its all set, reassemble, and fit the lens back over the housing
9. Line it up as best as you can and put back in the oven at the same temp. 6-8 minutes in squeeze the lens and housing together creating a good seal again.This actually worked great.
10. Run some silicone to MAKE SURE theres no moisture getting it
End result is great I think... I decided to keep the reflectors, for inspections and everything and to keep bulb brightness. Some pics look awkward because of the reflector shining with the flash...so keep posted for daytime pics!!!! Let me know what you think
1. Remove the headlights..bumper first then 3 -10mm bolts
2. Unplug the main harness and remove the blinker bulb.
3. Remove all bulbs..Definitely dont forget the the HID one!!!!
4. Take the three small screws out of the back which help to secure the lens to the housing. Youll see them
4. Preheat oven to 220 degrees ( I tested a few, this was the magic number) tuck up all wires, lie down some aluminum foil and place the headlight in there for 6-8 minutes. Dont worry about the Ballast, It took the heat without an issue..I did a lot of research on this first
5. Take the light out and slide a butter knife around the edges, working the silicone and prying a little, but obviously not too much to crack anything
6.Keep repeating heating and opening the edges, and eventually youll get the lens off the front. (Much easier than I expected.)
7.Dissasemble the light into the parts shown
8. I used adhesive promoter, matched car paint, then gloss. When its all set, reassemble, and fit the lens back over the housing
9. Line it up as best as you can and put back in the oven at the same temp. 6-8 minutes in squeeze the lens and housing together creating a good seal again.This actually worked great.
10. Run some silicone to MAKE SURE theres no moisture getting it
End result is great I think... I decided to keep the reflectors, for inspections and everything and to keep bulb brightness. Some pics look awkward because of the reflector shining with the flash...so keep posted for daytime pics!!!! Let me know what you think


Thread
Thread Starter
Forum
Replies
Last Post
Shankapotamus3
Series I Trouble Shooting
28
03-14-2021 03:53 PM
jasonrxeight
RX-8's For Sale/Wanted
2
09-30-2015 01:53 PM

