Self Vented Hood with GT500 Hood Vent
 06-04-2014, 12:11 PM
#1
Registered
Thread Starter
iTrader: (1)

Join Date: Jul 2013
Posts: 39
Likes: 0
Received 0 Likes
on
0 Posts
With the summer coming up and my ever growing desire to go to track days. I've taken on the project of venting my hood for better cooling while on track. This hood will only be used for driving to/tracking/ driving home from the track, so I am not worried about water intrusion. This may not be the best for daily driven cars.
I decided on the GT500 vent (AR3Z-16C630-AA) as it was relatively inexpensive ($80 shipped) from Tascaparts.com for the size and quality, and the fact that it was used as OE assumes a certain level of aerodynamic testing. With that said, I'm not sure it will be the best vent for tracking, but I think it will provide me some extra capacity for hotter track days. I feel for complete venting i'd need something much more extreme.

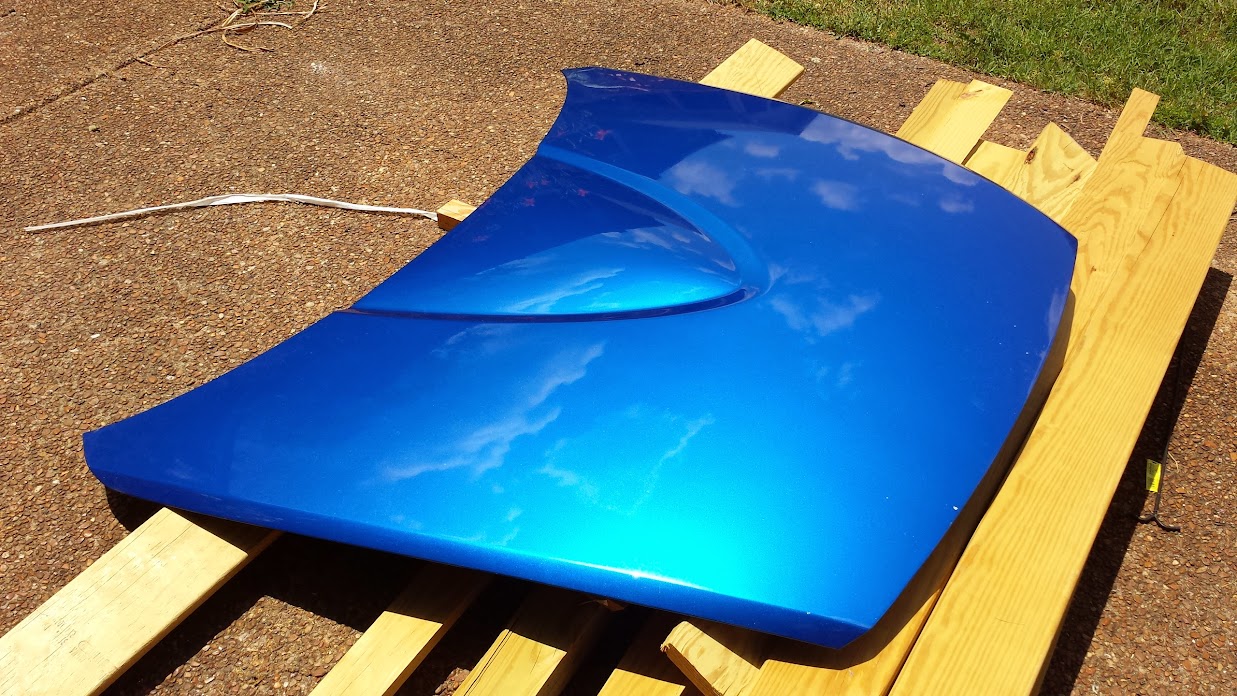
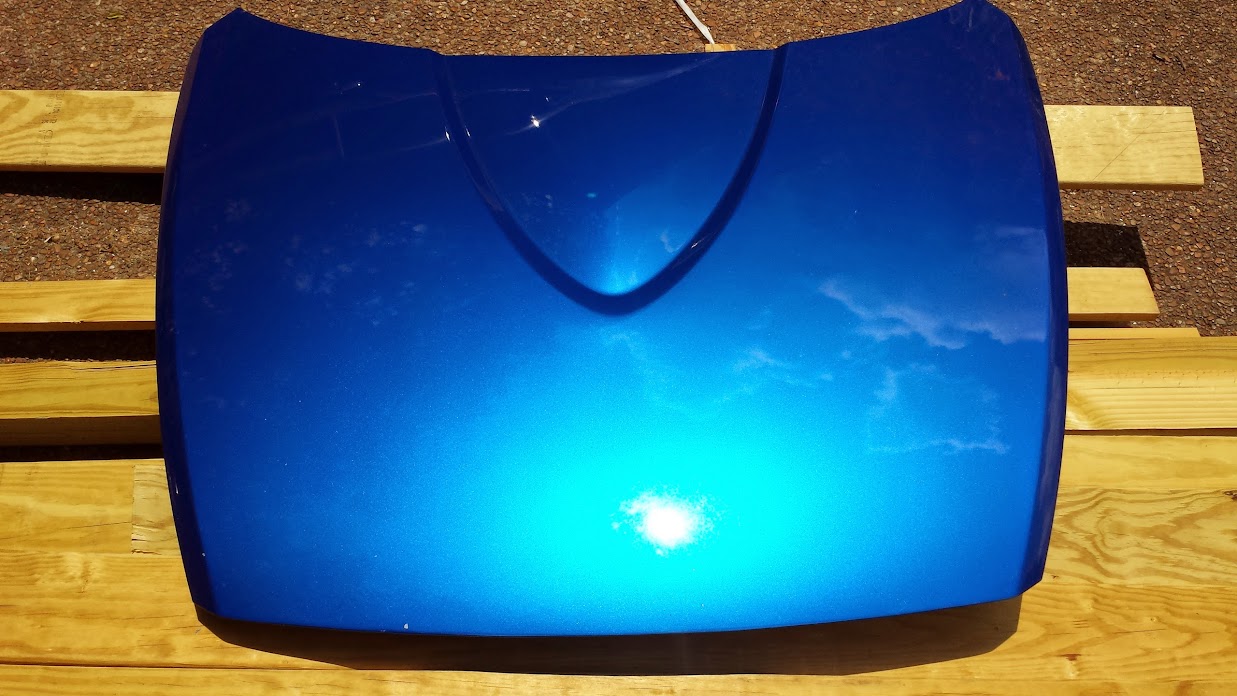
Started with a beautiful blue hood from a local forum member.
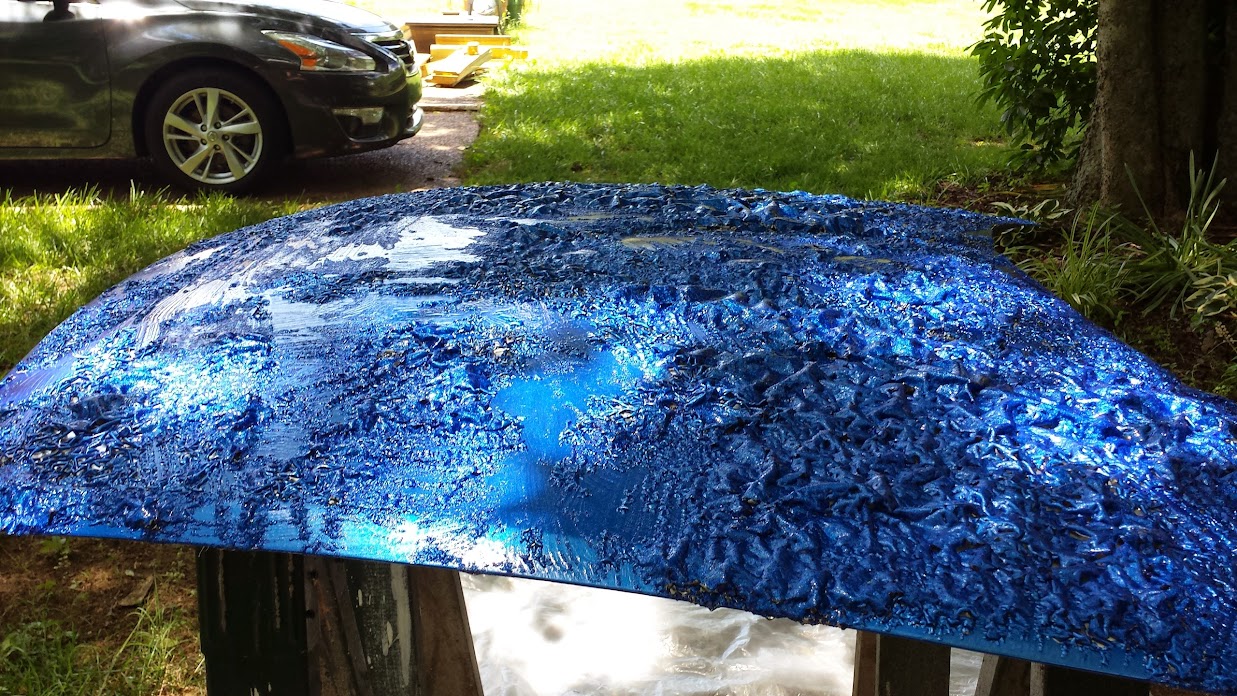
Super aggressive paint stripper. I watched the stripper move across the hood as paint bubbled up.
Not me in the picture. And you can tell by the hat he's not really gangster. Hood after 2nd round of stripping.

Noticed the hood had a few low spots on it, with what looked like filler... Hood didn't look repainted. Maybe factory work?


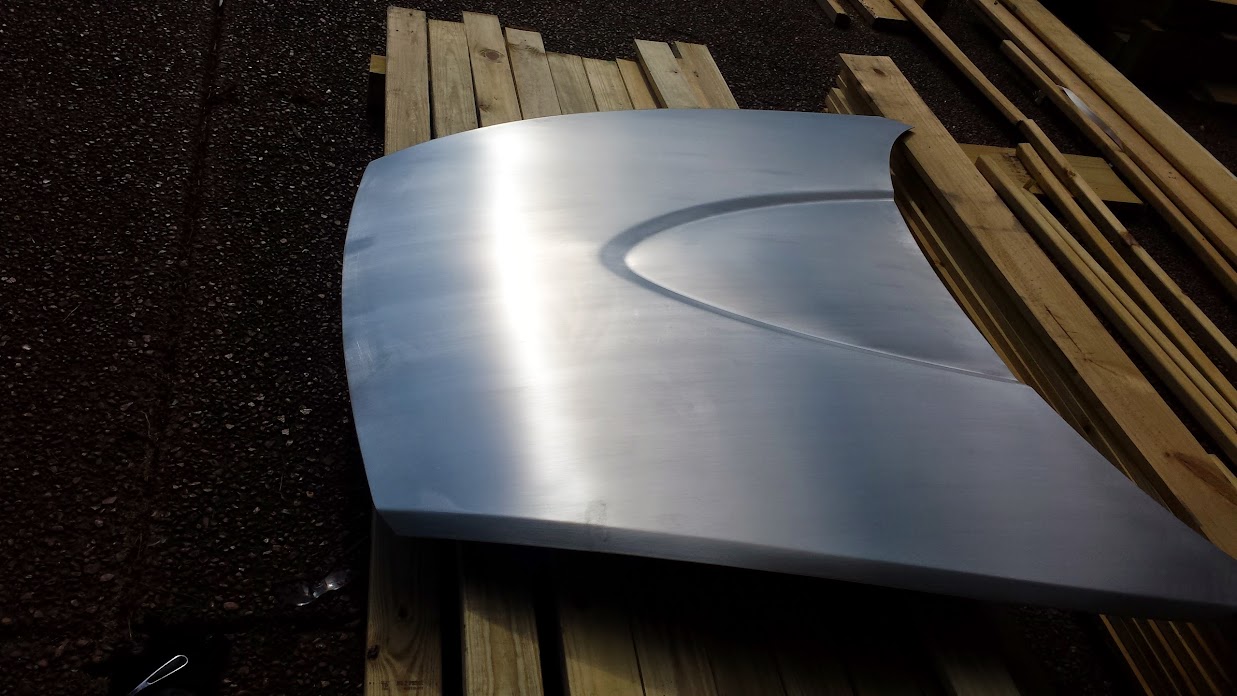
After "brushing" the aluminum with a 3M pad. Still debating on how to continue the finish as the brush lines are hard to keep straight. I just want something uniform without scratch marks everywhere.
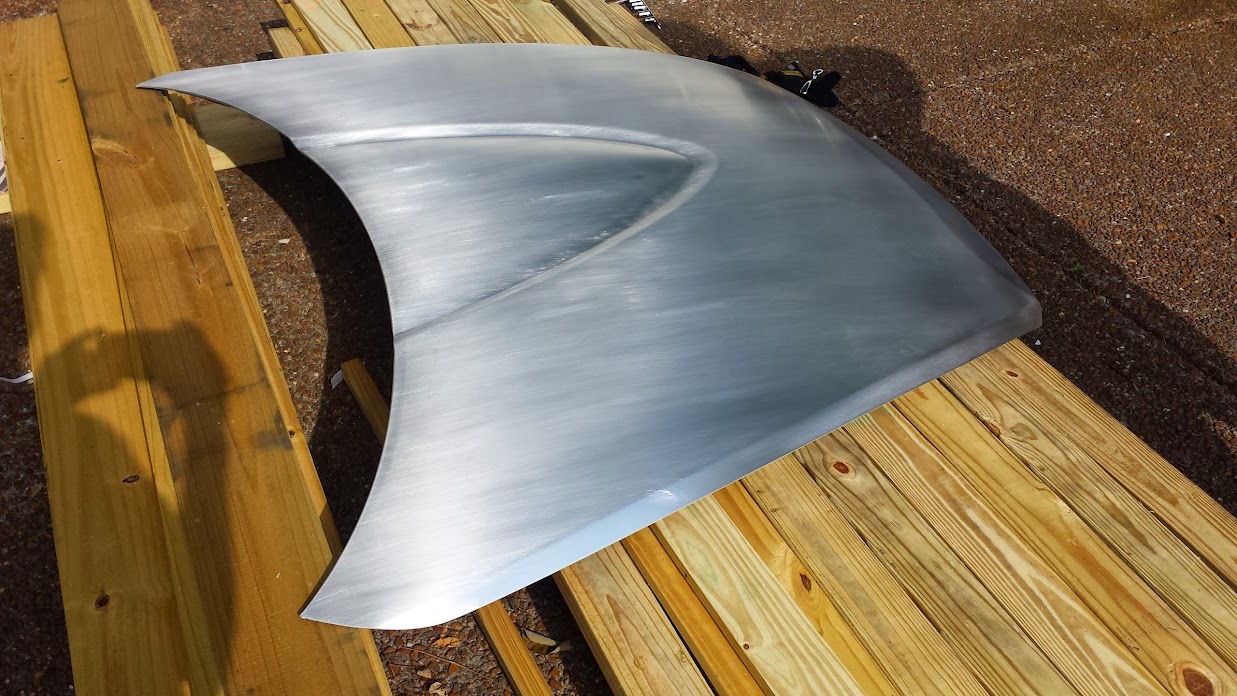
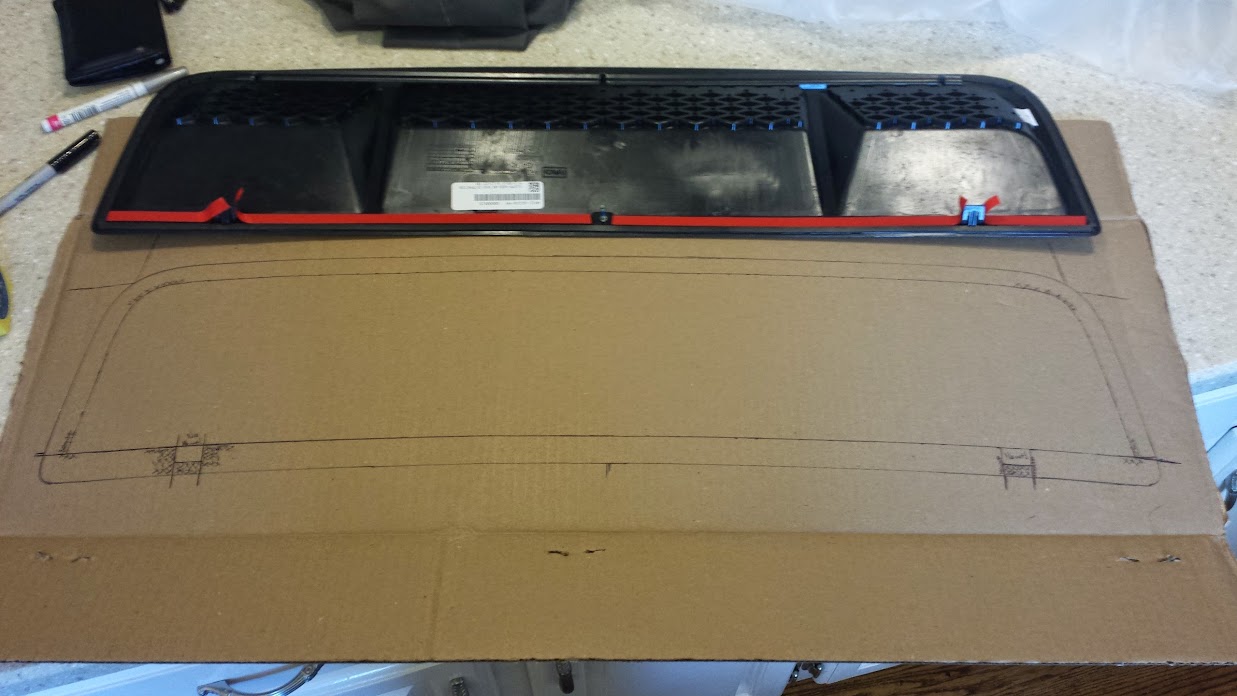
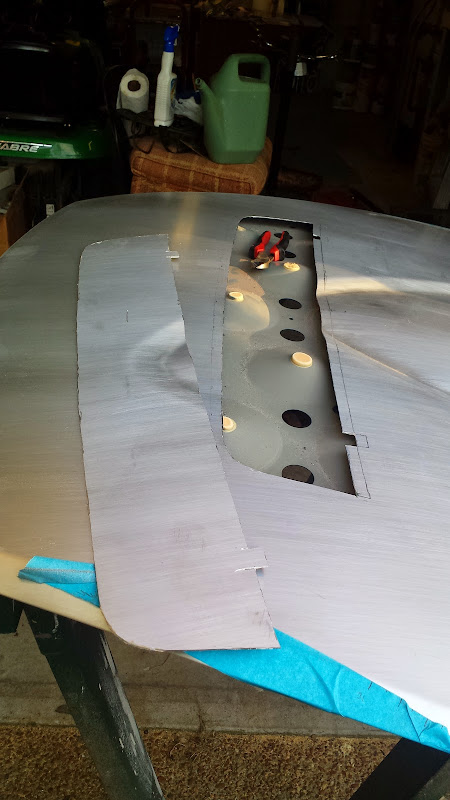
Test fitting on current hood. tape lines show frame rails, beginning or radiator, and start of hood "triangle".
Notice the clips, stud, curve... All taken into account during template making.
Finished template. Don't ever make a template on cardboard. When you cut it it tears and folds because it is two layers. Lesson learned. Luckily I made height and width measurements to adjust once template was transfered to hood.
I was alone so I didn't get any shot of me cutting, but I used a medium sized dremel with 1 1/2" EZ cutting wheels. Went through about 7 of them.
I decided on the GT500 vent (AR3Z-16C630-AA) as it was relatively inexpensive ($80 shipped) from Tascaparts.com for the size and quality, and the fact that it was used as OE assumes a certain level of aerodynamic testing. With that said, I'm not sure it will be the best vent for tracking, but I think it will provide me some extra capacity for hotter track days. I feel for complete venting i'd need something much more extreme.
Started with a beautiful blue hood from a local forum member.
Super aggressive paint stripper. I watched the stripper move across the hood as paint bubbled up.
Not me in the picture. And you can tell by the hat he's not really gangster. Hood after 2nd round of stripping.
Noticed the hood had a few low spots on it, with what looked like filler... Hood didn't look repainted. Maybe factory work?
After "brushing" the aluminum with a 3M pad. Still debating on how to continue the finish as the brush lines are hard to keep straight. I just want something uniform without scratch marks everywhere.
Test fitting on current hood. tape lines show frame rails, beginning or radiator, and start of hood "triangle".
Notice the clips, stud, curve... All taken into account during template making.
Finished template. Don't ever make a template on cardboard. When you cut it it tears and folds because it is two layers. Lesson learned. Luckily I made height and width measurements to adjust once template was transfered to hood.
I was alone so I didn't get any shot of me cutting, but I used a medium sized dremel with 1 1/2" EZ cutting wheels. Went through about 7 of them.
Last edited by FerociousP; 06-04-2014 at 12:52 PM.
 06-04-2014, 12:25 PM
#2
Registered
Thread Starter
iTrader: (1)
Join Date: Jul 2013
Posts: 39
Likes: 0
Received 0 Likes
on
0 Posts
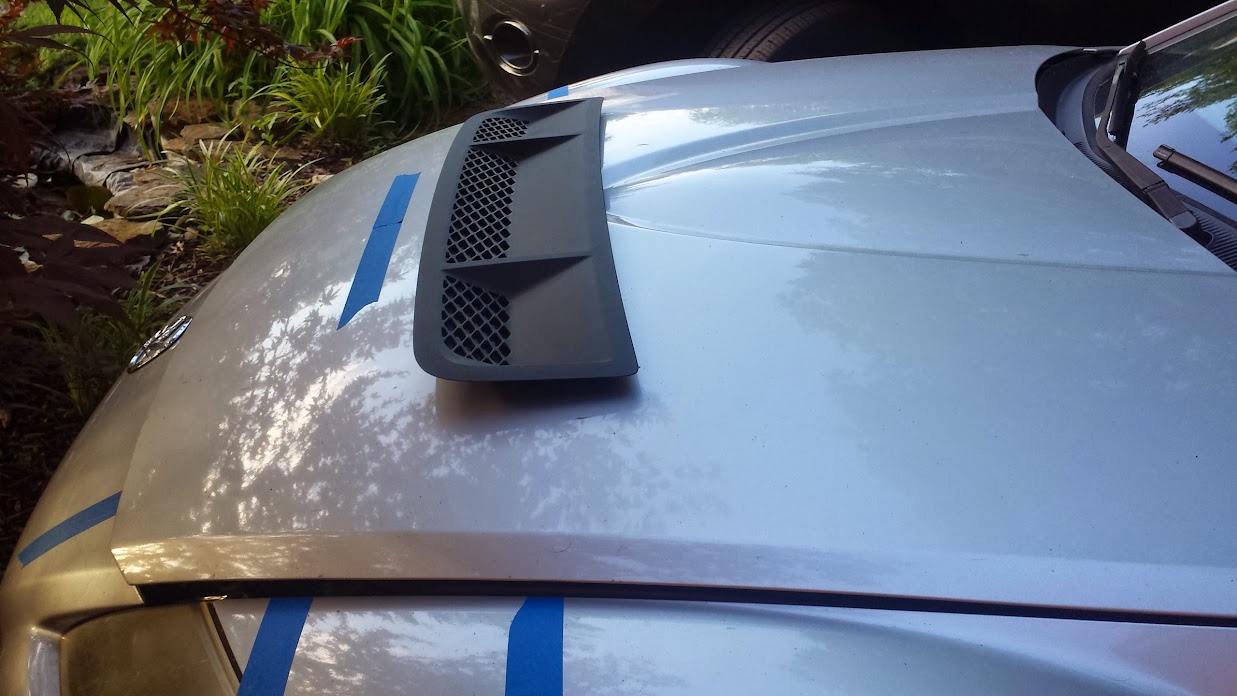
The front of the vent has a groove for the hood to slide into, so the front of the lip is "captured" and will not lift up, and the edges and sides have a bit of sealing foam. The "notches" had to be accounted for as well, but were little issue.
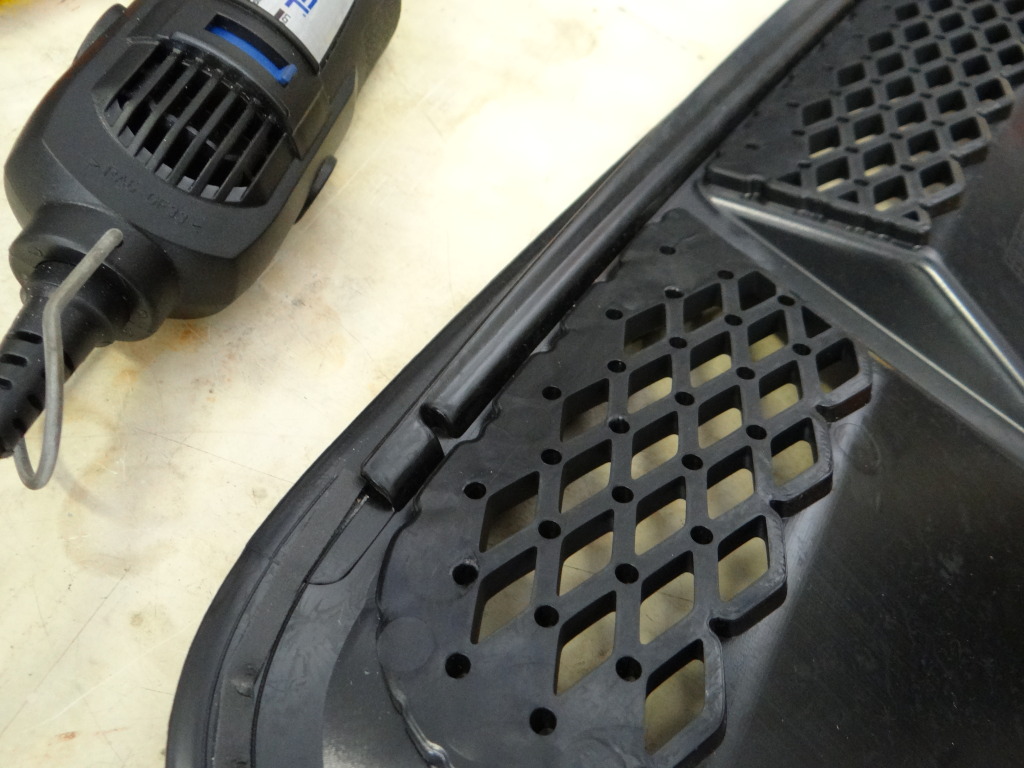

The clips all snapped into place with a little grinding, and even the stud will be funtional with a nut from the bottom. These two parts make the vent very secure and there is really no way for the vent to come off. 3M tape is also supplied in certain areas, but really isn't necessary.
Hopefully air just wants to fly out of there!

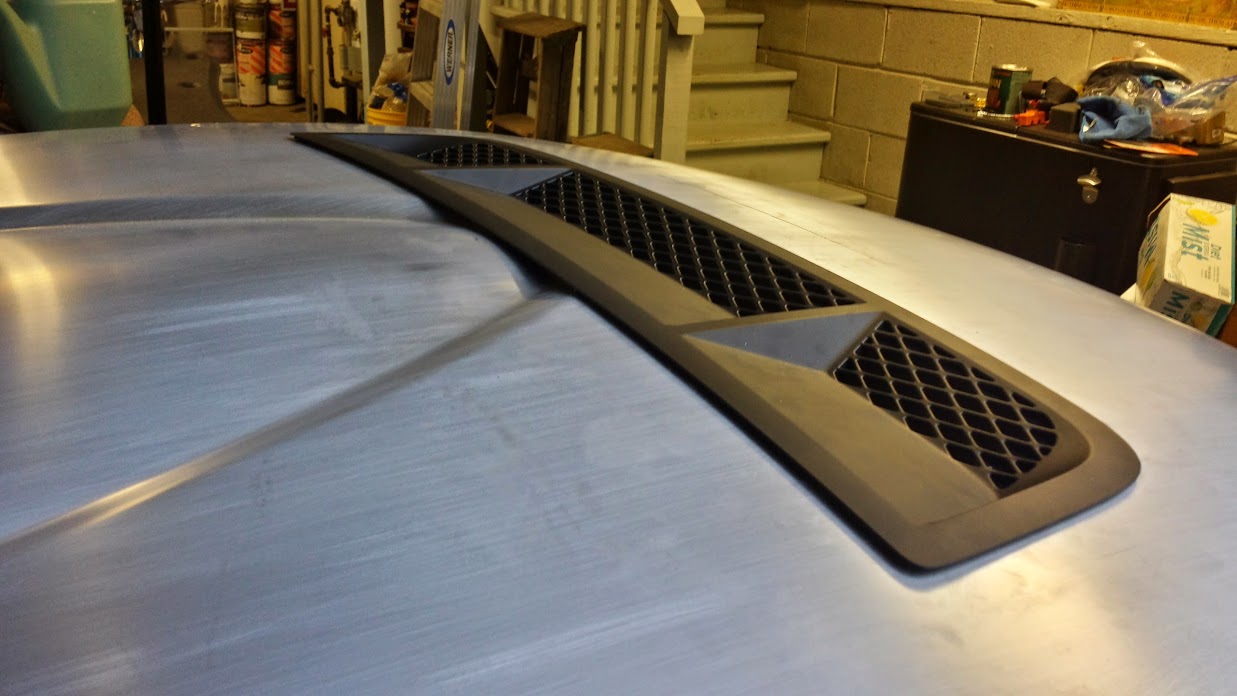
Driver-ish view. Gap from "triangle" is smaller than I thought it'd be, and i'm not bothered by it.
On the factory GT500 hood, the vent location is inset allowing flush intall. This isn't possible here, so this is about as flush as it gets. The plastic is tapered slightly with the "sharp" part being on the top of the edge, so the gap looks big, but it is actually sitting flush on the hood. I accepted it would look like this based on other attempts on other hoods on the internet.

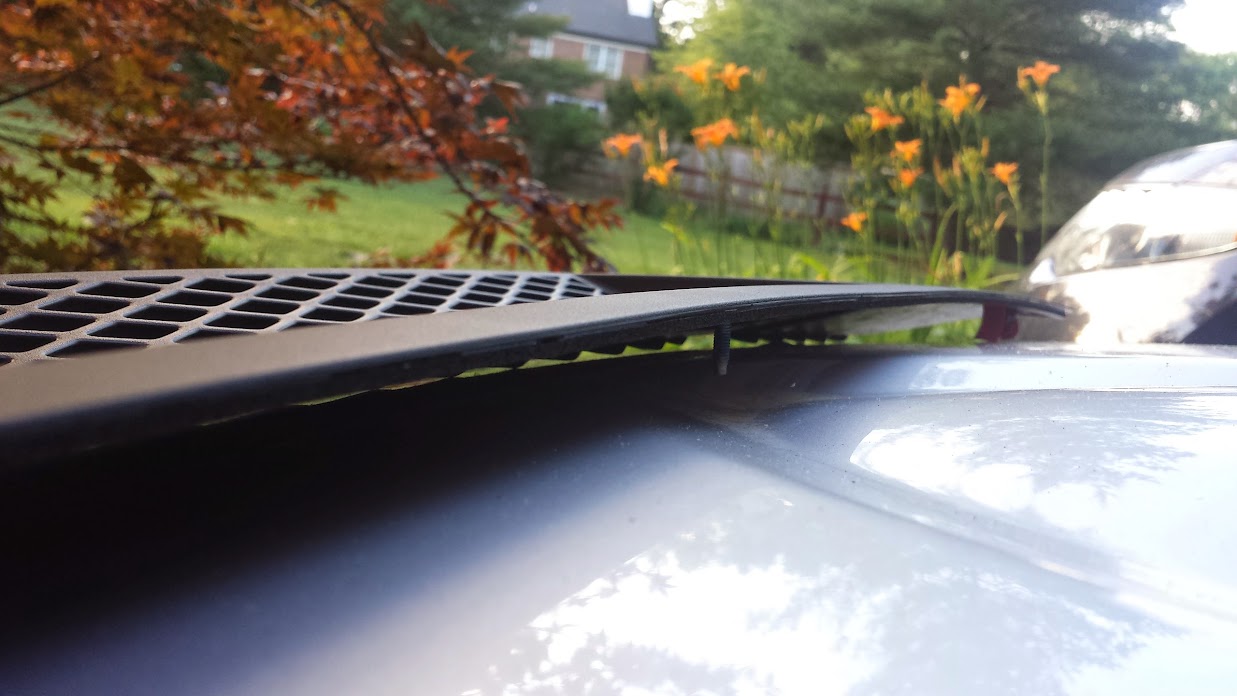
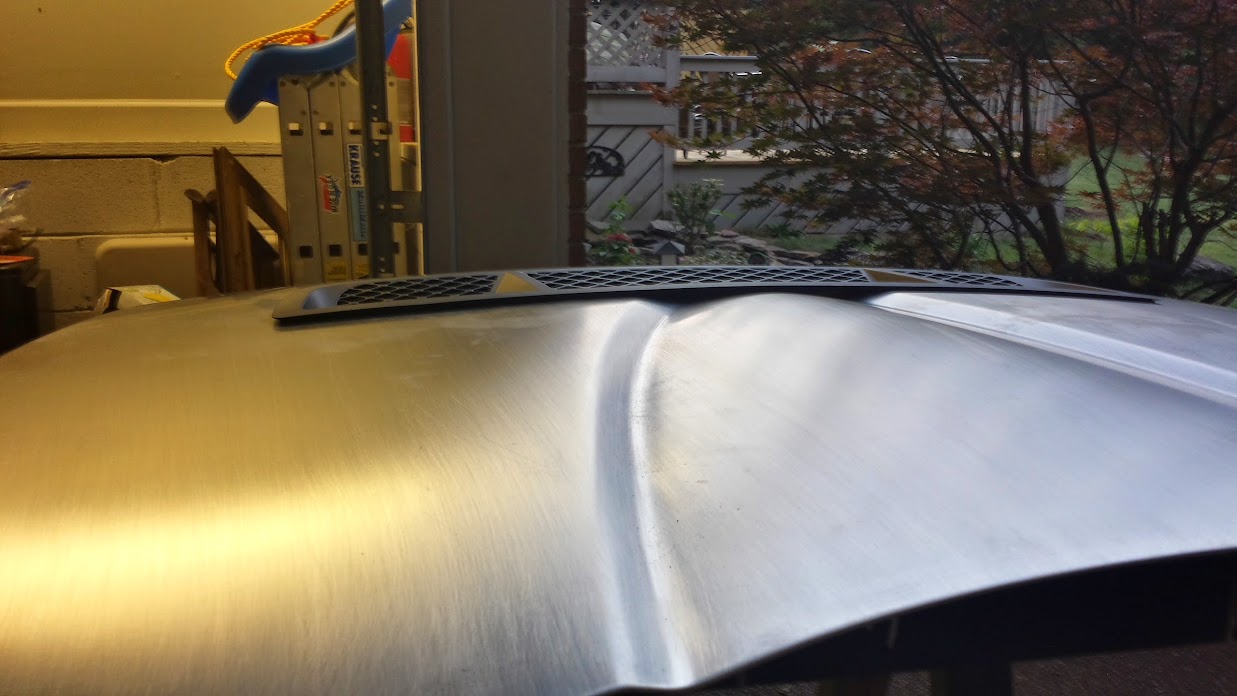
View from below.
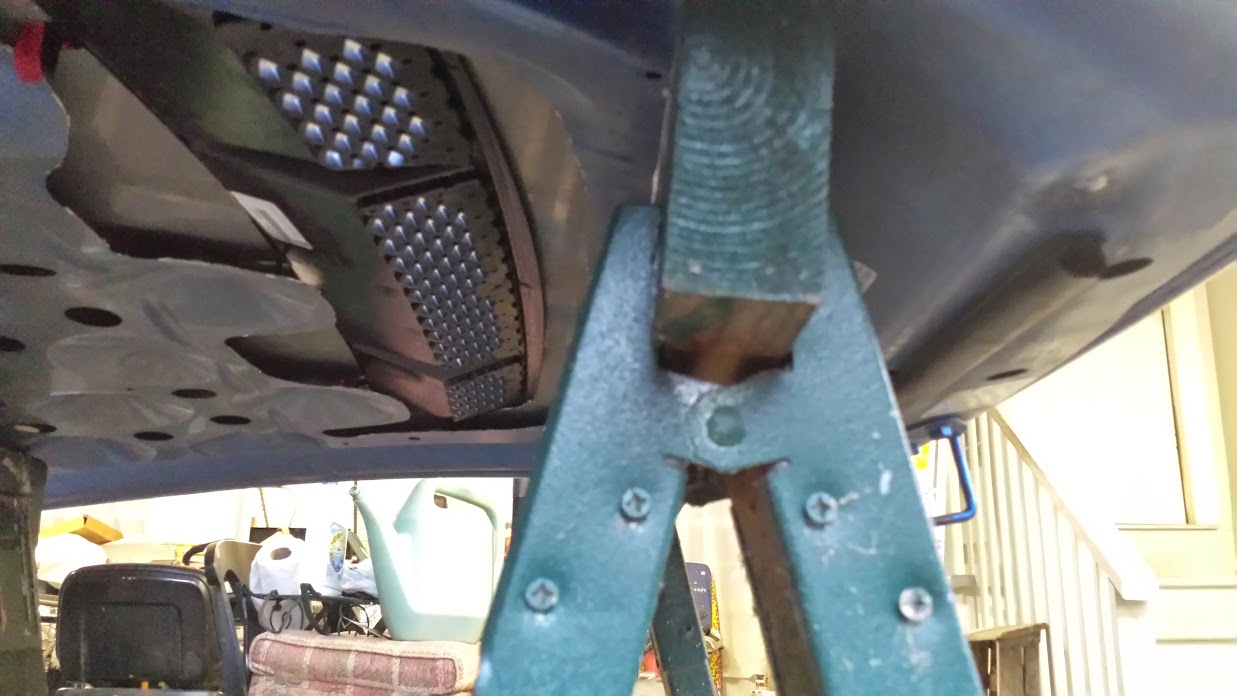
It was getting dark, hence the potato picture quality. Hood currently isn't mounted, but I plan to do so soon and check out location over the radiator. Its farther back than the tape I placed, but not too far back, so I'm hoping nothing but help in that department.
My current plan is to work on the metal finish a bit, and then use special clear coat (POR-15 GlistenPC) for bare aluminum. I don't want a polished hood, but like the bare aluminum look, especially with my silver car. We'll see how that works out. Although bare aluminum doesn't "rust" or even oxidize too badly, it gets dirty and even one touch with a finger will leave a nice smudge. It needs to be protected.
The clips all snapped into place with a little grinding, and even the stud will be funtional with a nut from the bottom. These two parts make the vent very secure and there is really no way for the vent to come off. 3M tape is also supplied in certain areas, but really isn't necessary.
Hopefully air just wants to fly out of there!
Driver-ish view. Gap from "triangle" is smaller than I thought it'd be, and i'm not bothered by it.
On the factory GT500 hood, the vent location is inset allowing flush intall. This isn't possible here, so this is about as flush as it gets. The plastic is tapered slightly with the "sharp" part being on the top of the edge, so the gap looks big, but it is actually sitting flush on the hood. I accepted it would look like this based on other attempts on other hoods on the internet.
View from below.
It was getting dark, hence the potato picture quality. Hood currently isn't mounted, but I plan to do so soon and check out location over the radiator. Its farther back than the tape I placed, but not too far back, so I'm hoping nothing but help in that department.
My current plan is to work on the metal finish a bit, and then use special clear coat (POR-15 GlistenPC) for bare aluminum. I don't want a polished hood, but like the bare aluminum look, especially with my silver car. We'll see how that works out. Although bare aluminum doesn't "rust" or even oxidize too badly, it gets dirty and even one touch with a finger will leave a nice smudge. It needs to be protected.
Last edited by FerociousP; 06-04-2014 at 12:58 PM.
06-23-2014, 01:58 AM
#3

Should have placed it below the rotary indentation. When it rains, water has a tendency to flow to the lowest point, you'll be getting a lot more water than just having that vent there.
Also aesthetically, it would have looked much better if it was lower.
Also aesthetically, it would have looked much better if it was lower.
06-23-2014, 02:09 AM
#4

A bare aluminium hood could turn out to be a stupid idea.
It looks good and all but it might reflect light straight to your eyes, especially once clear coated.
That's the reason why Abarth painted the hoods black back in the day
What have you got under the hood anyway? This mod might even work with an unpacked hood (smaller battery, aem intake without under tray etc). Get a cheap infrared thermometer and test it out!
 06-25-2014, 02:47 PM
#6
Registered
Thread Starter
iTrader: (1)
Join Date: Jul 2013
Posts: 39
Likes: 0
Received 0 Likes
on
0 Posts
I put it where it is because if I put it in front of the triangle for aesthetic reasons, the vent would be OVER the radiator, not behind it. The piece of blue tape on the hood is the location of the top of the rad, which is also down about 4 inches. Again, this is only for the track so form follows function.
A bare aluminium hood could turn out to be a stupid idea.
It looks good and all but it might reflect light straight to your eyes, especially once clear coated.
It looks good and all but it might reflect light straight to your eyes, especially once clear coated.


I've currently got the battery in stock location, and an AEM intake with no intake tray... it seems to be functioning well, though in the next few weeks i'll be doing some more thorough testing to determine the actual effects. A big post will come later.
use a belt sander to get even lines.
So far with the extra hood, vent, stripping supplies ($30), buying some dremel cutting wheels ($20), and the POR-15 stuff ($50 which i haven't applied yet) i've spent about $275-300... Even if a failure it won't be the end of the world, and still a fun exercise.
Last edited by FerociousP; 06-25-2014 at 03:01 PM.
 07-04-2014, 11:34 AM
#8

^This!
I love seeing people do stuff like this. I have a similar plan for my V-mount using an Evo 8/9 hood vent and making a duct box that seals to said vent with the hood closed. Either that, or I'm going to get creative with sheet metal and make a custom vent similar to Panspeed's FC hood.
I love seeing people do stuff like this. I have a similar plan for my V-mount using an Evo 8/9 hood vent and making a duct box that seals to said vent with the hood closed. Either that, or I'm going to get creative with sheet metal and make a custom vent similar to Panspeed's FC hood.

The following users liked this post:
jamezmazda (01-30-2020)
 07-10-2014, 04:12 PM
#11
Registered
Thread Starter
iTrader: (1)
Join Date: Jul 2013
Posts: 39
Likes: 0
Received 0 Likes
on
0 Posts
Since you seem to be familiar i'll go ahead and post my "tuft test". This basically shows that there is attached flow, and effectively low pressure, across most of the hood surface, and the tufts are not pulled into the vent, which shows at least the right flow direction. Remember this only really shows attached flow, not how efficient the vent is. I'm really debating fabricating a lip, as commonly seen on vented hoods to induce a higher negative pressure area.
Last edited by FerociousP; 07-10-2014 at 05:09 PM. Reason: correction
07-25-2014, 05:22 PM
#12
Great video. Shows that your airflow is staying attached. I'm not sure where you are, but if you are anywhere like Vegas or AZ, this would sure help the A/C stay cool while driving around town. Not to mention radiator efficiency etc...
 07-29-2014, 11:47 PM
#15
call me crazy, and some people may think there is an issue with your car, but see if you can do a lower speed run with a smoke bomb under the hood to see if the smoke comes out through the vents at low and high speeds. to hold it, just put it into a metal can somewhere in the engine bay like under the intake taped to the PS harness, light it and go. that will give you a very clear and visible idea of where the air flow in the engine bay is, as well as where else the air goes.
The following users liked this post:
jamezmazda (01-30-2020)
08-08-2014, 10:06 AM
#16
Registered
Thread Starter
iTrader: (1)
Join Date: Jul 2013
Posts: 39
Likes: 0
Received 0 Likes
on
0 Posts
Still doing some testing and trying different versions of lips and such.
Also working on a duct between rad and hood, tho that is quite complicated and I'm not ready to show results yet.


Formed an aluminum sheet around the front of the vent, and riveted in place. Then lifted the back to add a lip and a nice space for neg pressure. I wasn't going for pretty or perfect, just functional.

Also working on a duct between rad and hood, tho that is quite complicated and I'm not ready to show results yet.
Formed an aluminum sheet around the front of the vent, and riveted in place. Then lifted the back to add a lip and a nice space for neg pressure. I wasn't going for pretty or perfect, just functional.
 08-14-2014, 09:47 AM
#18
Registered
Thread Starter
iTrader: (1)
Join Date: Jul 2013
Posts: 39
Likes: 0
Received 0 Likes
on
0 Posts
Hindsight... WE probably should have. Thank you for pointing out the error of our ways. 
It also wouldn't have been as fun or as interesting, and I still have a somewhat well functioning hood for actual track use for less than an actual vented hood.... blah blah blah something something quote like "its all about the journey"...
With that said.... underhood ducting made temps slightly worse or at least took a while to cool down cruising on interstate (maybe I should buy and aftermarket duct?)... I believe the vent is too small for the duct size, considering it sealed off the entire front section of the engine bay... Now I'm slightly in a pickle, needing to either change the vent, add a larger front "lip" to the leading edge of the vent, or just give up. Adding a larger front lip is difficult to do because the change needs to be gradual, strong, and quite intricate. I don't have access to a TIG for AL like this: http://www.rx7club.com/attachments/2...-hood-pst4-jpg, so hand forming one is out... Also, I haven't found "front leading edge for hood vents" made of FG like or ABS that I could just rivet in front of the vent. All i find are giant vents like this: http://i54.tinypic.com/qrchhw.jpg, which is a little much for me... (although I don't know why i'm complaining... its a damn track hood).
08-14-2014, 01:13 PM
#19
add a driver and passenger side vent from the 2007 shelby gt500, as well as cut out the plastic mesh pattern in the one vent you have now. dont put a duct as you are restricting the air from also being able to exit via other areas around the motor. theoretically yes you want linear flow with little turbulence, however a build up of pressure would be more harmful as it would be significantly harder for air to get through. think of it in this sense; you arent measuring the airflow like a MAF where it needs to be perfect, you are trying to keep the air pressure as low as possible so air can get through the rad and out of the engine bay easier. dont be discouraged, proceed onward!


 08-17-2014, 07:15 PM
#21
Not that it should matter, but I'm glad you didn't. It's also entirely possible you are over thinking this. You already showed it works. Skip the shroud and just try the vent as is now that you cut out the grill. I'm guessing it works WAY better than no vent, even without the riveted on sheet you have. It also looks pretty good. Better without that.
Good luck at the track day!
Good luck at the track day!
08-18-2014, 10:04 AM
#22
Registered
Thread Starter
iTrader: (1)
Join Date: Jul 2013
Posts: 39
Likes: 0
Received 0 Likes
on
0 Posts
Temps got up to 220 at Barber this weekend. About 94 degrees, maybe 30-40% humidity...
First session they got to about 205 with 190 oil temps. Later in the day I'd get about 4 laps in before reaching 220 coolant and about 208 oil and having to do a cool down lap. Temps would drop relatively quickly to around 200.
I have a metal undertray, BHR Radiator, REmedy water pump, REmedy 170deg t-stat, well sealed radiator perimeter with foam, AEM intake with stock airbox tray removed... and the hood. STILL gets hot!! (only thing i haven't done is remove the condensor, and i don't want to do that )
)
First session they got to about 205 with 190 oil temps. Later in the day I'd get about 4 laps in before reaching 220 coolant and about 208 oil and having to do a cool down lap. Temps would drop relatively quickly to around 200.
I have a metal undertray, BHR Radiator, REmedy water pump, REmedy 170deg t-stat, well sealed radiator perimeter with foam, AEM intake with stock airbox tray removed... and the hood. STILL gets hot!! (only thing i haven't done is remove the condensor, and i don't want to do that
08-18-2014, 10:17 AM
#23
Buy a small battery like a deka\braille\odyssey or whatever life4po is out there and place it where the washer fluid bottle is.
At that point even a stock hood will do.
At that point even a stock hood will do.
08-18-2014, 05:09 PM
#24
Registered
Thread Starter
iTrader: (1)
Join Date: Jul 2013
Posts: 39
Likes: 0
Received 0 Likes
on
0 Posts
But, I doubt I'll see a very big change just moving the battery, at least enough of a change to justify the cost... expecially when I have to buy the battery, mount it, then modify cabling.

