DIY: You CAN lower the power seat!
 05-10-2012, 12:41 AM
#76

I just did this inside of 20 minutes. Took 5 minutes to locate the two bolts, a minute to unscrew them, about 10 minutes to get the brackets to the top of the frame and a couple more to thread the bolts back in from the top down.
This gained me about a 1/2 inch clearance which is all I needed to get my helmet to clear the roof liner.
This gained me about a 1/2 inch clearance which is all I needed to get my helmet to clear the roof liner.
i was plagued with so many problems, locating the bracket, getting my hand above the foam, loosening the bracket, sticking the washers and the bolt in there, wondering why i had no room to work, moving the seat back and forth to get more room, not to mention the hours i read and re read and re read and re read and re read and re read this thread to figure out what to do.
I COULD NOT HAVE DONE THIS MOD WITHOUT THE HELP OF GREEN! thanks again!


 ^^
05-11-2012, 01:15 AM
^^
05-11-2012, 01:15 AM
#78

I just did this inside of 20 minutes. Took 5 minutes to locate the two bolts, a minute to unscrew them, about 10 minutes to get the brackets to the top of the frame and a couple more to thread the bolts back in from the top down.
This gained me about a 1/2 inch clearance which is all I needed to get my helmet to clear the roof liner.
This gained me about a 1/2 inch clearance which is all I needed to get my helmet to clear the roof liner.
05-20-2012, 07:10 AM
#82
@hellbringer
I apologize. There is a typo in my 4/30 response. It should have said manual seat, for some stupid reason I said power seat.
The passenger seat is a manual seat as well. From the drawings in the parts list, it looks like the cloth driver seat is the same configuration as the manual passenger seat.
It seems that on some of the models the part of the seat cover that wraps around the back of the seat is very tight. This will make it hard to work with.
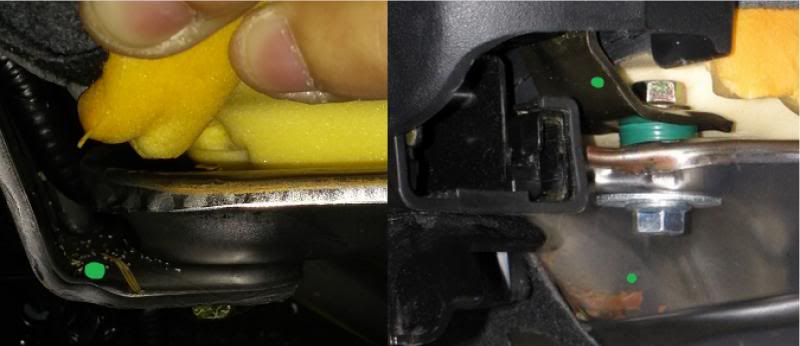
I scarfed this photobucket picture from earlier in this post.
http://i890.photobucket.com/albums/a...tunderside.jpg
The red circles show the brackets. If you look at the horizontal bar between the two circles, at the border of black material and the beginning of steel, you are looking at how the cloth that wraps around the back of the seat attaches to the bottom of the seat.
In this picture, you would pull it up, towards the front of the seat, and it would unhook the 2 tabs, one near each end. You can tell where they are in the picture by the rectangular hole between the right red circle and the two holes in the steel you can see foam through. You can see the one on the right, the one on the left is behind the wire loom. The rectangle is where the steel was punched out to make the tab. If it is unhooked, you can easily get it out of the way. If the seat is in the car, I would kneel outside the car, reach in with one arm, palm up, curl my fingers around the piece of plastic and push it toward the front of the car working one side at a time. If it will not come loose, you might need to pull the seat.
It could also all be glued together. My rear seats were glued in due to soda spilled before I bought the car.
I apologize. There is a typo in my 4/30 response. It should have said manual seat, for some stupid reason I said power seat.
The passenger seat is a manual seat as well. From the drawings in the parts list, it looks like the cloth driver seat is the same configuration as the manual passenger seat.
It seems that on some of the models the part of the seat cover that wraps around the back of the seat is very tight. This will make it hard to work with.
I scarfed this photobucket picture from earlier in this post.
http://i890.photobucket.com/albums/a...tunderside.jpg
The red circles show the brackets. If you look at the horizontal bar between the two circles, at the border of black material and the beginning of steel, you are looking at how the cloth that wraps around the back of the seat attaches to the bottom of the seat.
In this picture, you would pull it up, towards the front of the seat, and it would unhook the 2 tabs, one near each end. You can tell where they are in the picture by the rectangular hole between the right red circle and the two holes in the steel you can see foam through. You can see the one on the right, the one on the left is behind the wire loom. The rectangle is where the steel was punched out to make the tab. If it is unhooked, you can easily get it out of the way. If the seat is in the car, I would kneel outside the car, reach in with one arm, palm up, curl my fingers around the piece of plastic and push it toward the front of the car working one side at a time. If it will not come loose, you might need to pull the seat.
It could also all be glued together. My rear seats were glued in due to soda spilled before I bought the car.
09-07-2012, 03:07 PM
#83

Thread revival, I have done this to my driver power seat. Worked great, can finally drive with a helmet on, but the passenger seat.. That dang manuel seat is a pain, those brackets wont flip up as easy. I've tried pulling the pan down and pulling the bracket it up, but it wont budge. My woman is fairly tall along with me, so this would help her out, but i cant seem to flip that bracket on the passenger side. Any ideas? Thanks. [=
09-07-2012, 04:02 PM
#84
Alright!! After a long hard half hour, I figured out how to do the passenger seat, without taking it out of the car or anything. The manuel seats have different brackets! Yes they are different.. They have two push pin weld things so the bracket cant swivel up. All you need to do is just undo the bolts in the front that hold the pan up, and slide the seat cushion with the pan forward so the brackets are above the pan. Once thats done dont bolt the front up just yet. Bolt up the back bolts with the washers etc.. then bolt up the front, it took some time moving the seat back and forth, but it is possible! [= Thanks Green for this write up! Its awesome! Thinking about adding spacing to the front ones now, because when I push in the clutch pedal, the front of the seat is a bit high. Thank you again, hopefully this helps people with the manuel seats as well.
Last edited by <ARRXATE>; 09-07-2012 at 04:04 PM. Reason: typo
09-10-2012, 08:00 AM
#87
If you get the seat out in your adventures.....
My plan was to get to the foam, cut 1 to 1.5 inch diameter holes through the foam where my butt sits and where my legs go, then put it all back together. I think that will let me sink in deeper in those places, while still keeping the seat looking stock. Sinking in like that will also likely combat sliding around. I think a hole saw will work.
If it does not, I can just glue the plugs back in, or half a plug if I want a little more support.
09-12-2012, 02:04 PM
#88
Alright!! After a long hard half hour, I figured out how to do the passenger seat, without taking it out of the car or anything. The manuel seats have different brackets! Yes they are different.. They have two push pin weld things so the bracket cant swivel up. All you need to do is just undo the bolts in the front that hold the pan up, and slide the seat cushion with the pan forward so the brackets are above the pan. Once thats done dont bolt the front up just yet. Bolt up the back bolts with the washers etc.. then bolt up the front, it took some time moving the seat back and forth, but it is possible! [= Thanks Green for this write up! Its awesome! Thinking about adding spacing to the front ones now, because when I push in the clutch pedal, the front of the seat is a bit high. Thank you again, hopefully this helps people with the manuel seats as well.
tomorrow i will remove my sit to put pictures from my manual seat.........i was having a lot of work and i dint have time
04-27-2013, 01:09 PM
#89
MichRX-8
iTrader: (1)

Join Date: Jul 2012
Location: Michigan
Posts: 28
Likes: 0
Received 0 Likes
on
0 Posts
Here are a few extra pictures if anyone desired them... Just did this today. Be careful with the wiring, make sure when you are done that the fully-down seat slides back and forth without rubbing the wires


08-29-2013, 08:03 PM
#90
Registered

Join Date: Jul 2010
Posts: 15
Likes: 0
Received 0 Likes
on
0 Posts
Great Mod! Thanks to all the contributors.
Using 6 washers as a spacer I can now fit three fingers between the bottom of the back rest and the top of the seat bottom where they used to meet.
Using 6 washers as a spacer I can now fit three fingers between the bottom of the back rest and the top of the seat bottom where they used to meet.

 10-08-2013, 04:02 AM
#93

Albeit grave digging, I’d like to share my experience on this topic to further assist future potential modders. Let me start off by saying I was in the same situation as most of the members posting on this thread; I fit in the optimal seating position perfectly fine under the normal configuration (street driving), but as soon as track day came around I was forced to either rock a “gangsta lean” with the seat reclined further back or deal with my head hitting the roof all day… Not really sure which was the better option.
It was to the point where I was considering replacing the seats or buying a lesser equipped model. If I had known that in addition to the obvious weight savings, the manual seats and hard top provided more head room I might have purchased a base model in the first place... But I enjoy the amenities accompanied by the GT, and I just got a new motor so I won’t be changing vehicles any time soon. Obvious dilemma right?
So with a drift event coming up I was frantically attempting to solve the issue; trying to find a seating position that balanced comfort and performance, looking for a thinner helmet, different seats, you name it. Then suddenly I stumbled upon this thread. A practically free solution that only took a few minutes in the garage and lowered the aft portion of the seat nearly an inch, why not! After reading over every post a few times to piece together adequate information for the journey, I headed out to the local hardware store.
I decided to go with the M8-1.25 x 30mm bolts, and M8-1.25 nuts as described by the OP. I used 5/16 fender washers with a seemingly appropriate depth. The kind I purchased required 5 washers per side to place the nut flush with the top of the bolt. I wish I could recall the size, but I honestly just went with what looked right (sorry guys).
The procedure took about 40 minutes to complete. Most of which was from a fairly uncomfortable position with my head on the floorboard, but it wasn’t too bad. The seat/rail remained completely intact; the only fasteners that required removal were the two being replaced as aforementioned. No sensors needed to be moved or unplugged, although I did disconnect the battery in the measure of safety. The toughest part was working around the leather seat cover and foam padding. After being pulled aside there still wasn’t much room to work. But even then it was totally manageable, and I was able to complete mod in a reasonable amount of time with no major headaches.
Special considerations:
When installing the washers, make sure to use enough of them to push the nut flush with the top of the bolt. This not only maximizes drop, but prevents the smaller part of the bolt from penetrating the leather.
People who do this mod generally have long legs in addition to a long torso so it’s normally not an issue, but be advised that when all the way down, the seat bottom/sensors will bind with the floor pan when moved to a much further forward position. Obviously not an issue for us tall people, but be cautious when moving the seat forward to access the rear seats, or letting a shorter person drive for example. Fortunately the power seats provide a way around this. Just use the rear potion of the height adjustment to raise the seat a bit in advance of moving it forward. I let my shorter friend drive since performing the mod and it worked like a charm.
Driving feel:
Lowering only the rear portion of the seat at a considerable amount definitely feels different. Better or worse it takes some getting used to. I honestly feel more planted which is nice. Other benefits described by OP. The only notable difference is the obviously increased gap between the seat back and bottom. It creates the feel of less lumbar support, which I’d imagine would dissipate once adapted. I just adjust the rear height closer to stock for daily driving then drop it down for track use since I fit without hassle otherwise.
Opinion:
All that being said, I would ONLY perform this mod if you’re in a similar position (i.e. nearly fit and only require a very small amount of extra head room). If you really don’t fit now you still won’t afterwards. It might help a little, but you’re nearly putting swim fins on a cat at that point. Probably better off replacing the seats. It worked for me because the helmet was merely contacting the roof in the ideal position, not as much obtruding it. I only needed a little extra room when the helmet was on, and that was exactly what this mod provided. I’m happy with the results and hopefully you will be also. Thanks for reading, and feel free to contact me with any questions.
Last edited by 6speedrx; 10-08-2013 at 04:10 AM.
The following users liked this post:
rob babicki (06-07-2021)
03-13-2014, 09:58 PM
#94
Registered

Can't believe I waited so long before searching for this mod...
I'll be doing this on Saturday.
I took a pic of the original setup and made a before n after to help visualize without running out to the car and undoing the carpet piece to look, like I did
You guys saved my back and neck from further damage.
Thank you!
I'll be doing this on Saturday.
I took a pic of the original setup and made a before n after to help visualize without running out to the car and undoing the carpet piece to look, like I did
You guys saved my back and neck from further damage.
Thank you!
The following users liked this post:
rob babicki (06-07-2021)
03-13-2014, 10:35 PM
#95
Registered
And if anyone has difficulties removing the carpet piece by pushing it forward - I just pulled it gently down and back, and the metal piece it was hooked on to bent, making it easier to unhook. after I snapped the pic, I hooked on, bent it back into place. 
Last edited by hoonee46; 03-13-2014 at 10:44 PM.
03-14-2014, 08:59 AM
#96
Update,
I did the foam mod I mentioned above. I had to remove the seat, remove the seat cover, and I drilled 3/4 of the way through with an inch and a half hole saw in 4 places in the thickest part. Then, due to my butt size, I had to shave an inch off the bottom and sides. That got me another half an inch. I seem to have lost the photos. Sorry. If I find the pieces I cut off, I will at least post them.
I did the foam mod I mentioned above. I had to remove the seat, remove the seat cover, and I drilled 3/4 of the way through with an inch and a half hole saw in 4 places in the thickest part. Then, due to my butt size, I had to shave an inch off the bottom and sides. That got me another half an inch. I seem to have lost the photos. Sorry. If I find the pieces I cut off, I will at least post them.
07-22-2014, 05:12 PM
#98

The helmets you folks have must be REALLY thick. I have the power seats and sun roof and fit with a bit of room to spare with the seat all the way back, all the way down, and slightly reclined. I'm a bit over 6' 7".
09-22-2015, 04:49 AM
#99
Registered

I've done this, and it DOES help!
HOWEVER, there's a metal bar that runs across the bottom of the seat back. That metal bar is now right across my waist, and is aggravating when I push in my (rather heavy stage 1...) clutch. Anyone else having this issue? I'm finding that I have to crank the seat back up to "stock" when daily driving and then lower it for track/autocross.
Cloth seat, BTW.
Last edited by hufflepuff; 09-22-2015 at 04:54 AM.
01-22-2016, 09:33 AM
#100
New Member

Join Date: Aug 2015
Posts: 4
Likes: 0
Received 0 Likes
on
0 Posts
I'm looking into doing this, at the moment it just seems to be my hair scraping it which is quite annoying every time I have to look left or right. I'm currently having to do the "gangsta pose" to avoid that but after a while it's just uncomfortable and frustrating. I have a 2006 GT with sunroof and leather power seat which I hear are massive headroom eaters.

