DIY: Wiring a 4 channel LOC
 11-29-2007, 08:39 PM
#1
I made some poos
Thread Starter
iTrader: (1)

Join Date: Sep 2005
Location: Pittsburgh, PA
Posts: 841
Likes: 0
Received 0 Likes
on
0 Posts
DIY: Wiring a 4 channel LOC
DIY: Wiring an LOC to the Base Radio
PART 1
PLEASE READ THIS ENTIRELY BEFORE BEGINNING YOUR PROJECT
BACKGROUND:
I am not an audio guru, I definitely don't know everything. Just a regular guy who couldn't stand the stock radio anymore. I decided to upgrade and in a hastiness to get parts I used a cheap LOC that has since died (no sound from LF speaker). So I figured that when I got my good LOC in, I would take some pics installing it and make a DIY which you are reading now. There is alot of info on this site that you could figure out how to wire an LOC, but its not all in one place so I put it all here!
My system consists of:
Alpine MRP-F450
Infinity Kappa 680.7cs
Infinity Kappa 693.7i
GOALS:
Today I will show you how to wire a 4 channel LOC to the BASE radio in order to add an aftermarket amp to the system. I will also explain how to wire the LOC to the BOSE radio at the bottom of the page. I don't have a BOSE system but the principals are exactly the same. I will NOT be discussing how to wire an AMP as there is more than enough info on this site to help you do that.
WARNINGS:
1. Most of this information was found on these Forums in the stickys so please read them before attempting this!
2. If you don't feel comfortable cutting up and soldering the wiring in your new car then maybe you should let a professional installer do it.
3. Make sure that the wires you cut are the right ones. If you don't feel comfortable in your repair ability then don't attempt this.
4. DON'T get discouraged with all these warnings. This is a relatively simple thing to to. TAKE YOUR TIME AND YOU"LL BE FINE
TIPS:
1. Practice soldering outside of the car before you do it for real I've been soldering for 5 years and I am still not super awesome at it!
2. Use a solder on the thinner side. It takes less heat to melt it and can save some time. Not to mention the wires are 18g and they don't need a huge glob to make the connection.
3. Use the proper tools, it may cost more money to get the right tools, but will save you tons of time doing things the right way.
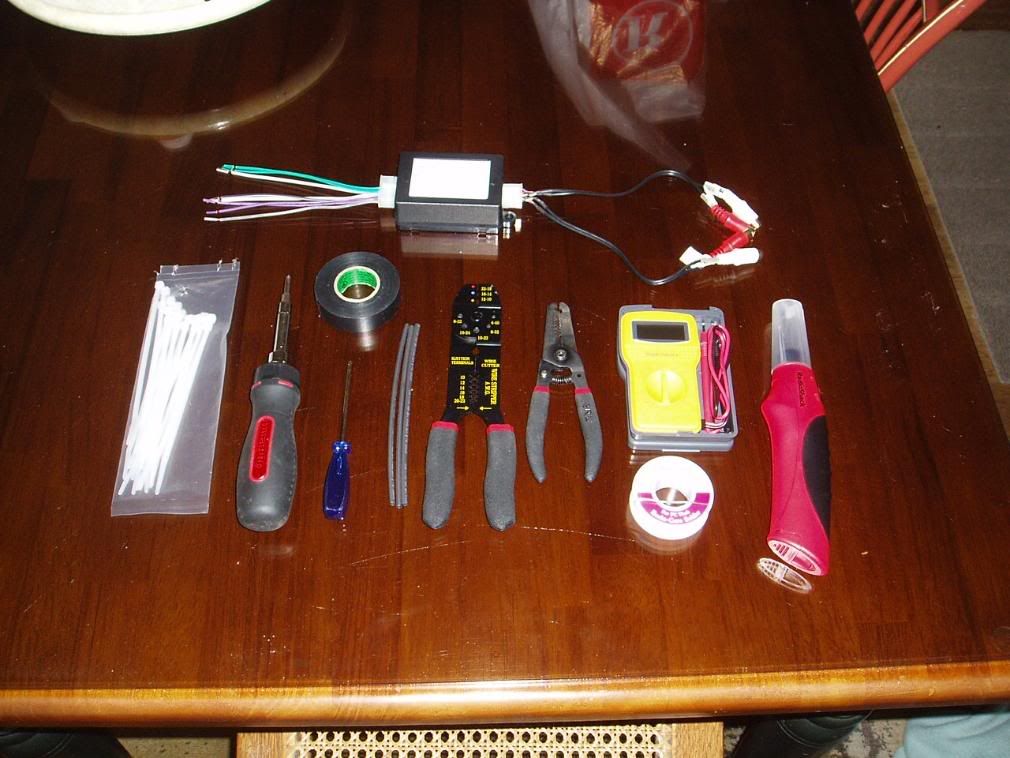
THINGS YOU NEED:
A Line Output Converter (DUH!)
Signal Wires
Wire ties
Wire Cutters
Wire Strippers
Soldering Iron
60-40 Rosin Core Solder (Get it Thin)
Heatshrink Tubing
Lighter or Mini Torch
Digital Multimeter (optional but always good to diagnose problems and check connections)
Medium Flat Head Screwdriver
Phillips Head Screwdriver
10mm Socket
Socket wrench with extensions
Electrical Tape
Patience!!!
LETS GET STARTED:
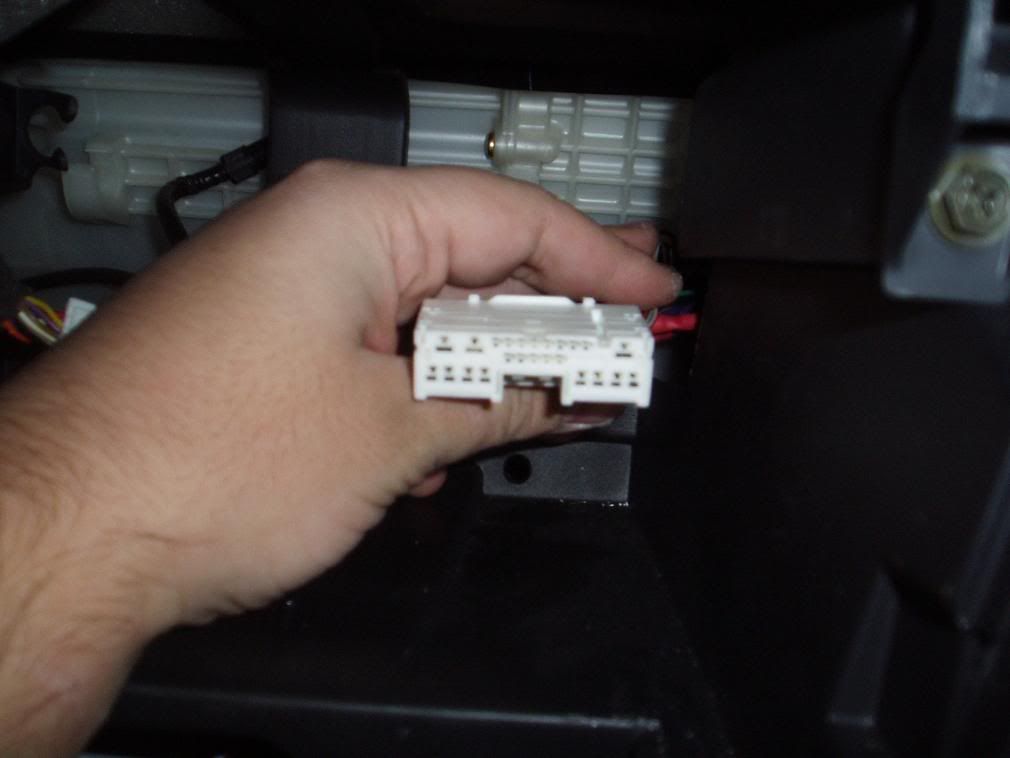
1. First remove the Radio, instructions for this can be found here on pages 1-6. After removing that 10mm pain in the *** bolt I "lost it" with no ill effects to my radio. It will also help to remove the glovebox. Instructions on glovebox removal.
2. The harness you need is the one that is connected to the bottom left of the radio if you were to look at it from the back. I find it easiest to push the harness back and to the right so that it comes out at the front passengers footwell and you will have a good amount of room to work with.
Picture of Harness:
Picture of Where it should be when you push it out the back:

3. After identifying the proper harness you will need to identify the wires that go from this harness to the speakers.
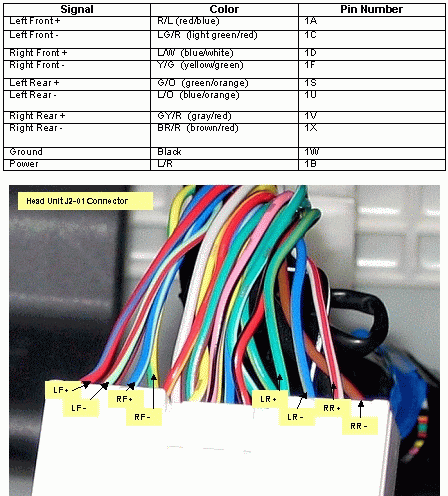
Here is the Pinout of this Harness looking at it from the back:
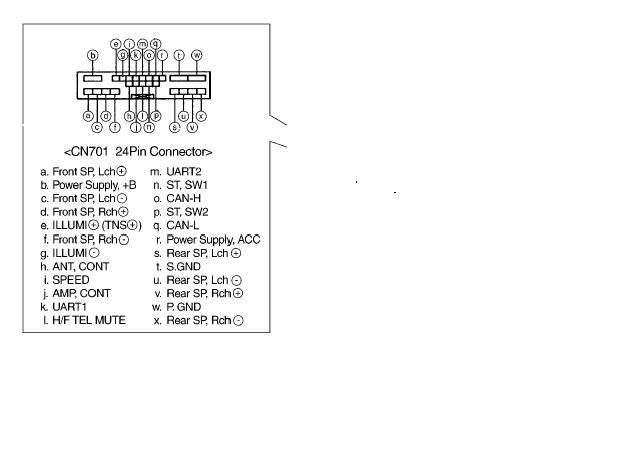
The Wires in connections A,C,D,F and S,U,V,X are the ones we are looking for.
Their colors and roles are as follows:
A - Left Front Speaker + Color= RED
C - Left Front Speaker - Color= WHITE
D - Right Front Speaker + Color= WHITE/RED
F - Right Front Speaker - Color= YELLOW/RED
S - Left Rear Speaker + Color= PURPLE
U - Left Rear Speaker - Color= PINK
V - Right Rear Speaker + Color= WHITE/BLUE
X - Right Rear Speaker - Color= BLACK/BLUE
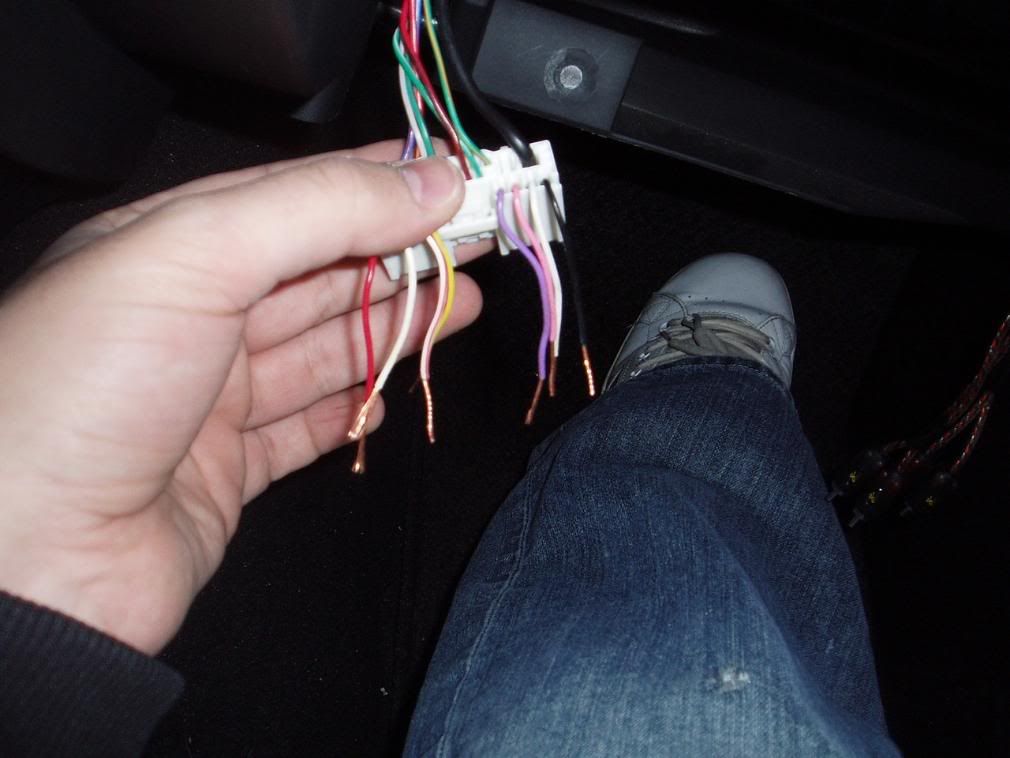
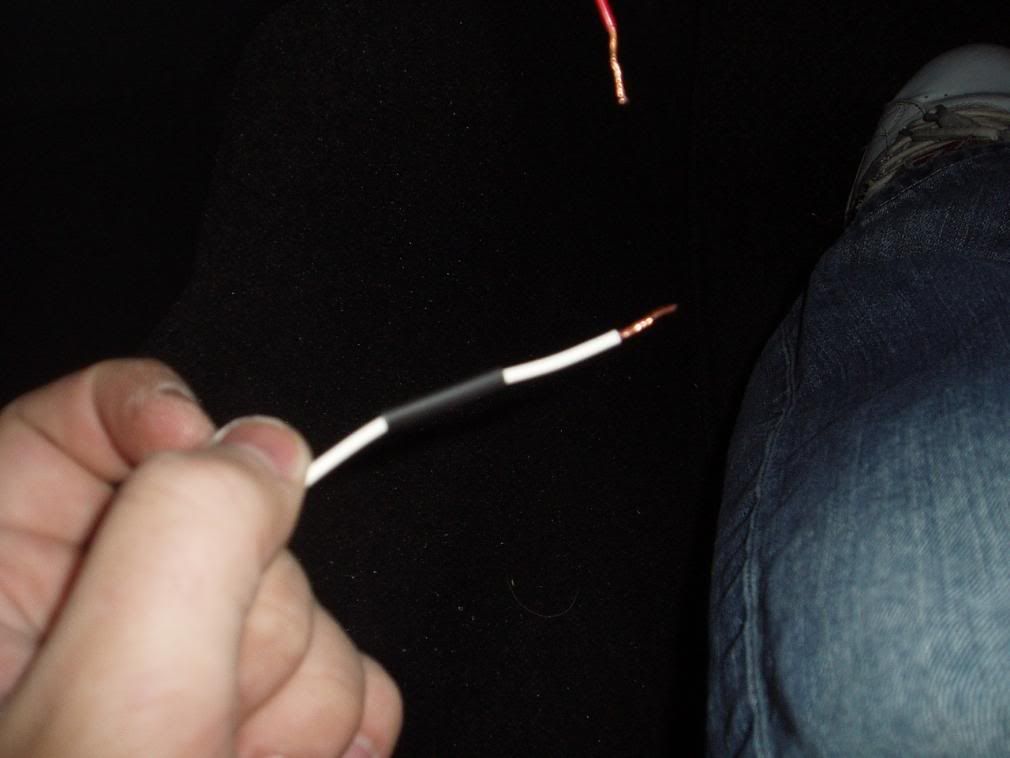
4. Cut the Wires identified in step three about 3-4 inches back from the harness. Then strip the ends about 3/8 of an inch down. DO NOT cut them directly at the harness as we need them to be connected to the LOC
Here is a picture of the wires cut:

And the wires stripped:
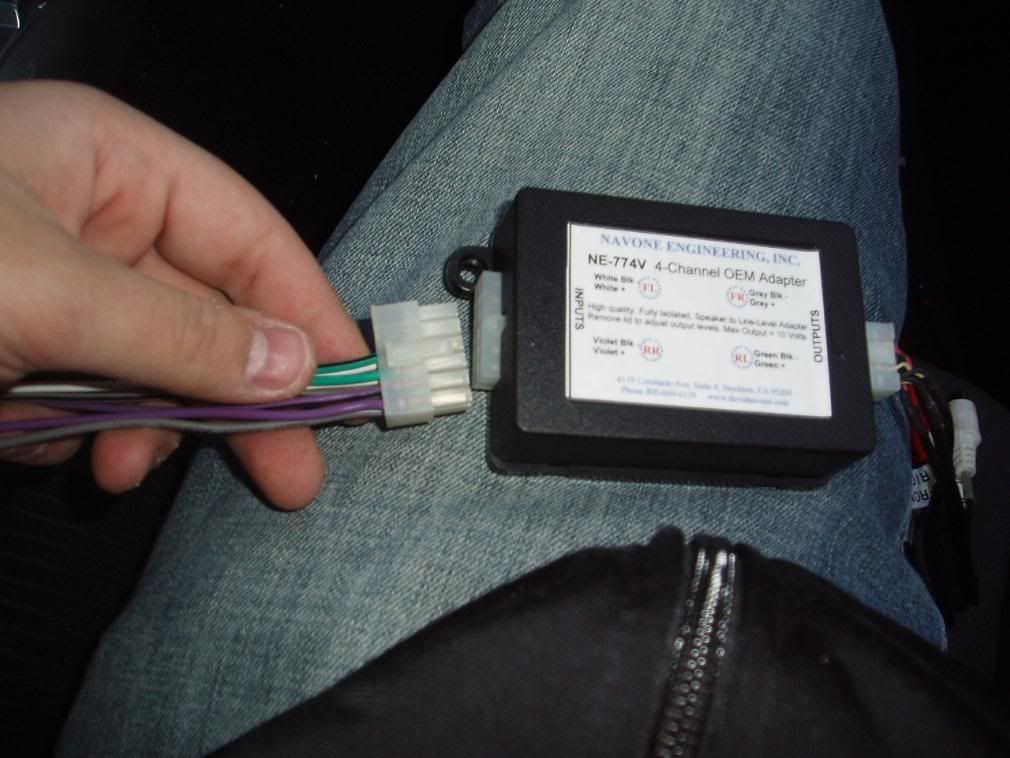
5. I am using the Navone Engineering NE774V as the LOC. It has detchable connections for the inputs and outputs which most LOCs should have. Go ahead and disconnect the Inputs connection and set aside the rest of the unit, we don't need it yet. This is done so you don't damage the internals of the unit while soldering (Remeber that heat travels)
NE-774V:
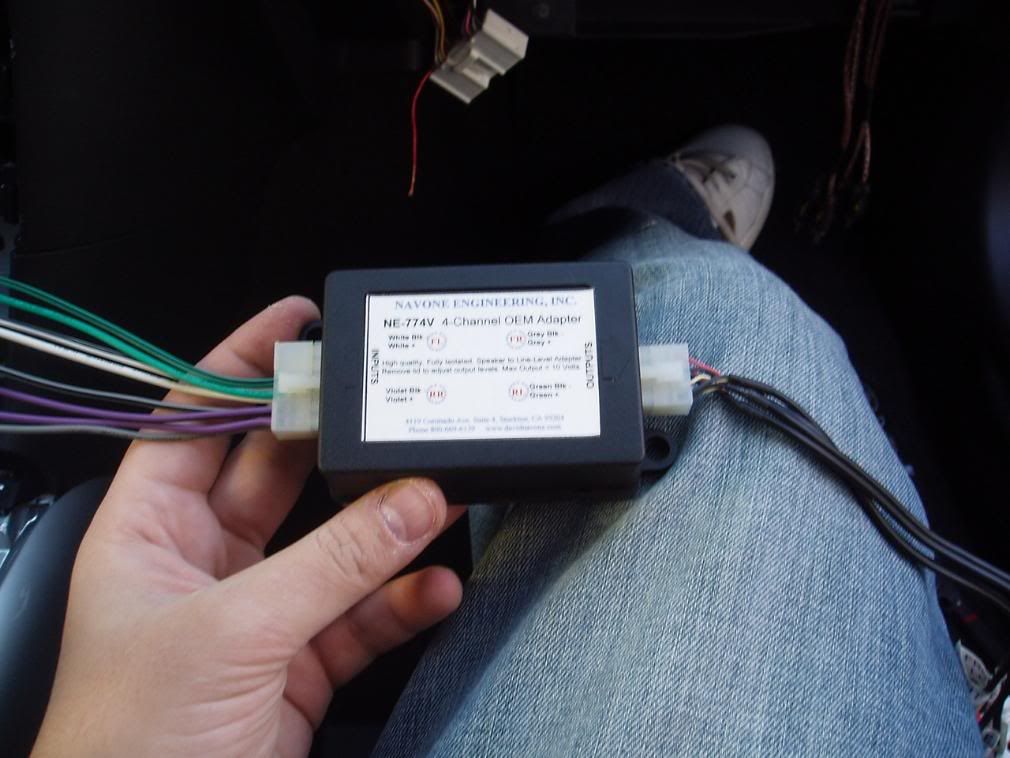
Connection you need to disconnect:
6. Most aftermarket stereo equipment goes by a standard color format which is as follows:
White: LF+
White/Black: LF-
Grey: RF+
Grey/Black: RF-
Green: LR+
Green/Black: LR-
Purple: RR+
Purple/Black: RR-
The NE774v that I am using is cool enough to even have this information written on the wires themselves, I tried to get a picture of this but my camera sucks.
The connections that need to be made are as follows:
On NE774V to Wires out of Harness:
White to RED
White/Black to WHITE
Grey to WHITE/RED
Grey/Black to YELLOW/RED
Green to PURPLE
Green/Black to PINK
Purple to WHITE/BLUE
Purple/Black to BLACK/BLUE
On to PART TWO...
PART 1
PLEASE READ THIS ENTIRELY BEFORE BEGINNING YOUR PROJECT
BACKGROUND:
I am not an audio guru, I definitely don't know everything. Just a regular guy who couldn't stand the stock radio anymore. I decided to upgrade and in a hastiness to get parts I used a cheap LOC that has since died (no sound from LF speaker). So I figured that when I got my good LOC in, I would take some pics installing it and make a DIY which you are reading now. There is alot of info on this site that you could figure out how to wire an LOC, but its not all in one place so I put it all here!
My system consists of:
Alpine MRP-F450
Infinity Kappa 680.7cs
Infinity Kappa 693.7i
GOALS:
Today I will show you how to wire a 4 channel LOC to the BASE radio in order to add an aftermarket amp to the system. I will also explain how to wire the LOC to the BOSE radio at the bottom of the page. I don't have a BOSE system but the principals are exactly the same. I will NOT be discussing how to wire an AMP as there is more than enough info on this site to help you do that.
WARNINGS:
1. Most of this information was found on these Forums in the stickys so please read them before attempting this!
2. If you don't feel comfortable cutting up and soldering the wiring in your new car then maybe you should let a professional installer do it.
3. Make sure that the wires you cut are the right ones. If you don't feel comfortable in your repair ability then don't attempt this.
4. DON'T get discouraged with all these warnings. This is a relatively simple thing to to. TAKE YOUR TIME AND YOU"LL BE FINE
TIPS:
1. Practice soldering outside of the car before you do it for real I've been soldering for 5 years and I am still not super awesome at it!
2. Use a solder on the thinner side. It takes less heat to melt it and can save some time. Not to mention the wires are 18g and they don't need a huge glob to make the connection.
3. Use the proper tools, it may cost more money to get the right tools, but will save you tons of time doing things the right way.
THINGS YOU NEED:
A Line Output Converter (DUH!)
Signal Wires
Wire ties
Wire Cutters
Wire Strippers
Soldering Iron
60-40 Rosin Core Solder (Get it Thin)
Heatshrink Tubing
Lighter or Mini Torch
Digital Multimeter (optional but always good to diagnose problems and check connections)
Medium Flat Head Screwdriver
Phillips Head Screwdriver
10mm Socket
Socket wrench with extensions
Electrical Tape
Patience!!!
LETS GET STARTED:
1. First remove the Radio, instructions for this can be found here on pages 1-6. After removing that 10mm pain in the *** bolt I "lost it" with no ill effects to my radio. It will also help to remove the glovebox. Instructions on glovebox removal.
2. The harness you need is the one that is connected to the bottom left of the radio if you were to look at it from the back. I find it easiest to push the harness back and to the right so that it comes out at the front passengers footwell and you will have a good amount of room to work with.
Picture of Harness:
Picture of Where it should be when you push it out the back:
3. After identifying the proper harness you will need to identify the wires that go from this harness to the speakers.
Here is the Pinout of this Harness looking at it from the back:
The Wires in connections A,C,D,F and S,U,V,X are the ones we are looking for.
Their colors and roles are as follows:
A - Left Front Speaker + Color= RED
C - Left Front Speaker - Color= WHITE
D - Right Front Speaker + Color= WHITE/RED
F - Right Front Speaker - Color= YELLOW/RED
S - Left Rear Speaker + Color= PURPLE
U - Left Rear Speaker - Color= PINK
V - Right Rear Speaker + Color= WHITE/BLUE
X - Right Rear Speaker - Color= BLACK/BLUE
4. Cut the Wires identified in step three about 3-4 inches back from the harness. Then strip the ends about 3/8 of an inch down. DO NOT cut them directly at the harness as we need them to be connected to the LOC
Here is a picture of the wires cut:
And the wires stripped:
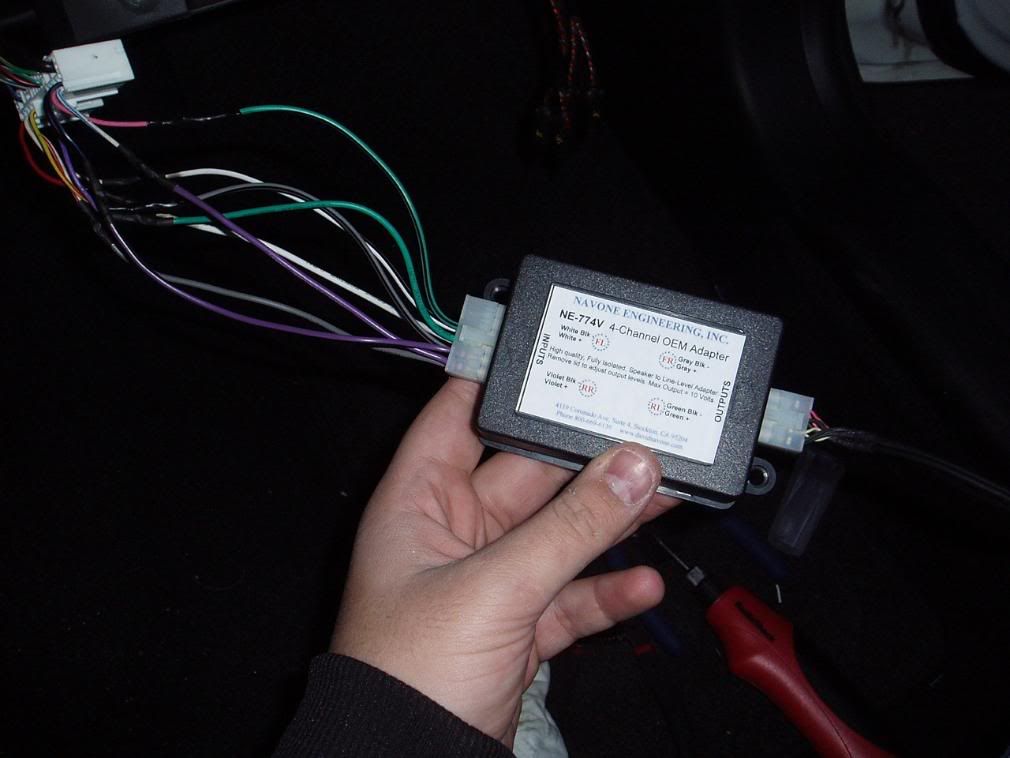
5. I am using the Navone Engineering NE774V as the LOC. It has detchable connections for the inputs and outputs which most LOCs should have. Go ahead and disconnect the Inputs connection and set aside the rest of the unit, we don't need it yet. This is done so you don't damage the internals of the unit while soldering (Remeber that heat travels)
NE-774V:
Connection you need to disconnect:
6. Most aftermarket stereo equipment goes by a standard color format which is as follows:
White: LF+
White/Black: LF-
Grey: RF+
Grey/Black: RF-
Green: LR+
Green/Black: LR-
Purple: RR+
Purple/Black: RR-
The NE774v that I am using is cool enough to even have this information written on the wires themselves, I tried to get a picture of this but my camera sucks.
The connections that need to be made are as follows:
On NE774V to Wires out of Harness:
White to RED
White/Black to WHITE
Grey to WHITE/RED
Grey/Black to YELLOW/RED
Green to PURPLE
Green/Black to PINK
Purple to WHITE/BLUE
Purple/Black to BLACK/BLUE
On to PART TWO...
 11-29-2007, 08:45 PM
#2
I made some poos
Thread Starter
iTrader: (1)
Join Date: Sep 2005
Location: Pittsburgh, PA
Posts: 841
Likes: 0
Received 0 Likes
on
0 Posts
DIY: Wiring a 4 channel LOC
PART 2
7. Now that you know what needs to be connected and where it needs to be connected to it is TIME TO SOLDER!! If you don't feel comfortable soldering then you can use Butt Connectors but you will ultimately get a better connection if you solder. It will also look better and last longer.
Start by placing a 1 to 1.5 inch piece of heatshrink tubing over the wire and push it away from the end:
Make two "hooks" with the first connections exposed wires and hook them together:
Then twist the ends back on themselves:

Place the heated soldering iron onto the bottom of the connection and let it sit for about 10-15 seconds or so:
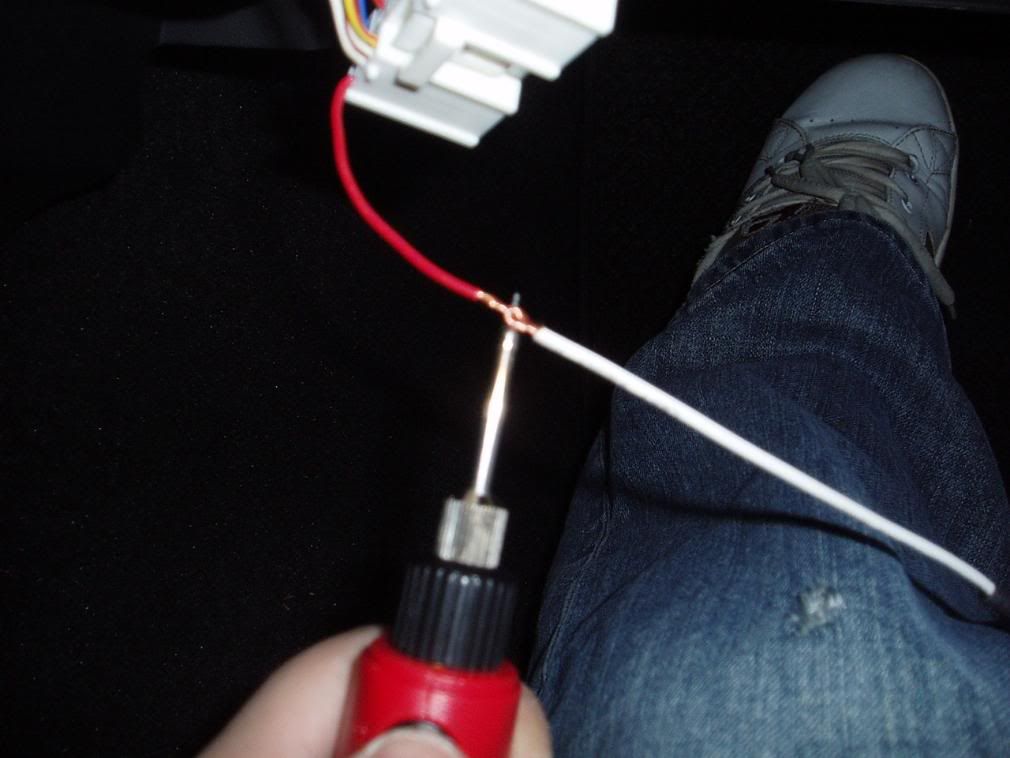
Now touch the solder to the exposed wire on the top, NOT THE IRON. If the wire is heated up enough the solder will sink into the wire and bind them together:
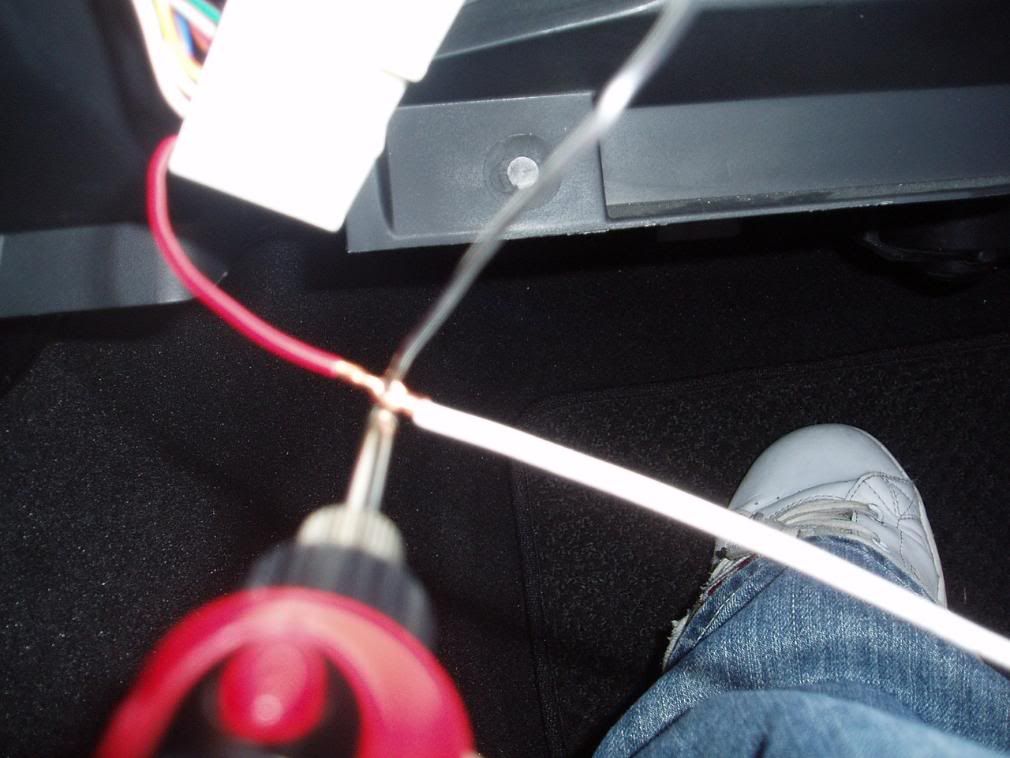
Let it cool fully and check your connections using the Ohm Setting on your Digital Multimeter set to 200k. You should see a reading of 0.0 when it has settled, if not then you have a bad connection.
Now slide the heatshrink tubing over the connection you just made and heat it with a lighter to shrink it around the connection. 7 more times and you will have this:
Here is a great video on how to solder for those new to the concepts:
Popular Mechanics, How to Solder
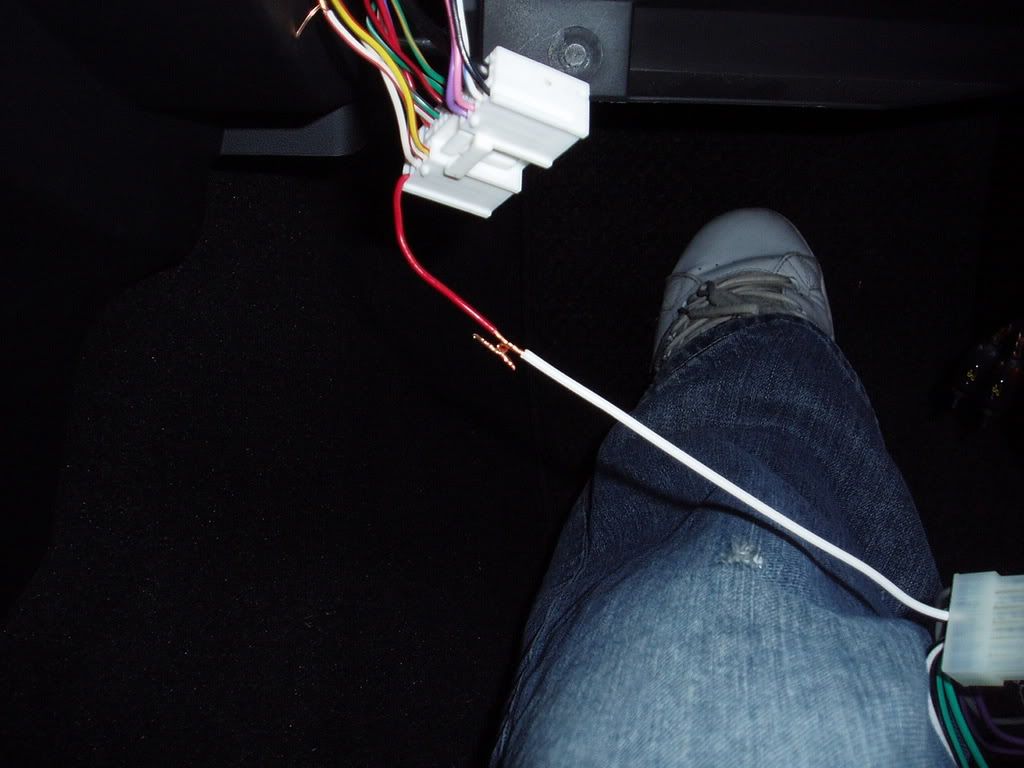
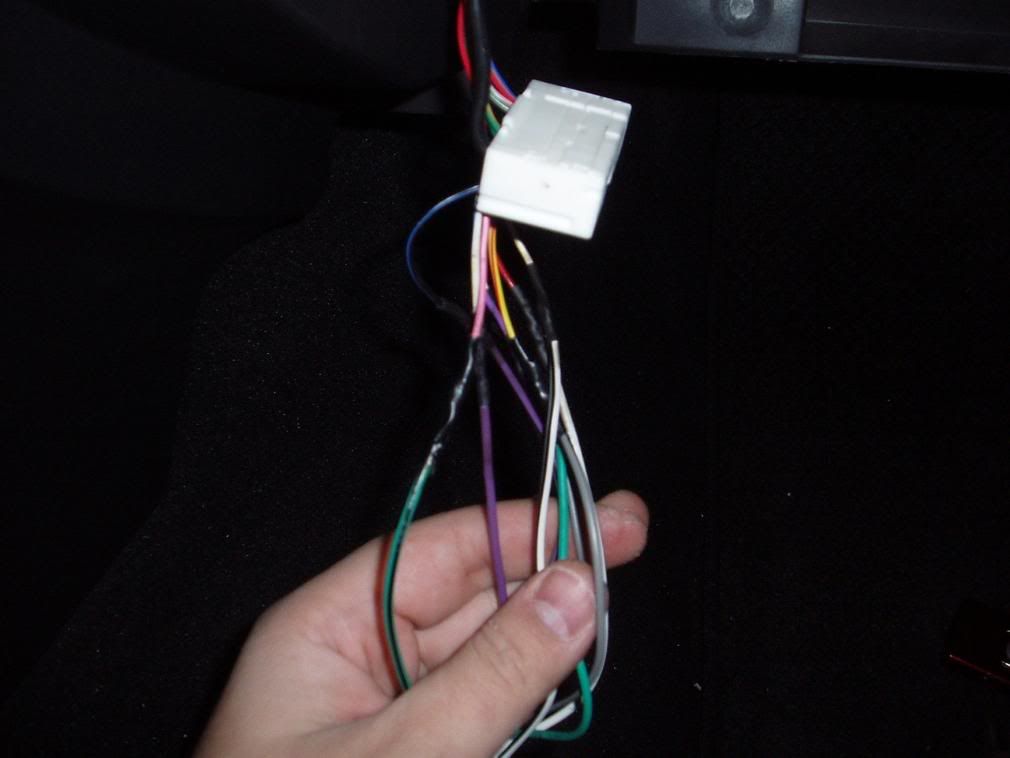
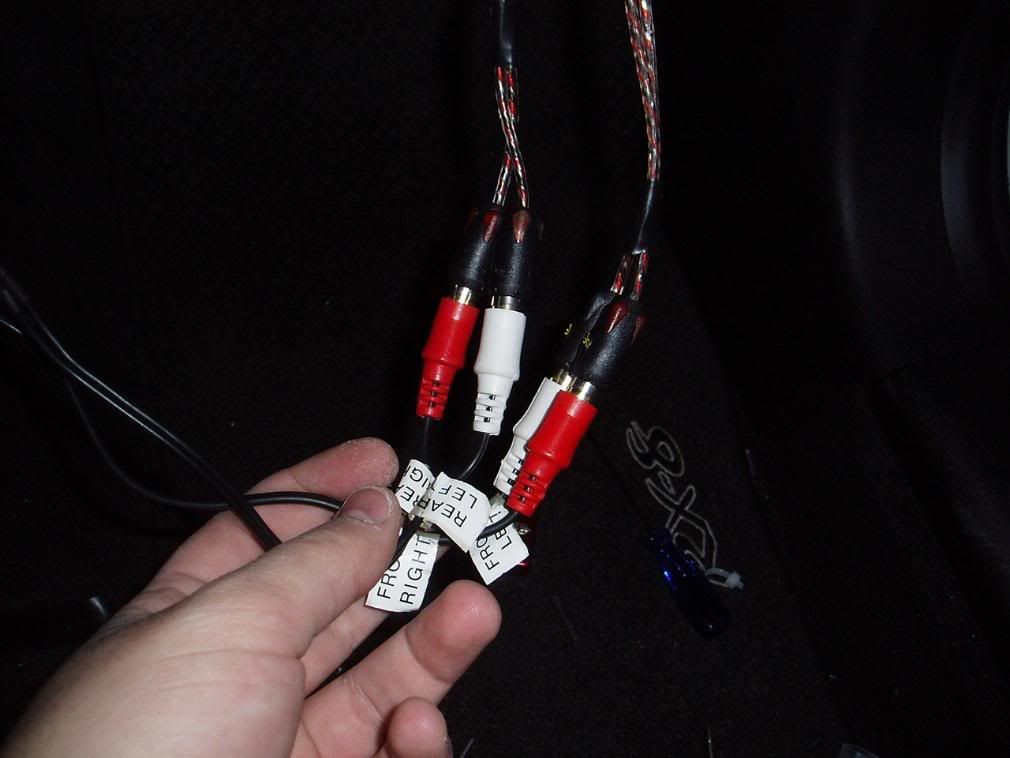
8. Now that all the wires are connected you can connect the LOC back to the inputs harness:
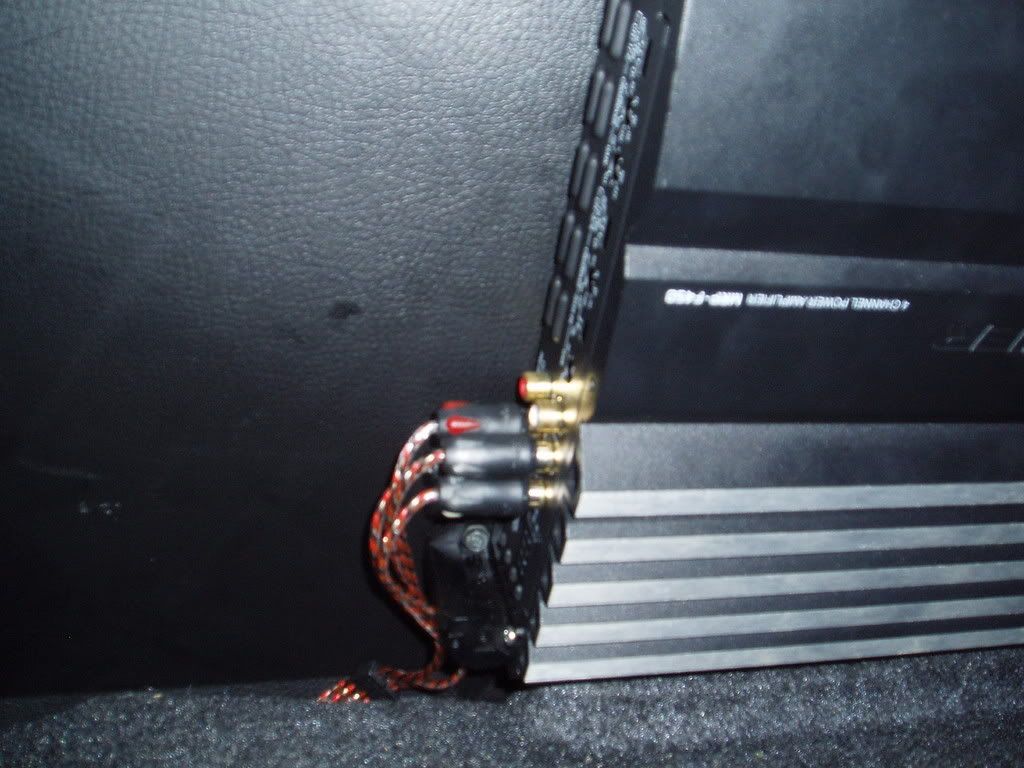
9. Connect your signal wires to the ouputs end of the LOC and run them to wherever your amp will be.
Amp in the trunk:
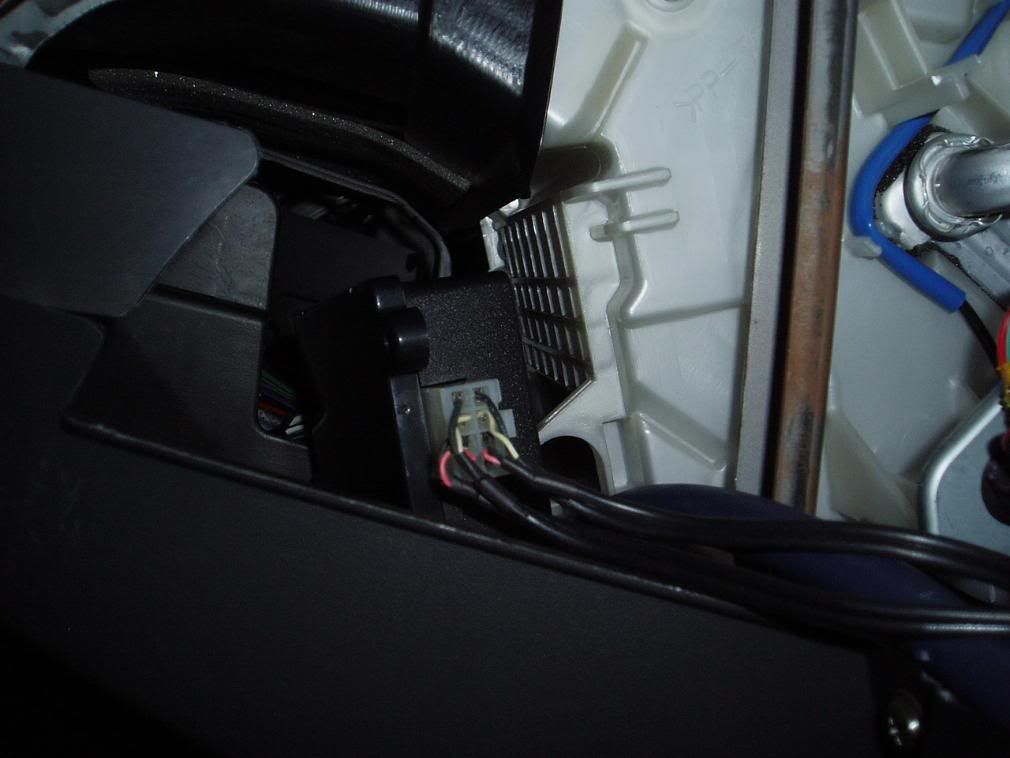
And find a place to put the LOC. I attached mine behind and to the left of the glovebox. There is an area that is pretty open between the glove box and radio:
10. You have now sucessfully installed a LOC onto your BASE radio! Now wire up that amp!
SOME NOTES:
To Wire the speakers up all I did was run wire from the speaker outs of my amp to the other end of the wires from the harness I cut, which puts the amp in-line with the stock wiring. I've found that the 18g stock wiring is enough for the 100watts per corner I am running now. Anything past that and you should be looking to upgrade the wiring (READ: Pain in the ***).
Here are some pictures of what I did:
Amp in back w/speaker outputs:

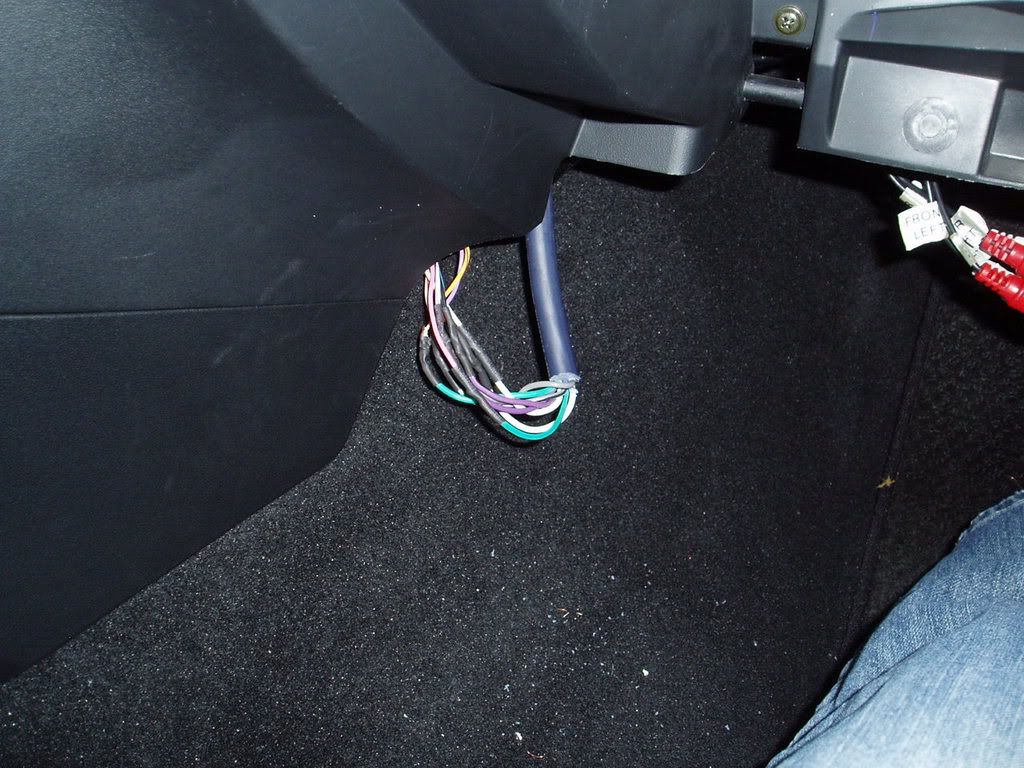
Those wires up front:
FOR A BOSE SYSTEM:
There are a few differences but the idea is exactly the same:
1. The wire colors are different from the Base radio but are as follows:
2. You don't need to take out the radio as all of these wires are in the trunk at the Bose AMP. Just cut them BEFORE they enter the amp.
3. Unlike a base radio, you don't have the option to just run wires to the wires you cut as it will go from your amp to the Bose amp and then to the speakers (NOT GOOD). You will have to run new wires, the rears are easy as your amp should be in the back and so are the rear speakers! The fronts are harder, you will have to go through the molex in the doors and run wire through them to your front speakers. How to run wire through the molex
If there are any questions post them here or PM me and I will try to help.
Good Luck!!
7. Now that you know what needs to be connected and where it needs to be connected to it is TIME TO SOLDER!! If you don't feel comfortable soldering then you can use Butt Connectors but you will ultimately get a better connection if you solder. It will also look better and last longer.
Start by placing a 1 to 1.5 inch piece of heatshrink tubing over the wire and push it away from the end:
Make two "hooks" with the first connections exposed wires and hook them together:
Then twist the ends back on themselves:
Place the heated soldering iron onto the bottom of the connection and let it sit for about 10-15 seconds or so:
Now touch the solder to the exposed wire on the top, NOT THE IRON. If the wire is heated up enough the solder will sink into the wire and bind them together:
Let it cool fully and check your connections using the Ohm Setting on your Digital Multimeter set to 200k. You should see a reading of 0.0 when it has settled, if not then you have a bad connection.
Now slide the heatshrink tubing over the connection you just made and heat it with a lighter to shrink it around the connection. 7 more times and you will have this:
Here is a great video on how to solder for those new to the concepts:
Popular Mechanics, How to Solder
8. Now that all the wires are connected you can connect the LOC back to the inputs harness:
9. Connect your signal wires to the ouputs end of the LOC and run them to wherever your amp will be.
Amp in the trunk:
And find a place to put the LOC. I attached mine behind and to the left of the glovebox. There is an area that is pretty open between the glove box and radio:
10. You have now sucessfully installed a LOC onto your BASE radio! Now wire up that amp!
SOME NOTES:
To Wire the speakers up all I did was run wire from the speaker outs of my amp to the other end of the wires from the harness I cut, which puts the amp in-line with the stock wiring. I've found that the 18g stock wiring is enough for the 100watts per corner I am running now. Anything past that and you should be looking to upgrade the wiring (READ: Pain in the ***).
Here are some pictures of what I did:
Amp in back w/speaker outputs:
Those wires up front:
FOR A BOSE SYSTEM:
There are a few differences but the idea is exactly the same:
1. The wire colors are different from the Base radio but are as follows:
2. You don't need to take out the radio as all of these wires are in the trunk at the Bose AMP. Just cut them BEFORE they enter the amp.
3. Unlike a base radio, you don't have the option to just run wires to the wires you cut as it will go from your amp to the Bose amp and then to the speakers (NOT GOOD). You will have to run new wires, the rears are easy as your amp should be in the back and so are the rear speakers! The fronts are harder, you will have to go through the molex in the doors and run wire through them to your front speakers. How to run wire through the molex
If there are any questions post them here or PM me and I will try to help.
Good Luck!!
 11-30-2007, 12:25 AM
#5

2. You don't need to take out the radio as all of these wires are in the trunk at the Bose AMP. Just cut them BEFORE they enter the amp.
3. Unlike a base radio, you don't have the option to just run wires to the wires you cut as it will go from your amp to the Bose amp and then to the speakers (NOT GOOD). You will have to run new wires, the rears are easy as your amp should be in the back and so are the rear speakers! The fronts are harder, you will have to go through the molex in the doors and run wire through them to your front speakers. How to run wire through the molex
11-30-2007, 10:41 AM
#6
I made some poos
Thread Starter
iTrader: (1)
Join Date: Sep 2005
Location: Pittsburgh, PA
Posts: 841
Likes: 0
Received 0 Likes
on
0 Posts
I don't have a bose so all of my information is from the forums but I will try to help.
Short answer is no.
1. Speaker level or high level inputs are never a really good idea
2. There are seperate amps in the 2 front doors for the speakers inside them. So even if you took it off the inputs side then wired the speaker outs of the new amp to the bose amps outputs in the rear, basically replacing the bose amp with an afftermarket amp, the fronts would still be going through the amps in the doors as well.
What you could probably do is cut the wiring from the inputs side of the front amps, and run wire straight from the cut inputs to the new speakers, which would bypass the front amps and you wouldn't have to run wires through the molex. This is just an idea though, so hopefully someone who has replaced the bose could help more.
 11-30-2007, 05:58 PM
#8
I made some poos
Thread Starter
iTrader: (1)
Join Date: Sep 2005
Location: Pittsburgh, PA
Posts: 841
Likes: 0
Received 0 Likes
on
0 Posts
Yes, you can run the wires straight from the headunit to the Amp if the amp has speaker level inputs. In my experieces though, it is better to use an LOC to convert the signal to low level and then use that for the amps signal.
12-04-2007, 12:32 AM
#10
I made some poos
Thread Starter
iTrader: (1)
Join Date: Sep 2005
Location: Pittsburgh, PA
Posts: 841
Likes: 0
Received 0 Likes
on
0 Posts
thats exactly what I had when I had subs, but decided to get rid of them to save some weight. I could actually feel a difference after the heavy *** box was removed.

Thread
Thread Starter
Forum
Replies
Last Post
Danield97
Series I Trouble Shooting
1
09-30-2015 05:59 PM
Learners_Permit
Series I Interior, Audio, and Electronics
8
09-27-2015 07:38 PM

