DIY: Stainless Steel Clutch Line/Clutch Bleeding
 01-10-2011, 10:33 AM
#1

DIY: Stainless Steel Clutch Line/Clutch Bleeding
I decided to do a write up after replacing my clutch line, with how to replace and properly bleed the system. If you follow these steps you can avoid problems, especially if you follow these steps for bleeding the system. It will keep you from creating a massive air pocket in the slave cylinder.
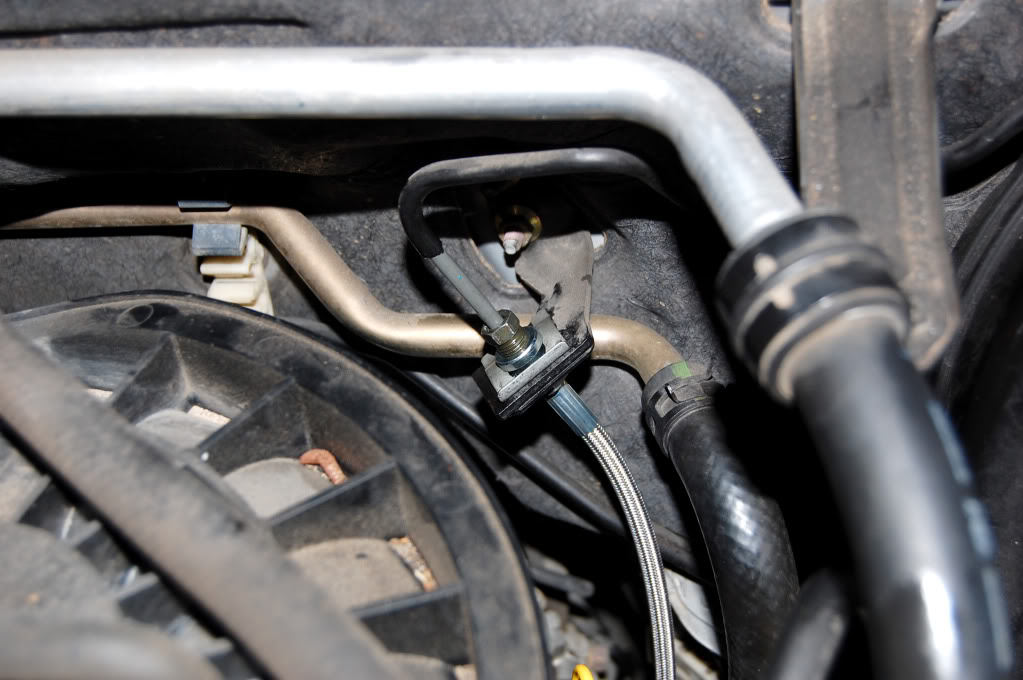
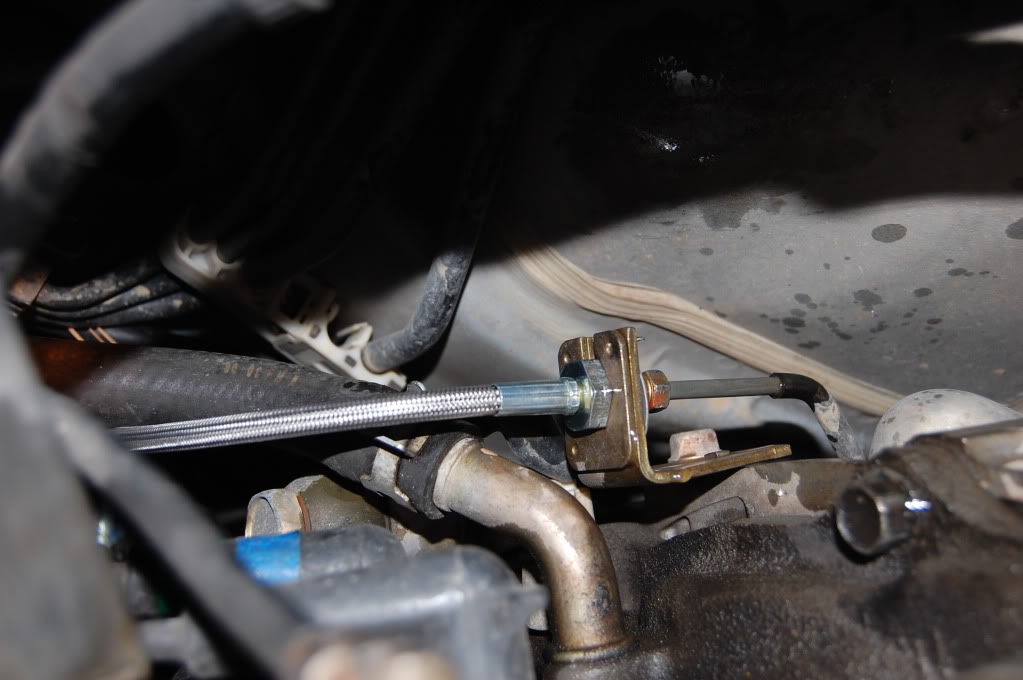
These photos show you where all the fittings are. They also show you the parts in my terminology.
READ ALL STEPS BEFORE ATTEMPTING.
IF YOU DO NOT KNOW HOW TO BLEED LINES THIS IS NOT A PROJECT FOR YOU TO DO. MAKE SURE SOMEONE ON THE PROJECT KNOWS HOW TO BLEED A SYSTEM. PREFERABLY THE PERSON UNDER THE CAR.
Larger photos can be found in the Album Here:http://s151.photobucket.com/albums/s...Clutch%20Line/
I recommend two people for this project. With two people you can have it done in about 15-20 mins on your first try.
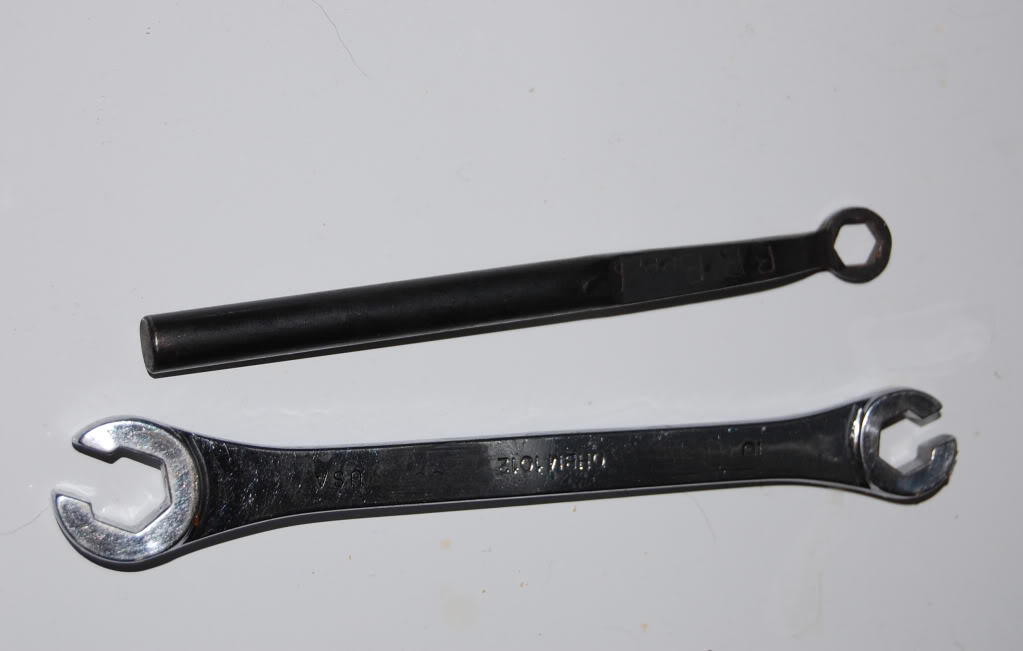
Step one find the RIGHT TOOLS! This part is extremely important. Do not use an open ended wrench. You can damage the lines. With the wrong tool these lines can be collapsed and you do not want to have to replace them. Its an incredible amount of work and engineering to do this. If you don't have the right tools buy them first. Don't get in a hurry or try to wing this. The damage you can cause is expensive and time consuming. It requires 5 things to do this. First you will need to either buy or create your clutch line. I made my own, but you can get them for about 30 dollars from a lot of different vendors. If you do not have experience in making lines and fittings properly then just go out and buy one. The second thing you need is DOT 4, or High Temp brake fluid. You can pretty much find this stuff any where. You wont need a lot if you follow these steps properly. The tools you will need are very specialized tools. Buy, Borrow, or Rent but get the right tool. The first one is a 10mm Line Wrench. Pictured below it prevents damage to the fragile and easily crushed or fractured lines. The second is an 8mm (13/16) bleeding wrench. Its angled to make bleeding systems a lot easier. The last tool you will need is a vice grip. I did not take a picture of it because well we all know what a vice grip looks like (hopefully). The vice grip will only be used twice, but it keeps the spring clip from flying off when you pull it. You can use pliers but using a vice grip means you wont loose this clip, and why risk it if you don't have to.
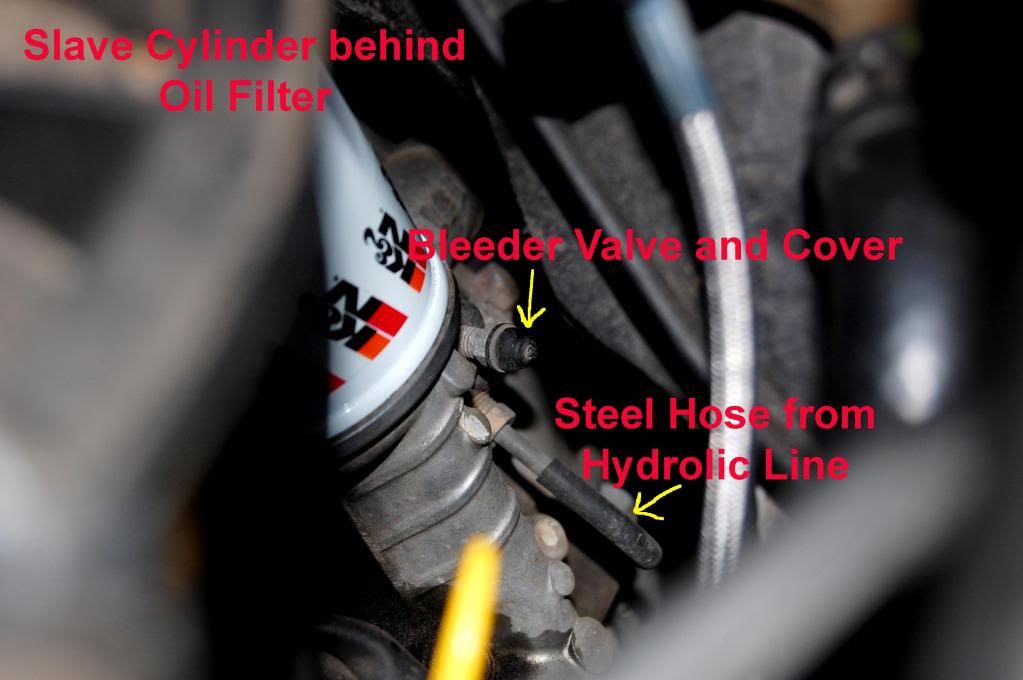
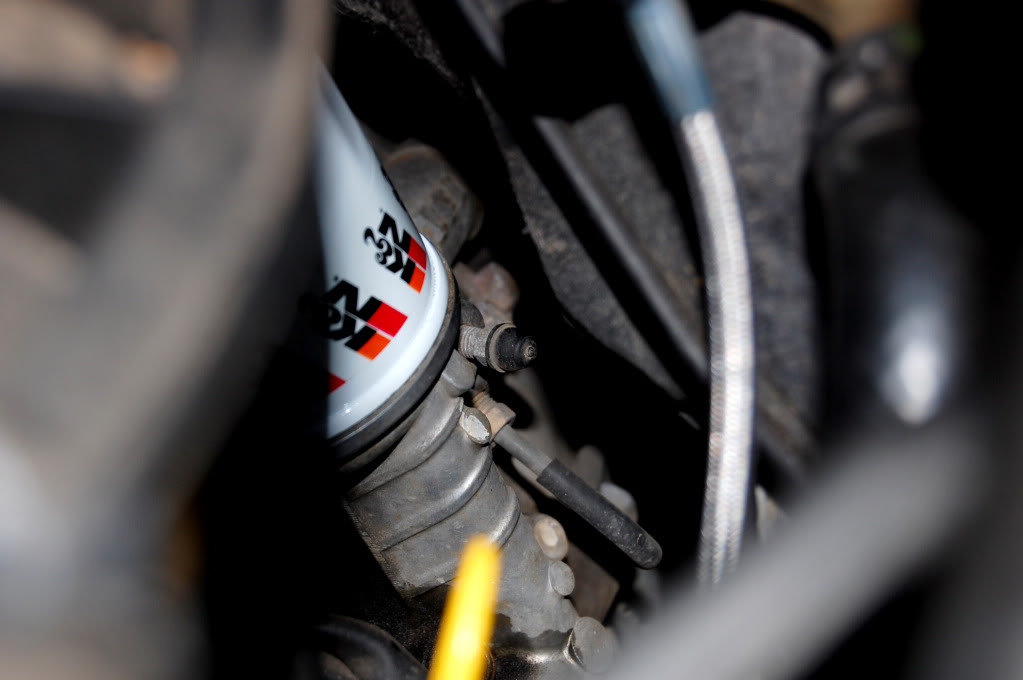
Step two: Remove the bleeder valve cover. You will need this piece for part of the process so keep it handy and close by. You can see the bleeder valve rubber cover in this photo. It sits just behind the oil filter. This is the clutch slave cylinder bleeder.
Step 3: Jack the car up. I have to say it or someone wont do it. Now on this step locate both ends of the hydraulic clutch line. You will find one on the left side of the brake cylinder. You will find the other on the driver side of the transmission under the car. Its easiest to just follow the line to the bottom of the car. This is also the part where two people make this job super fast. If one person stays under the car they can help properly bleed the system, and help you get the line hooked up quickly. Once you have found both ends of the line you are ready to go.
Have the person under the car grab the bleeder valve cover off the driver side brake caliper. They will need this later on.
The line is marked with a pink indicator.
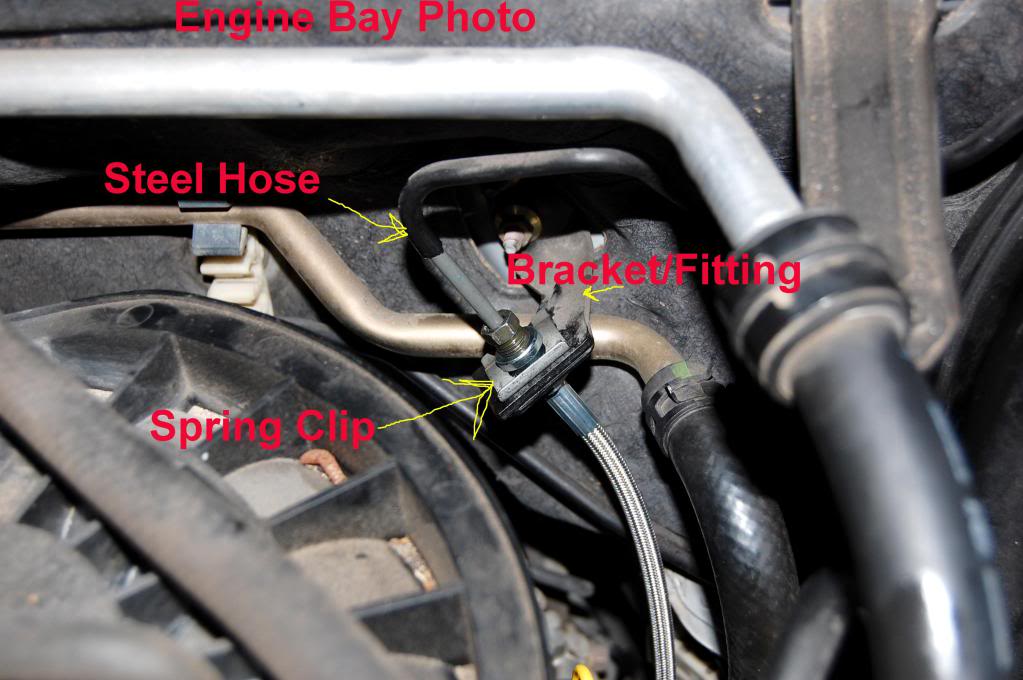
Engine Bay/Top of Line: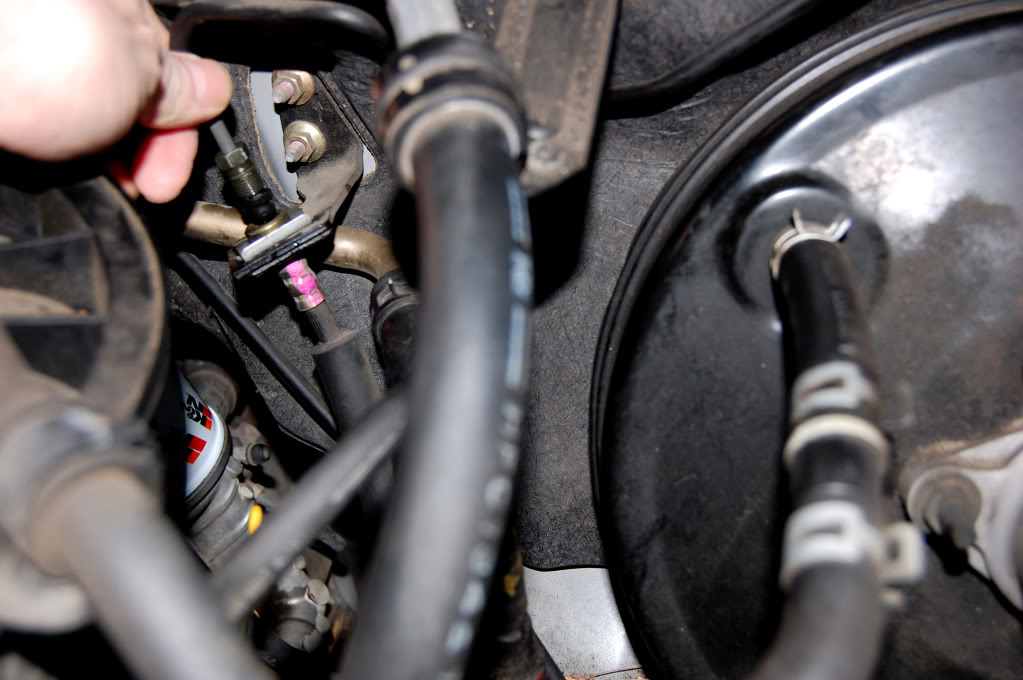
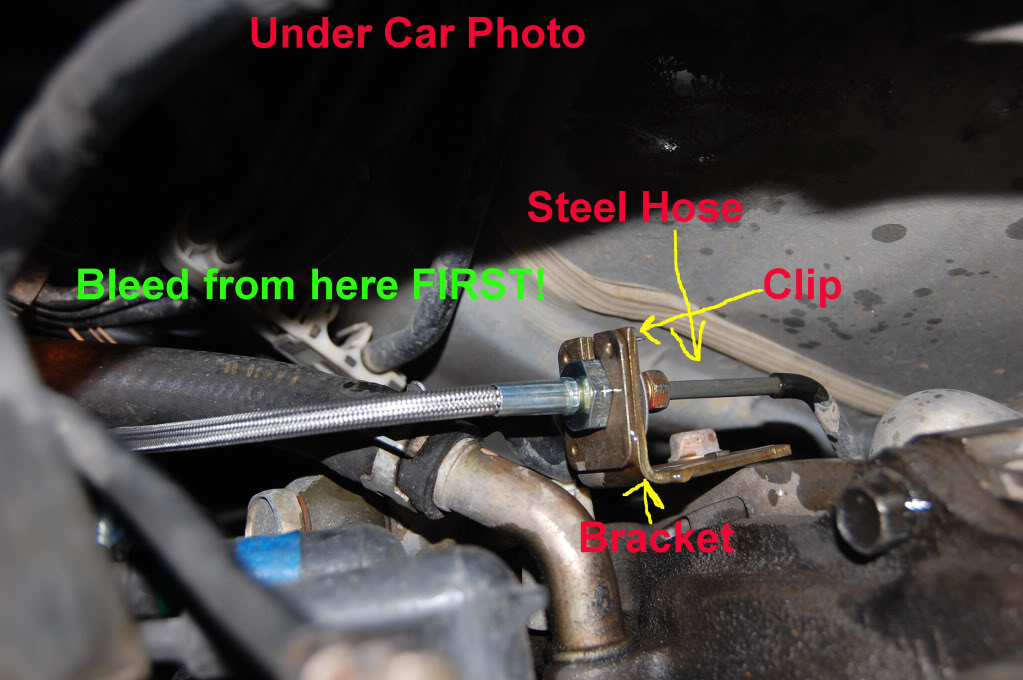
Bottom/Under Car Line: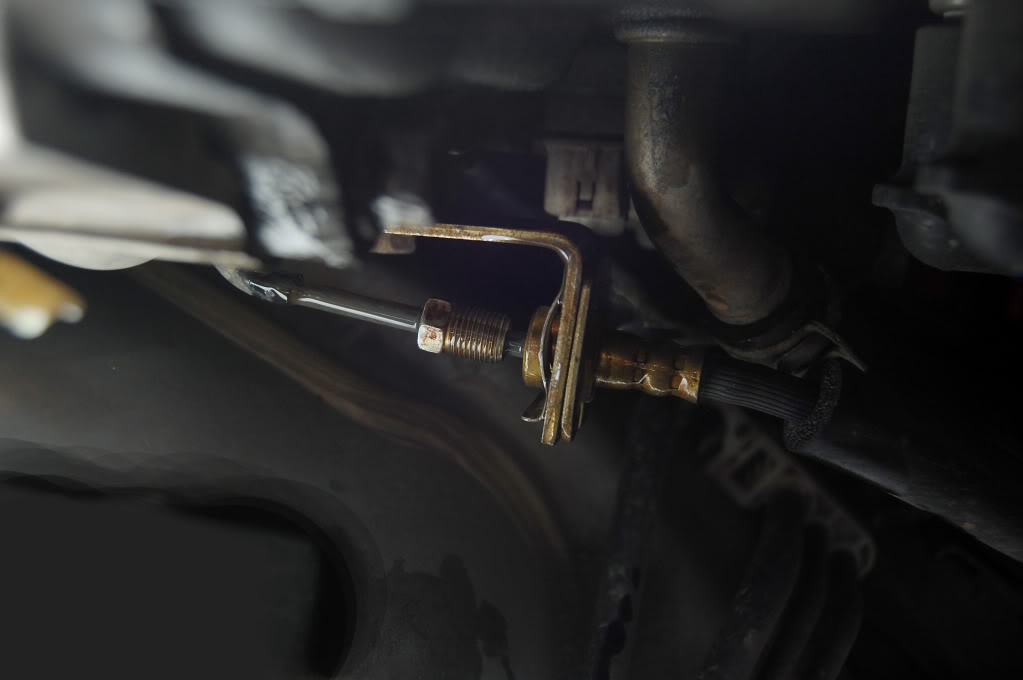
Step 4: With the rubber bleeder valve cover close by use the 10mm line wrench to crack the top of the line. This is the end in the engine bay. Once you have it broken free go ahead and remove the line. As quickly as you can place the rubber valve cover over the metal tube end of the line. This will prevent fluid from draining out of the master cylinder and make bleeding easier. Once you have capped the steel line go ahead and remove the top half of the hydraulic line. Make sure it stays pointing up so that you don't drain the system.
Step 5: Have the second person do the same thing on the bottom half of the car. They can reach up and easily pull a valve cover off the driver side brake caliper. Once they separate the bottom half of the system have them cap the steel hose immediately. This prevents unnecessary fluid loss.
Step 6: Both people will have to remove the spring clip and hold onto it. Make sure you do not loose this piece while removing it. Use a set of vice grips to pull it off. Preferably have the person up top do this first. You remove it simply by pulling it in one direction. You will see the tracks on the clip. Once this clip is removed from both ends you can throw away the old line. An image will be found below of this clip being removed up top, but the person down below can very easily see it. Once this clip is removed from both ends go ahead and throw the old line in the trash.
Step 7: The person up top should do this part first. Feed the new line into the bracket. It will only fit in one way, and the clip will not fit back on if its not in properly. Once you have the end of the line in the bracket you will need to turn it until it seats. Once its seated properly you can slid the spring clip back into place. If its seated correctly this takes no effort. Once the person up top has this clip in place feed the line to the person down below and have them route the line properly. They will want to route it exactly like the old line was. The process is the same for the lower end. Once seated into the bracket properly the spring clip slides right on.
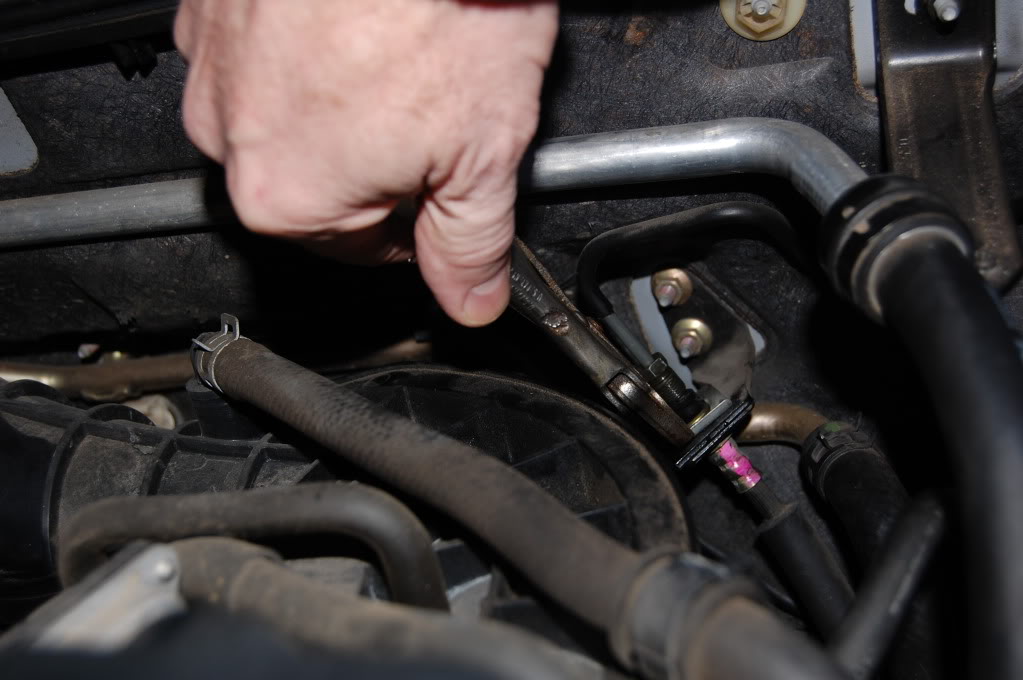
Step 8: The person up top with line wrench in hand can now fully connect the line back into the system. Make sure you get it on tight but do not over tighten. This will fracture the metal line from the clutch master cylinder. Once the person up top has the line properly hooked back up it will look like this:
Now its the person under the cars turn. They will want to hook the line up and tighten it just barely tight. This is important. Its time to bleed the system. Bleed it from the fitting the person under the car just hooked up. This will remove 98% of the air in the system. Bleed the new stainless line to the lower fitting. There will be a lot of air obviously but bleeding to this point keeps air out of the slave cylinder. You will be surprised but the system can just about be bleed completely to here. I was able to complete this process with only two bleeds to the slave cylinder after properly bleeding to this fitting point. Once you have properly bleed the system out to this fitting you are almost done.
Step 9: The final bleed. At this point you are just about done. The clutch will actually feel normal. It shouldn't feel like you need to bleed the system if you did all the steps correctly. Just to be on the safe side though we are going to bleed the slave cylinder. Go ahead and bleed the system from the slave cylinder. If after two bleeds you do not find any air then you are good to go.
Step 10: Test drive the vehicle. After you have removed the jack stands and the car is back on the ground go ahead and test drive the vehicle. Everything should work properly but this is a test that should be done. Take the bleeder wrench with you just in case.
MAKE SURE YOU PLACE THE BLEEDER VALVE COVERS BACK ON. Just in case you forgot to :P
Step 11: to be performed two weeks later. Go ahead and bleed the system one more time. Two weeks worth of driving will have moved any air that was in the system to both ends. Either back to the reservoir or back to the slave cylinder bleeder valve. I did not find any air but you might so just to be safe give it a shot.
Completed photos:
These photos show you where all the fittings are. They also show you the parts in my terminology.
READ ALL STEPS BEFORE ATTEMPTING.
IF YOU DO NOT KNOW HOW TO BLEED LINES THIS IS NOT A PROJECT FOR YOU TO DO. MAKE SURE SOMEONE ON THE PROJECT KNOWS HOW TO BLEED A SYSTEM. PREFERABLY THE PERSON UNDER THE CAR.
Larger photos can be found in the Album Here:http://s151.photobucket.com/albums/s...Clutch%20Line/
I recommend two people for this project. With two people you can have it done in about 15-20 mins on your first try.
Step one find the RIGHT TOOLS! This part is extremely important. Do not use an open ended wrench. You can damage the lines. With the wrong tool these lines can be collapsed and you do not want to have to replace them. Its an incredible amount of work and engineering to do this. If you don't have the right tools buy them first. Don't get in a hurry or try to wing this. The damage you can cause is expensive and time consuming. It requires 5 things to do this. First you will need to either buy or create your clutch line. I made my own, but you can get them for about 30 dollars from a lot of different vendors. If you do not have experience in making lines and fittings properly then just go out and buy one. The second thing you need is DOT 4, or High Temp brake fluid. You can pretty much find this stuff any where. You wont need a lot if you follow these steps properly. The tools you will need are very specialized tools. Buy, Borrow, or Rent but get the right tool. The first one is a 10mm Line Wrench. Pictured below it prevents damage to the fragile and easily crushed or fractured lines. The second is an 8mm (13/16) bleeding wrench. Its angled to make bleeding systems a lot easier. The last tool you will need is a vice grip. I did not take a picture of it because well we all know what a vice grip looks like (hopefully). The vice grip will only be used twice, but it keeps the spring clip from flying off when you pull it. You can use pliers but using a vice grip means you wont loose this clip, and why risk it if you don't have to.
Step two: Remove the bleeder valve cover. You will need this piece for part of the process so keep it handy and close by. You can see the bleeder valve rubber cover in this photo. It sits just behind the oil filter. This is the clutch slave cylinder bleeder.
Step 3: Jack the car up. I have to say it or someone wont do it. Now on this step locate both ends of the hydraulic clutch line. You will find one on the left side of the brake cylinder. You will find the other on the driver side of the transmission under the car. Its easiest to just follow the line to the bottom of the car. This is also the part where two people make this job super fast. If one person stays under the car they can help properly bleed the system, and help you get the line hooked up quickly. Once you have found both ends of the line you are ready to go.
Have the person under the car grab the bleeder valve cover off the driver side brake caliper. They will need this later on.
The line is marked with a pink indicator.
Engine Bay/Top of Line:
Bottom/Under Car Line:
Step 4: With the rubber bleeder valve cover close by use the 10mm line wrench to crack the top of the line. This is the end in the engine bay. Once you have it broken free go ahead and remove the line. As quickly as you can place the rubber valve cover over the metal tube end of the line. This will prevent fluid from draining out of the master cylinder and make bleeding easier. Once you have capped the steel line go ahead and remove the top half of the hydraulic line. Make sure it stays pointing up so that you don't drain the system.
Step 5: Have the second person do the same thing on the bottom half of the car. They can reach up and easily pull a valve cover off the driver side brake caliper. Once they separate the bottom half of the system have them cap the steel hose immediately. This prevents unnecessary fluid loss.
Step 6: Both people will have to remove the spring clip and hold onto it. Make sure you do not loose this piece while removing it. Use a set of vice grips to pull it off. Preferably have the person up top do this first. You remove it simply by pulling it in one direction. You will see the tracks on the clip. Once this clip is removed from both ends you can throw away the old line. An image will be found below of this clip being removed up top, but the person down below can very easily see it. Once this clip is removed from both ends go ahead and throw the old line in the trash.
Step 7: The person up top should do this part first. Feed the new line into the bracket. It will only fit in one way, and the clip will not fit back on if its not in properly. Once you have the end of the line in the bracket you will need to turn it until it seats. Once its seated properly you can slid the spring clip back into place. If its seated correctly this takes no effort. Once the person up top has this clip in place feed the line to the person down below and have them route the line properly. They will want to route it exactly like the old line was. The process is the same for the lower end. Once seated into the bracket properly the spring clip slides right on.
Step 8: The person up top with line wrench in hand can now fully connect the line back into the system. Make sure you get it on tight but do not over tighten. This will fracture the metal line from the clutch master cylinder. Once the person up top has the line properly hooked back up it will look like this:
Now its the person under the cars turn. They will want to hook the line up and tighten it just barely tight. This is important. Its time to bleed the system. Bleed it from the fitting the person under the car just hooked up. This will remove 98% of the air in the system. Bleed the new stainless line to the lower fitting. There will be a lot of air obviously but bleeding to this point keeps air out of the slave cylinder. You will be surprised but the system can just about be bleed completely to here. I was able to complete this process with only two bleeds to the slave cylinder after properly bleeding to this fitting point. Once you have properly bleed the system out to this fitting you are almost done.
Step 9: The final bleed. At this point you are just about done. The clutch will actually feel normal. It shouldn't feel like you need to bleed the system if you did all the steps correctly. Just to be on the safe side though we are going to bleed the slave cylinder. Go ahead and bleed the system from the slave cylinder. If after two bleeds you do not find any air then you are good to go.
Step 10: Test drive the vehicle. After you have removed the jack stands and the car is back on the ground go ahead and test drive the vehicle. Everything should work properly but this is a test that should be done. Take the bleeder wrench with you just in case.
MAKE SURE YOU PLACE THE BLEEDER VALVE COVERS BACK ON. Just in case you forgot to :P
Step 11: to be performed two weeks later. Go ahead and bleed the system one more time. Two weeks worth of driving will have moved any air that was in the system to both ends. Either back to the reservoir or back to the slave cylinder bleeder valve. I did not find any air but you might so just to be safe give it a shot.
Completed photos:

 01-10-2011, 10:40 AM
#3
The only difference I have really found is that it makes the clutch smoother. Its not like when I did the brake lines and it made the brakes firmer. The clutch has the same pressure, but the consistence and smoothness of the engagement is wonderful. It actually makes dropping the hammer on the clutch a lot better. Makes launching a lot smoother too. I have noticed a tiny improvement on my shifting speed.
01-10-2011, 10:54 AM
#5
Thats another DIY for another thread :P I have the install done, but I didn't take photos of the install. So I will be doing a friend at works car and that DIY will be made soon after. Those photos I took there were from me doing his car. I always do the project and forget to take the before photos. Bad habit but hey I get excited and goto town lol.
 06-03-2012, 07:08 PM
#7
Registered User

Join Date: Apr 2009
Posts: 39
Likes: 0
Received 0 Likes
on
0 Posts
Hi, I just wanted to thank you for this DIY! Jacking up the car and removing the front driver wheel helped me alot! When bleeding the clutch, I realised that my stainless steel line was moving when we pressed the clutch pedal. Is this normal? Like the line is secure but it looks like the fluid pressure in the line is causing this.
10-20-2013, 08:31 AM
#8

I installed the Agency Power SS clutch line recently and some tips I found to make it alot easier were:
The clutch line fittings can be stripped quite easily, theyre the same as brake line fittings. If you feel them start to strip. Stop and use a vice grips.
The bottom fitting that leads to the slave cylinder is in a very tight space to reach. Mine was seized pretty bad. Easiest way to get this was taking out the slave cylinder from underneath (2 12mm bolts on the trans bellhousing).
With the line still connected to the slave. Removing the slave brings the entire line assembly out and you can loosen it out of the car.
When reinstalling make sure everything lines up and bleed really well. I bleed from the slave cyl directly. Still don't think I bled well enough so I might have to go back and bleed a 2nd time (there was a lot of black fluid still coming out).
10-22-2013, 10:49 AM
#9
Registered

Join Date: Aug 2009
Location: White Salmon, WA
Posts: 12
Likes: 0
Received 0 Likes
on
0 Posts
GK1707 - I highly recommend you re-bleed until you have fluid that is the same color/clarity as the new fluid you're putting in. Additionally, if the waste/old fluid looks bad from the clutch slave, you may want to consider a full brake system bleed. Both systems share the same reservoir so the fluid in you brake lines and wheel cylinders could be bad, too. Discoloration, in my experience, is generally a sign of moisture in the fluid or at best a sign of fluid that should be changed out ASAP
Posted From RX8Club.com Android App
Posted From RX8Club.com Android App
10-22-2013, 03:55 PM
#10
GK1707 - I highly recommend you re-bleed until you have fluid that is the same color/clarity as the new fluid you're putting in. Additionally, if the waste/old fluid looks bad from the clutch slave, you may want to consider a full brake system bleed. Both systems share the same reservoir so the fluid in you brake lines and wheel cylinders could be bad, too. Discoloration, in my experience, is generally a sign of moisture in the fluid or at best a sign of fluid that should be changed out ASAP
Posted From RX8Club.com Android App
Posted From RX8Club.com Android App
Thanks for your input. I plan on bleeding the entire system along with upgrading to SS brake lines as well.
10-22-2013, 06:23 PM
#11
GK1707 - I highly recommend you re-bleed until you have fluid that is the same color/clarity as the new fluid you're putting in. Additionally, if the waste/old fluid looks bad from the clutch slave, you may want to consider a full brake system bleed. Both systems share the same reservoir so the fluid in you brake lines and wheel cylinders could be bad, too. Discoloration, in my experience, is generally a sign of moisture in the fluid or at best a sign of fluid that should be changed out ASAP
Posted From RX8Club.com Android App
Posted From RX8Club.com Android App
11-12-2013, 08:34 PM
#12
Registered

Join Date: Aug 2009
Location: Rowlett, Texas
Posts: 16
Likes: 0
Received 0 Likes
on
0 Posts
Nothing but bubbles
I just put a new clutch, pressure plate, master, and slave in the wife's RX8. I'm trying to bleed the line from the slave and I'm getting nothing but bubbles. The only way I can get actual fluid to come through when bleeding is when I open the bleeder valve about a 1/4 turn, but all it's doing it letting more air i the system. I've tried having my son push the pedal down while I open and close the valve. I've tried using a Mighty Vac to bled the line from the slave. Same thing, nothing but bubbles, lots of bubbles. I even tried to use the Might Vac from the Master Cylinder by cutting a hole in the cap and try to pull the fluid in from the slave, that did work for crap. By using the Might Vac, I can see that I don't have any leaks, I can get it to hold 10hg. What in the world am I doing wrong?
11-12-2013, 08:47 PM
#13
Keep the bleeder valve closed and cap on the reservoir tight. Pump the clutch pedal by hand until you feel some pressure, give it a few pumps by foot. Then hold down the clutch pedal once you get some pressure. Open the bleeder valve.. wait for fluid to come out. Repeat process until clear fluid starts coming out
02-13-2015, 04:12 PM
#15

More than likely you have air still in the clutch master cylinder or between the clutch MC and the main Brake MC reservior where it pulls fluid from.
When you drain the entire system it's a big pain to get all the air out, so I sympathize with you. You just have to start at the top and work your way down until it's all filled full.
When you drain the entire system it's a big pain to get all the air out, so I sympathize with you. You just have to start at the top and work your way down until it's all filled full.
02-13-2015, 04:16 PM
#16
SARX Legend
iTrader: (46)

I'm glad this was bumped. I replaced my clutch master and clutch slave recently and installed a speedbleeder on the clutch slave. It made bleeding the clutch very easy. I have done it many times before and it was always a PIA, mainly just getting to the bleed nipple on the slave.
These are the ones you need, you can split the price with an RX-8 buddy.
These are the ones you need, you can split the price with an RX-8 buddy.
02-15-2015, 01:17 PM
#17
Registered

those are pretty cool and great for caliper too but i was asking the fitting size of the fitting attached to the line it'self
here's what I had made for $40 at cisco Hydraulics 3ft stainless steel braided hydro line,, with (two) "3AN" females crimped on either side. then bought (two) "3AN to m10x1.0 adapter"
here's what I had made for $40 at cisco Hydraulics 3ft stainless steel braided hydro line,, with (two) "3AN" females crimped on either side. then bought (two) "3AN to m10x1.0 adapter"


Thread
Thread Starter
Forum
Replies
Last Post
TotalAutoPerformance
Vendor Classifieds
12
10-17-2018 09:00 AM
Road Cone
RX-8 Parts For Sale/Wanted
5
11-06-2015 01:52 PM
tommy26Germany
Series I Trouble Shooting
11
09-29-2015 10:33 AM