DIY: Spring Install
 04-22-2010, 10:28 AM
#1
Stupidity keeps me busy!!
Thread Starter

Join Date: Jul 2009
Location: south of Boston
Posts: 511
Likes: 0
Received 0 Likes
on
0 Posts
DIY: Spring Install
I will be attaching photos as well as using links as it is alot easier. if for somereason the links go down the attachments will still be visible.
I went with the progress technology springs. Got them from Brice at Raceroots.com. great price and came in about 3 days. very similar in drop and spring load as the Tein's but i have heard about alot of peoples Tein S-tech's sagging over time and getting spongy so with alittle research Progress tech, as a company, has a very good reputation, so for me the decision was simple.
like an idiot i don't have any great before pictures but will look through my older photos for some soon.
also i will give reviews in about a week when they settle and i get an alignment.
shameless plug.
http://raceroots.com/index.php/produ...rt-spring.html
***REAR SPRINGS***
1. jack up rear of car. this is what you should see.

2. Remove wheels
3. remove sway bar endlinks from lower control arm from both sides of vehicle.

this is a 14 mm nut but the bolt may start to spin inside the endlink, if so you can use an allen wrench inside the end of the bolt to secure it and continue with the 14mm nut.

also remove the little arm for the self leveling headlights. it is on the drivers side rear lower control arm. the same arm as the sway bar but i dont have it so i can't show it.
4. mark the allignment cam washer on both sides, this will be removed completely. now remove the lower controll arm. I marked all of the cam bolts and losened them all but only removed the lower one with the sway bar attached. this is for preloading the bushings.

5.remove the 12mm bolt that is at the top of the spring area, it is vertical and goes up into the trunk area.

I went with the progress technology springs. Got them from Brice at Raceroots.com. great price and came in about 3 days. very similar in drop and spring load as the Tein's but i have heard about alot of peoples Tein S-tech's sagging over time and getting spongy so with alittle research Progress tech, as a company, has a very good reputation, so for me the decision was simple.
like an idiot i don't have any great before pictures but will look through my older photos for some soon.
also i will give reviews in about a week when they settle and i get an alignment.
shameless plug.
http://raceroots.com/index.php/produ...rt-spring.html
***REAR SPRINGS***
1. jack up rear of car. this is what you should see.
2. Remove wheels
3. remove sway bar endlinks from lower control arm from both sides of vehicle.
this is a 14 mm nut but the bolt may start to spin inside the endlink, if so you can use an allen wrench inside the end of the bolt to secure it and continue with the 14mm nut.
also remove the little arm for the self leveling headlights. it is on the drivers side rear lower control arm. the same arm as the sway bar but i dont have it so i can't show it.
4. mark the allignment cam washer on both sides, this will be removed completely. now remove the lower controll arm. I marked all of the cam bolts and losened them all but only removed the lower one with the sway bar attached. this is for preloading the bushings.
5.remove the 12mm bolt that is at the top of the spring area, it is vertical and goes up into the trunk area.
Last edited by E.M.S.; 04-24-2010 at 07:23 AM.
 04-22-2010, 10:28 AM
#2
Stupidity keeps me busy!!
Thread Starter
Join Date: Jul 2009
Location: south of Boston
Posts: 511
Likes: 0
Received 0 Likes
on
0 Posts
6. open trunk and undo the tabs holding the side carpet back exposing the upper shock mounts. remove the two nuts on the trunk floor and the two gold bolts in the center.

7. now remove the 17mm bolt holding the shock in place and remove the shock assembly from the vehicle.

8. i must suggest that you use a spring compressor but in all honesty for the rears, i just put weight on the assembly and unscrewed the top nut, there is very little tension on the rear spring at full droop and it was easy to hold it down. be carefull as even though there is little tension, there is still enough to blow the top nut and washers into your face if your not carefull.

now reassembly is reverse. although when i put mine back in, i loosened every one of the control arm mounts jacked up the hub by placing a jack under the bottom control arm at the hub and then tightened all of the control arm mounts. this is called preloading and i am an ******* for not taking a picture of this. line back up the cam washers on the alignment adjustments and tighten everything down. thats it for the rears. if it werent for taking pictures both rears would have taken me about an hour total.
on to the fronts.
7. now remove the 17mm bolt holding the shock in place and remove the shock assembly from the vehicle.
8. i must suggest that you use a spring compressor but in all honesty for the rears, i just put weight on the assembly and unscrewed the top nut, there is very little tension on the rear spring at full droop and it was easy to hold it down. be carefull as even though there is little tension, there is still enough to blow the top nut and washers into your face if your not carefull.
now reassembly is reverse. although when i put mine back in, i loosened every one of the control arm mounts jacked up the hub by placing a jack under the bottom control arm at the hub and then tightened all of the control arm mounts. this is called preloading and i am an ******* for not taking a picture of this. line back up the cam washers on the alignment adjustments and tighten everything down. thats it for the rears. if it werent for taking pictures both rears would have taken me about an hour total.
on to the fronts.
Last edited by E.M.S.; 04-22-2010 at 11:12 AM.
04-22-2010, 10:29 AM
#3
Stupidity keeps me busy!!
Thread Starter
Join Date: Jul 2009
Location: south of Boston
Posts: 511
Likes: 0
Received 0 Likes
on
0 Posts
***FRONT SPRINGS***
on to the fronts.
these were slightly more of a pain in the *** but went a little quicker actually.
i will leave out pictures that make some points redundant.
1. jack up car and secure with jack stands.
2. remove wheels and pop the hood.
3. remove front sway bar endlinks from both sides just like the rear, this makes removal much easier. make sure you remove them from both sides before working on any side. this way the sway bar can be swung out of the way if needed.
4. remove strut bar by removing 3 14mm nuts on each side. if you have the MS or similar type, make sure you loosed the MC brace as well

5. now remove the 17mm nut on the bottom of the shock assembly and tap (carefully) the bolt out of the shock.

6. at this time you want to loosen and remove the bolts holding the top of the upper control arm. you can take the shock assenbly out without actually removing the a-arm but why fight with everything in the world when you don't have to. just make sure that you support the hub with your leg or knee as to not over stetch the antilock brake sensor wire.

on to the fronts.
these were slightly more of a pain in the *** but went a little quicker actually.
i will leave out pictures that make some points redundant.
1. jack up car and secure with jack stands.
2. remove wheels and pop the hood.
3. remove front sway bar endlinks from both sides just like the rear, this makes removal much easier. make sure you remove them from both sides before working on any side. this way the sway bar can be swung out of the way if needed.
4. remove strut bar by removing 3 14mm nuts on each side. if you have the MS or similar type, make sure you loosed the MC brace as well
5. now remove the 17mm nut on the bottom of the shock assembly and tap (carefully) the bolt out of the shock.
6. at this time you want to loosen and remove the bolts holding the top of the upper control arm. you can take the shock assenbly out without actually removing the a-arm but why fight with everything in the world when you don't have to. just make sure that you support the hub with your leg or knee as to not over stetch the antilock brake sensor wire.
Last edited by E.M.S.; 04-22-2010 at 11:13 AM.
04-22-2010, 10:29 AM
#4
Stupidity keeps me busy!!
Thread Starter
Join Date: Jul 2009
Location: south of Boston
Posts: 511
Likes: 0
Received 0 Likes
on
0 Posts
6. now, i don't have a picture of this but it is best to mark the alignment cam in the front and loosen that as well, not only will it help with preloading and saving the bushing inside the lower control arm but will make removal a breeze.
7. once the lower control arm bushing is loosened and the top bolts are removed, take out the shock assembly by lowering it down and taking out the top first. trust me, this is the easiest way.
8. with the front shocks you MUST use a spring compressor. they are under considerably more stress than the rears once they are assembled.

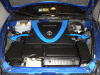
here you can see my spring compressors, bought these little puppies from autozone about 6 years ago for $50 and has more than payed for themselves. plus i use air tools because i can.
9. install is reverse of removal. so many people have gone over preloading that i don't think it's necessary to explain it here. i will save one more post below for final pictures once the springs have settled and i get an allignment in a week or so. total time should be, with air tools, about 3 hrs. but alot of that time i was taking pictures and also moving all the tools from the back to the front and getting back up to get the camera for photos and running back in the house for more beer or yelling at my dog for barking at the neighborhood kids.
good luck and enjoy.
again, just wanted to thank Brice at raceroots for hooking me up wit these. didn't want to be like everyone else and go with the Tein's, here is another option.
First impression is it looks good. i hope the front drops just alittle bit more but the rear looks just about perfect. now it makes the wheels look way too sunken in.
I have only driven to advanced auto parts so far and that was just to grab some new hose clamps for the AEM install but i didn't tighten the lugs all the way so i had to hand tighten them and borrow a deep 21mm lug wrench with a narrow wall so i could keep my wheel from falling off. less than 1/2 a mile and it was rough going.. glad i didn't lose the wheel.
7. once the lower control arm bushing is loosened and the top bolts are removed, take out the shock assembly by lowering it down and taking out the top first. trust me, this is the easiest way.
8. with the front shocks you MUST use a spring compressor. they are under considerably more stress than the rears once they are assembled.
here you can see my spring compressors, bought these little puppies from autozone about 6 years ago for $50 and has more than payed for themselves. plus i use air tools because i can.
9. install is reverse of removal. so many people have gone over preloading that i don't think it's necessary to explain it here. i will save one more post below for final pictures once the springs have settled and i get an allignment in a week or so. total time should be, with air tools, about 3 hrs. but alot of that time i was taking pictures and also moving all the tools from the back to the front and getting back up to get the camera for photos and running back in the house for more beer or yelling at my dog for barking at the neighborhood kids.
good luck and enjoy.
again, just wanted to thank Brice at raceroots for hooking me up wit these. didn't want to be like everyone else and go with the Tein's, here is another option.
First impression is it looks good. i hope the front drops just alittle bit more but the rear looks just about perfect. now it makes the wheels look way too sunken in.
I have only driven to advanced auto parts so far and that was just to grab some new hose clamps for the AEM install but i didn't tighten the lugs all the way so i had to hand tighten them and borrow a deep 21mm lug wrench with a narrow wall so i could keep my wheel from falling off. less than 1/2 a mile and it was rough going.. glad i didn't lose the wheel.
Last edited by E.M.S.; 04-22-2010 at 02:44 PM.
04-22-2010, 10:32 AM
#6
Stupidity keeps me busy!!
Thread Starter
Join Date: Jul 2009
Location: south of Boston
Posts: 511
Likes: 0
Received 0 Likes
on
0 Posts
oh I also midified and installed my new/used AEM. according to https://www.rx8club.com/showthread.p...et+NA+4th+gear . the removal of one of the 90* bends gives the most increase in power. also as i had a sr motorsports short ram the heat soak from just sitting at a light on a warm/hot day made the car very weak until i started getting some fresh air in there. probably wouldn't be as bad if i didn't remove my lower intake tray but oh well.

Last edited by E.M.S.; 04-22-2010 at 12:02 PM.
 04-22-2010, 11:24 AM
#8
Stupidity keeps me busy!!
Thread Starter
Join Date: Jul 2009
Location: south of Boston
Posts: 511
Likes: 0
Received 0 Likes
on
0 Posts


 04-24-2010, 07:38 AM
#14
Stupidity keeps me busy!!
Thread Starter
Join Date: Jul 2009
Location: south of Boston
Posts: 511
Likes: 0
Received 0 Likes
on
0 Posts
yes, you need to preload the rear as well. any suspension part that is now going to be working at a different opperating range should be adjusted. these are rubber bushings and will be wearing faster, hindering the normal suspension travel of the new range in geometry.
this is very easy to do. there are 4 control arms in the rear. this is a very complicated rear suspension but thankfully, workng on it is quite simple.
1. follow the 4 control arms from the hub to the chassis.
2. loosen all of the bolts attaching the control arms to the chassis end of the suspension
3. now jack up the hub assembly until the weight starts to come off of the jack stand. do't try to lift the vehicle off the jackstand or put more force on the hub by weighing down the vehicle on that side with people. you want it right around where it will be at ride height so a good reference is when the vehicle just starts to lift from the support.
4. tighten all bolts back to factory specs. for me this was a guesstimate as i didn't have the service manual. the cable guy was here and i had no internet service for a while.
thats it.
now on to the alignment cams.
i will show pictures later if i have the chance but as a description. think of a bolt with a washer welded onto it. when that bolt moves along it's center (long) axis, the washer spins with it, correct?
well that was easy. now picture the same thing but with a washer that has the hole drilled off center. as the bolt turns along it's center (long) axis the washer will spin with it but in an exaggerated circle, right?
now what would happen if we were to take the same bolt with the same washer, the one off center, and we were to trap the washer so that it could spin but not in that larger exaggerated circle?the bolt would move in an exaggerated circle. i know this is hard to picture but on the suspension the washer is held in place by two crimped spots on the PPF or power plant frame. these prohibit the washers movement and force the bolt to move inwards or outwards allowing the suspension to be adjusted. this is why we mark where the center is, or any other point on the washer, because with those crimped spots on the frame the washer may be placed right back to where it was at any time as long as it was marked with a pencil or marker. i recomend a pencil.
i know my description would be better with pictures but i am running out the door and thought i would try to help before i come back later this evening. if no pics tonight they will be here by tuesday as that is my next day off.
04-25-2010, 04:50 PM
#16
Stupidity keeps me busy!!
Thread Starter
Join Date: Jul 2009
Location: south of Boston
Posts: 511
Likes: 0
Received 0 Likes
on
0 Posts
Car may be totaled. Got into an accident at 9:20 am on saturday on my way to my state civil service fire exam. I'll explain later. I just got to a computer after spending the day in the hospital yesterday.
The springs were perfect it was the fault of somepone else who tried to race me and blew his engine as a result.
The springs were perfect it was the fault of somepone else who tried to race me and blew his engine as a result.
04-26-2010, 03:17 AM
#19
Stupidity keeps me busy!!
Thread Starter
Join Date: Jul 2009
Location: south of Boston
Posts: 511
Likes: 0
Received 0 Likes
on
0 Posts
I was not racing, someone tried to race me on and off for over a mile, I had my cruise control set and was just comfortably cruising. When he finally did pass me he blew his engine, filled the entire highway with smoke, covered my car with oil and I couldn't see, a piece of his engine or turbo came flying out of his car and hit my right front tire and ripped the wheel out of my hand and slammed me into the car next to me. 6 people corroberated the story of the jackass trying to race me over and over and the police cited him for the accident but either way I missed the exam, spent the day in the hospital and most likely lost the car.
I honestly feel like I got hit in the neck with a baseball bat. Thank god for flexerill.
I should be able to get pics tomorrow, I have to work 16 hrs today, this should be interesting.
I honestly feel like I got hit in the neck with a baseball bat. Thank god for flexerill.
I should be able to get pics tomorrow, I have to work 16 hrs today, this should be interesting.
04-26-2010, 03:22 AM
#20
Stupidity keeps me busy!!
Thread Starter
Join Date: Jul 2009
Location: south of Boston
Posts: 511
Likes: 0
Received 0 Likes
on
0 Posts
The guy that I slammed into was ok too, we both went to the hospital in the ambulance and he had a sore shoulder from slamming into the door but was otherwise uninjured and was released before I was. Gotta say though, the RX8 is one hell of a sturdy car, if I was in something less robust I could have been seriously injured instead of just sore. No airbag deployment though and the other guy only had his passenger side curtain go off, nothing else.
04-26-2010, 06:41 AM
#23
Stupidity keeps me busy!!
Thread Starter
Join Date: Jul 2009
Location: south of Boston
Posts: 511
Likes: 0
Received 0 Likes
on
0 Posts
i would buy another 8. the state trooper cited him for speeding and a marked lane violation. myself and the driver of the acura were not cited and found not at fault by the state police. the accident.
 04-26-2010, 07:46 AM
#25
Stupidity keeps me busy!!
Thread Starter
Join Date: Jul 2009
Location: south of Boston
Posts: 511
Likes: 0
Received 0 Likes
on
0 Posts
no, not a civic. it was a cobalt with FI over boosted and boom and it looked nice for a cobalt. dark tint and debadged. i actually couldn't tell it was a cobalt. the Freetown police officer was the one who told me it was a cobalt.
glad it finally got to you.
glad it finally got to you.