DIY: Spark Plug Change.
 05-03-2008, 11:28 PM
#1
One Shot One Kill
Thread Starter

DIY: Spark Plug Change.
I've decided to get all the important data together on 1 post, so people don't have to hunt all around for information.
Tools Needed:
Brain
Glove/Eye protection
Jack Stand
Jack
Magnetic Spark Plug Socket - 13/16 inch or the metric equivalent.
Ratchet + Extensions
You need 3 long extensions.
One of the extensions need to be a wobble. Similar to swivel, but it's a wobble. - expo1
Anti-seize(i have no idea about copper or aluminum anti-seize, i looked around and there is no big deal, just use copper if that's available)
2 Leading Spark Plugs - RE7CL
2 Trailing Spark Plugs - RE9BT
could try www.sparkplugs.com
Spark Plug Torque Specification:
114-156 in-lbf
https://www.rx8club.com/attachment.p...9&d=1144614389
Thanks to TeamRX8
Spark Plug Gap Specification
Standard [both]: 1.15mm-1.25mm (0.046-0.049in)
Maximum: Leading 1.5mm (0.059in) Trailing 1.4mm (0.055in)
Thanks to Go48
Instructions:
*write down your radio preset*
*Remove the driver's side wheel before starting*
*Disconnect the Negative Terminal on your battery*
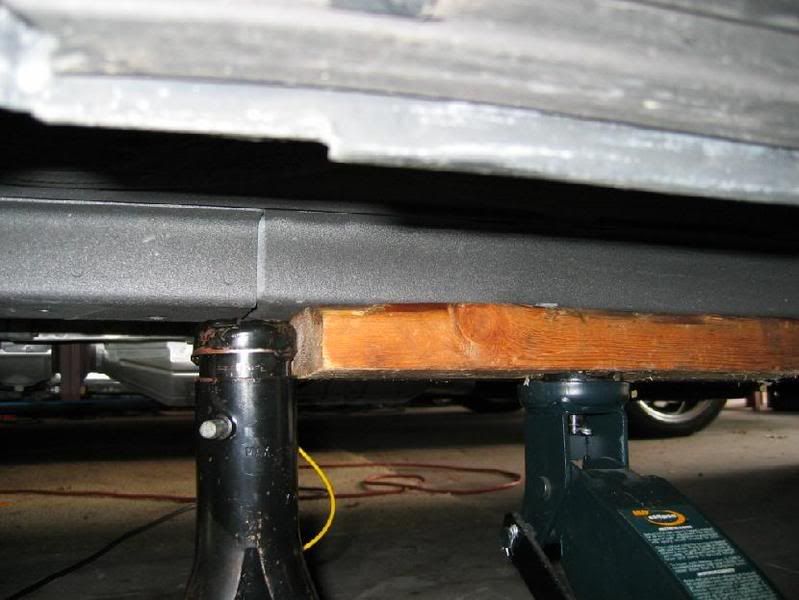
#1 - Jack the car using a good hydraulic jack, placing a piece of wood between the jack and your frame rail. This will prevent you from denting the underside of your car. ALWAYS PLACE A JACK STAND UNDER THE CAR. THIS COULD SAVE YOUR LIFE!
# 2 - From underneath the car, you have a clear reach at the rear plugs. I recommend breaking them loose with the wrench, but then removing them by hand. Not only do you avoid banging your knuckles on everything, but it goes faster.
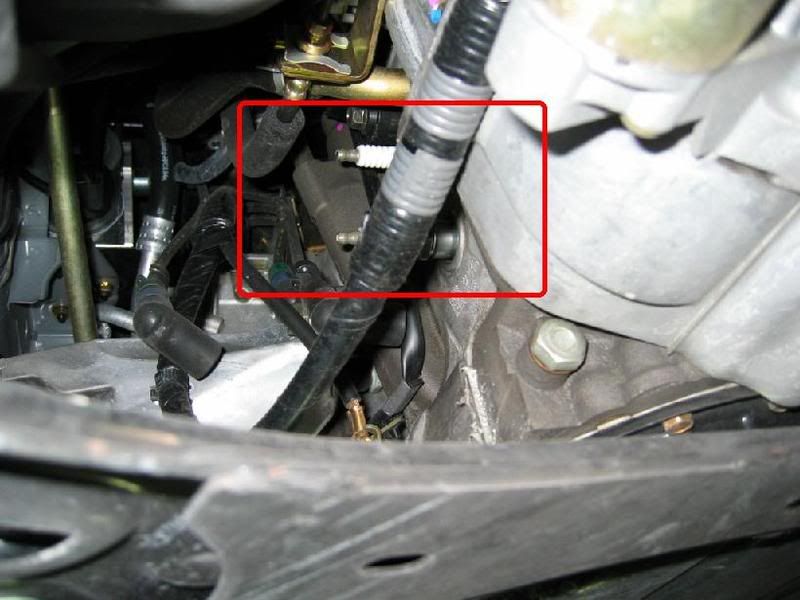
#3 For the front rotor, the plugs are tough to reach. Next time, I will remove the driver's side wheel, but since I didn't have my lug key with me, I still reached them by turning the wheels all the way to the right. Behind the wheel, remove the upper fastener on the rubber splash "thingy". (Oooohh....Technical terms! :D ) This is NOT a screw, but one of those that only requires a quarter turn to release it, similar to the clips on your wheel well liner. Once it pops out, gently pop out the washer by sliding a flat head screwdriver under it and twisting gently. Did I say gently? Seriously people, these things beak easy.
If you've got skinny arms, you CAN use this method, but as I said: Take the wheel off.
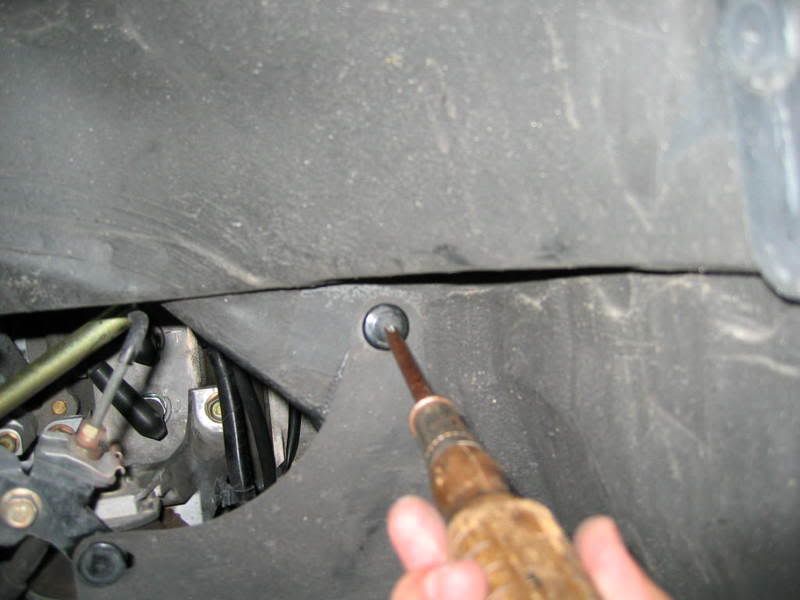
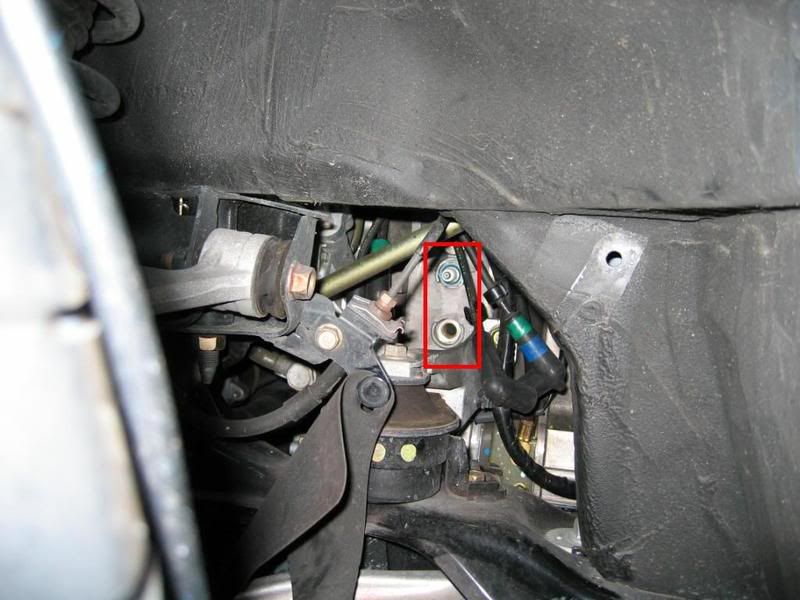
The front plugs are now visible.
#4 When reinstalling the plugs, be sure to apply a light coat of anti-seize to the threads.
#5 Each plug is marked with a T or an L, which indicates leading or trailing. It is VERY important they are reinstalled correctly. Double check this, and note the T and L cast into the side of the motor beside each hole. Match these up. Image for Which Wire/Coil goes to which plug here: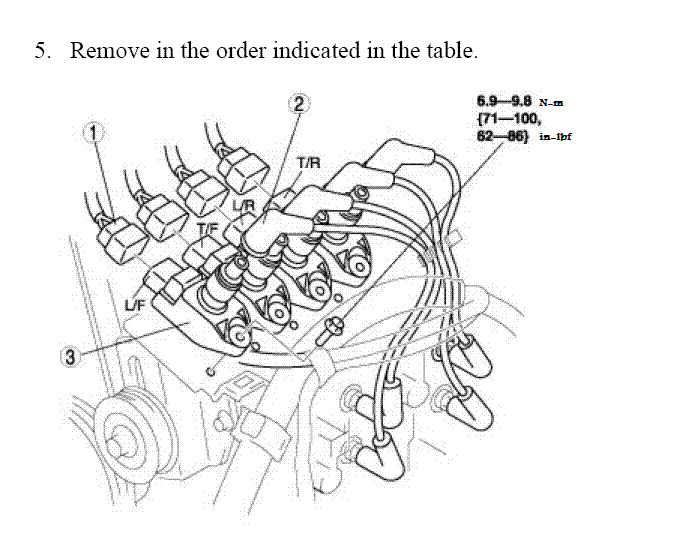
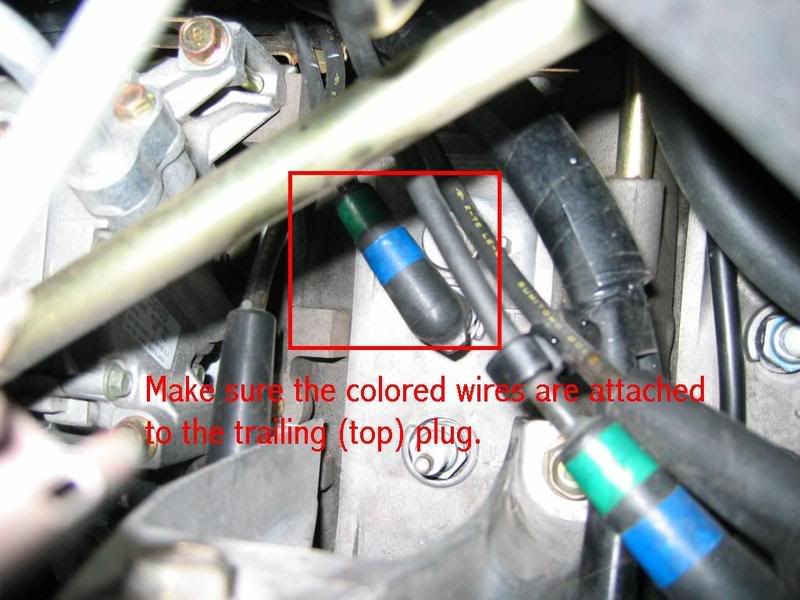
Also, you did notice that the trailing plug wires are marked with green and blue tape, right? If not, make sure upon reinstallation that you attach them correctly.
Original Thread: https://www.rx8club.com/series-i-do-yourself-forum-73/diy-spark-plug-change-31872/
Thanks to : Tony Orlando
Image for Which Wire/Coil goes to which plug here:
*reattach the negative terminal of the battery*
*start the car (warm it up)*
*to reset the DSC, turn wheel all the way left, than all the way right, shut down the engine*
DONE
Please Let me know if anything is inaccurate/out of date and needs update/change.
Tools Needed:
Brain
Glove/Eye protection
Jack Stand
Jack
Magnetic Spark Plug Socket - 13/16 inch or the metric equivalent.
Ratchet + Extensions
You need 3 long extensions.
One of the extensions need to be a wobble. Similar to swivel, but it's a wobble. - expo1
Anti-seize(i have no idea about copper or aluminum anti-seize, i looked around and there is no big deal, just use copper if that's available)
2 Leading Spark Plugs - RE7CL
2 Trailing Spark Plugs - RE9BT
could try www.sparkplugs.com
Spark Plug Torque Specification:
114-156 in-lbf
https://www.rx8club.com/attachment.p...9&d=1144614389
Thanks to TeamRX8
Spark Plug Gap Specification
Standard [both]: 1.15mm-1.25mm (0.046-0.049in)
Maximum: Leading 1.5mm (0.059in) Trailing 1.4mm (0.055in)
Thanks to Go48
Instructions:
*write down your radio preset*
*Remove the driver's side wheel before starting*
*Disconnect the Negative Terminal on your battery*
#1 - Jack the car using a good hydraulic jack, placing a piece of wood between the jack and your frame rail. This will prevent you from denting the underside of your car. ALWAYS PLACE A JACK STAND UNDER THE CAR. THIS COULD SAVE YOUR LIFE!
# 2 - From underneath the car, you have a clear reach at the rear plugs. I recommend breaking them loose with the wrench, but then removing them by hand. Not only do you avoid banging your knuckles on everything, but it goes faster.
#3 For the front rotor, the plugs are tough to reach. Next time, I will remove the driver's side wheel, but since I didn't have my lug key with me, I still reached them by turning the wheels all the way to the right. Behind the wheel, remove the upper fastener on the rubber splash "thingy". (Oooohh....Technical terms! :D ) This is NOT a screw, but one of those that only requires a quarter turn to release it, similar to the clips on your wheel well liner. Once it pops out, gently pop out the washer by sliding a flat head screwdriver under it and twisting gently. Did I say gently? Seriously people, these things beak easy.
If you've got skinny arms, you CAN use this method, but as I said: Take the wheel off.
The front plugs are now visible.
#4 When reinstalling the plugs, be sure to apply a light coat of anti-seize to the threads.
#5 Each plug is marked with a T or an L, which indicates leading or trailing. It is VERY important they are reinstalled correctly. Double check this, and note the T and L cast into the side of the motor beside each hole. Match these up. Image for Which Wire/Coil goes to which plug here:
Also, you did notice that the trailing plug wires are marked with green and blue tape, right? If not, make sure upon reinstallation that you attach them correctly.
Original Thread: https://www.rx8club.com/series-i-do-yourself-forum-73/diy-spark-plug-change-31872/
Thanks to : Tony Orlando
Image for Which Wire/Coil goes to which plug here:
*reattach the negative terminal of the battery*
*start the car (warm it up)*
*to reset the DSC, turn wheel all the way left, than all the way right, shut down the engine*
DONE
Please Let me know if anything is inaccurate/out of date and needs update/change.
Last edited by xsnipersgox; 02-04-2010 at 01:05 AM.
 05-04-2008, 11:36 PM
#2
Registered

Join Date: Apr 2004
Location: Northwestern NJ
Posts: 61
Likes: 0
Received 0 Likes
on
0 Posts
Plugs, wires and coil packs done
Today I replaced my coil packs, wires and plugs using your techniques including removing the wheel for access to the plugs. That made it almost easy. Then I removed the corrugated rubber connector from the throttle body to the air intake box. That let me see and touch the coil packs.
BUT, when I started it up, it started right away and revved to 5K easily but as soon as I took it out for a test spin, the engine made sounds like predetonating or pinging or something under load and had no power. I limped home. Looked for disconnected vacuum lines and connectors. Any clues what to look for to fix this?
BUT, when I started it up, it started right away and revved to 5K easily but as soon as I took it out for a test spin, the engine made sounds like predetonating or pinging or something under load and had no power. I limped home. Looked for disconnected vacuum lines and connectors. Any clues what to look for to fix this?

 05-05-2008, 05:54 AM
#5
Registered

If the plugs in the glove box were new, those plugs should have been installed by the dealer prior to delivering the car to you. Standard procedure. Long story, but basically, the new cars are likely to be repeatedly shut down without fully warming up the engines when moving them in the port area and around the car lot. That can lead to engine flooding. The newly installed plugs at delivery were intended to avoid that.
They were probably leading plugs ("L" on them) since those are the key plugs for this car. The trailing plugs ("T" on them) are not as critical to startup.
Last edited by Go48; 05-05-2008 at 06:03 AM.
 06-26-2008, 04:57 PM
#7
Registered
Join Date: Apr 2004
Location: Northwestern NJ
Posts: 61
Likes: 0
Received 0 Likes
on
0 Posts
 12-26-2008, 06:47 PM
#8
The Chosen Eight
iTrader: (2)

Join Date: Nov 2007
Location: MArlborough MA
Posts: 58
Likes: 0
Received 0 Likes
on
0 Posts
im going to remove my spark plug tomorrow and let them dry out because i my car is flooded but i have a question on those picture i see the 2 sparkplugs...are the other 2 plugs right next to the first 2 are they groupped tgether will i be able to see all 4 with the wheel off
12-26-2008, 06:55 PM
#9

Front set is IN the motor mount area; rear set is to the right of that - you can see and get to all 4 really easy from under the car / wheel well area. Looks like this
T - * *
L - * *
With the front two resting in the motor mount bracket.
T - * *
L - * *
With the front two resting in the motor mount bracket.
02-27-2009, 12:07 PM
#10
75shot55fueljets=GOBABYGO

Join Date: Dec 2007
Location: Sebastopol, CA
Posts: 142
Likes: 0
Received 0 Likes
on
0 Posts
Just did this Yesterday along with fresh coils. and i gotta say holy crap, i was driving a hybrid compared to now, the leading plugs had 58k on them and look like a toasted bagel with cheese burnt in the center aka i cant even see the damn probe spark wire thing. and the coils were putting up some teribal ohm numbers when i tested them. so i totally recommend this to someone who is feeling a lack of power. great diy every thing spot on.
bad thing i got 4 stitches changing the plugs, they were on so tight when i went to loosen the last leading i busted it open to the bone on my knuckle, lots of blood... and shot.. huge needle... so i'd add WEAR A PAIR OF GLOVES. its worth it. my pinky looks like a blue thumb.
bad thing i got 4 stitches changing the plugs, they were on so tight when i went to loosen the last leading i busted it open to the bone on my knuckle, lots of blood... and shot.. huge needle... so i'd add WEAR A PAIR OF GLOVES. its worth it. my pinky looks like a blue thumb.
 02-27-2009, 12:23 PM
#12
75shot55fueljets=GOBABYGO
Join Date: Dec 2007
Location: Sebastopol, CA
Posts: 142
Likes: 0
Received 0 Likes
on
0 Posts
no clue i didn't do it, and i changed coils and plugs same time.
Edit:ya i got the shot first then the scrub where i got to see flesh and a little oil and dirt and road grime. i thought i cleaned it pretty well but then they just rip it open and scrub and fold back over. bad experience. aka use gloves
Edit:ya i got the shot first then the scrub where i got to see flesh and a little oil and dirt and road grime. i thought i cleaned it pretty well but then they just rip it open and scrub and fold back over. bad experience. aka use gloves
Last edited by SebtownRx8; 02-27-2009 at 10:18 PM.
02-27-2009, 07:06 PM
#13
Surf Hard, Drive Hard

Join Date: Feb 2007
Location: Indialantic, Florida
Posts: 7,840
Likes: 0
Received 11 Likes
on
9 Posts
Just did this Yesterday along with fresh coils. and i gotta say holy crap, i was driving a hybrid compared to now, the leading plugs had 58k on them and look like a toasted bagel with cheese burnt in the center aka i cant even see the damn probe spark wire thing. and the coils were putting up some teribal ohm numbers when i tested them. so i totally recommend this to someone who is feeling a lack of power. great diy every thing spot on.
bad thing i got 4 stitches changing the plugs, they were on so tight when i went to loosen the last leading i busted it open to the bone on my knuckle, lots of blood... and shot.. huge needle... so i'd add WEAR A PAIR OF GLOVES. its worth it. my pinky looks like a blue thumb.
bad thing i got 4 stitches changing the plugs, they were on so tight when i went to loosen the last leading i busted it open to the bone on my knuckle, lots of blood... and shot.. huge needle... so i'd add WEAR A PAIR OF GLOVES. its worth it. my pinky looks like a blue thumb.
03-18-2009, 02:03 PM
#14

Awesome writeup. I will be sure to knock this out soon.
Quick question, obviously vehicle abuse would dictate this.... but could someone make some notes on how often these Laser Iridium spark plugs need to be replaced?
Light abuse: XXX miles
Mediocure abuse: XXX miles
Heavy abuse: XXX miles
Track abuse: XXX miles
Maybe something like that. Then add it to the first post?

 05-14-2009, 03:09 PM
#17
Registered User

Join Date: Aug 2008
Location: Illinois
Posts: 91
Likes: 0
Received 0 Likes
on
0 Posts
good stuff here for a Rotary noob like me....couple questions...
the plugs with the grooves in them, by the electrode...are these the trailing, or leading ones?
also, where can i buy new coil packs?
the plugs with the grooves in them, by the electrode...are these the trailing, or leading ones?
also, where can i buy new coil packs?
05-14-2009, 03:09 PM
#18
Registered User
Join Date: Aug 2008
Location: Illinois
Posts: 91
Likes: 0
Received 0 Likes
on
0 Posts
05-14-2009, 10:10 PM
#19
Senior Member

Join Date: Jul 2003
Location: DC Metro Area, USA
Posts: 1,554
Likes: 0
Received 0 Likes
on
0 Posts
05-15-2009, 12:08 PM
#20
Registered User
Join Date: Aug 2008
Location: Illinois
Posts: 91
Likes: 0
Received 0 Likes
on
0 Posts

 07-18-2009, 07:10 PM
#23
Registered

Join Date: Jun 2009
Posts: 294
Likes: 0
Received 0 Likes
on
0 Posts
07-18-2009, 07:32 PM
#24
Registered
iTrader: (2)

Join Date: Nov 2008
Location: Frederick, CO.
Posts: 24
Likes: 0
Received 0 Likes
on
0 Posts
Bump! x2 I was also wondering the same thing. Im planning on doing this tomorrow (Sunday). If you do check the gap, do u use the same coin things as you would for other spark plugs? Any info on the gapping issue would greatly help!! Thanks!!
07-18-2009, 08:07 PM
#25
Utopia Taco Bell

Well after waiting for a reply to my gap question and not getting any answers I justed plugged and played the spark plugs.
1500 miles later Im getting same performance and better gas mileage. No problems.
1500 miles later Im getting same performance and better gas mileage. No problems.