DIY: Remove SSV (beta/teaser video)
 03-27-2010, 01:30 PM
#51

I wanted to make a more detailed DIY, but people seem to be doing OK with the basic video I shot.
People don't realize that the maintenance ports on the lower intake manifold only squirts into the primary runners... which makes sense because there are no valves to block the fluid.
So spraying "decarb" into these ports will never reach the SSV.
And like I pointed out earlier, spraying through the top (like through the brake booster line or throttle body) will only cover a small percentage of the valve for two reasons.
1) Fluid will go through the primary, secondary, and auxiliary runners, so you can't concentrate it at just the secondary.
2) The valve is closed at this time, so you're only hitting the exposed area. Fluid will make its way around the valve (the valve doesn't make a complete seal), but even then its a small percentage you're covering.


 03-29-2010, 11:17 AM
#54
Registered
iTrader: (1)

Join Date: Jun 2009
Location: Philly Burbs
Posts: 123
Likes: 0
Received 0 Likes
on
0 Posts
holy ***** this looks awful. Im almost 40k and hope i never have to do this. Looks like im ordering a catch can this week. Are all the catch cans virtually the same or is it most def. a get what you pay for type of part?
03-29-2010, 11:22 AM
#55
The goal of a catch can is to keep that oil mist out of your intake. Beyond that, its really up to you.
04-26-2010, 08:33 PM
#60
Registered User

Join Date: Apr 2010
Posts: 10
Likes: 0
Received 0 Likes
on
0 Posts
6 inches from gold
Jon, fantastic job on the video. Realize this is an older thread, but if you see this I'm wondering if you can confirm something. I took this on today and got as far as the lower t-stat housing (in other words, almost to the SSV valve). I wasn't able to get to the lower nut on the inside. Have to take another crack at it later. I don't yet have a shop manual. Can you confirm there are 3 nuts holding the lower t-stat housing (the two in back and the one up front) or am overlooking another? In this part of the video it sort of jumps ahead after the first nut in front is removed. Appreciate all the time you've put into this. Thanks.
04-26-2010, 08:57 PM
#61
stingray65- That is why I labeled it as a beta/teaser DIY because I haven't gone "step-by-step" with details yet.
I did want to do this next time I have to take one out, just haven't gotten to it.
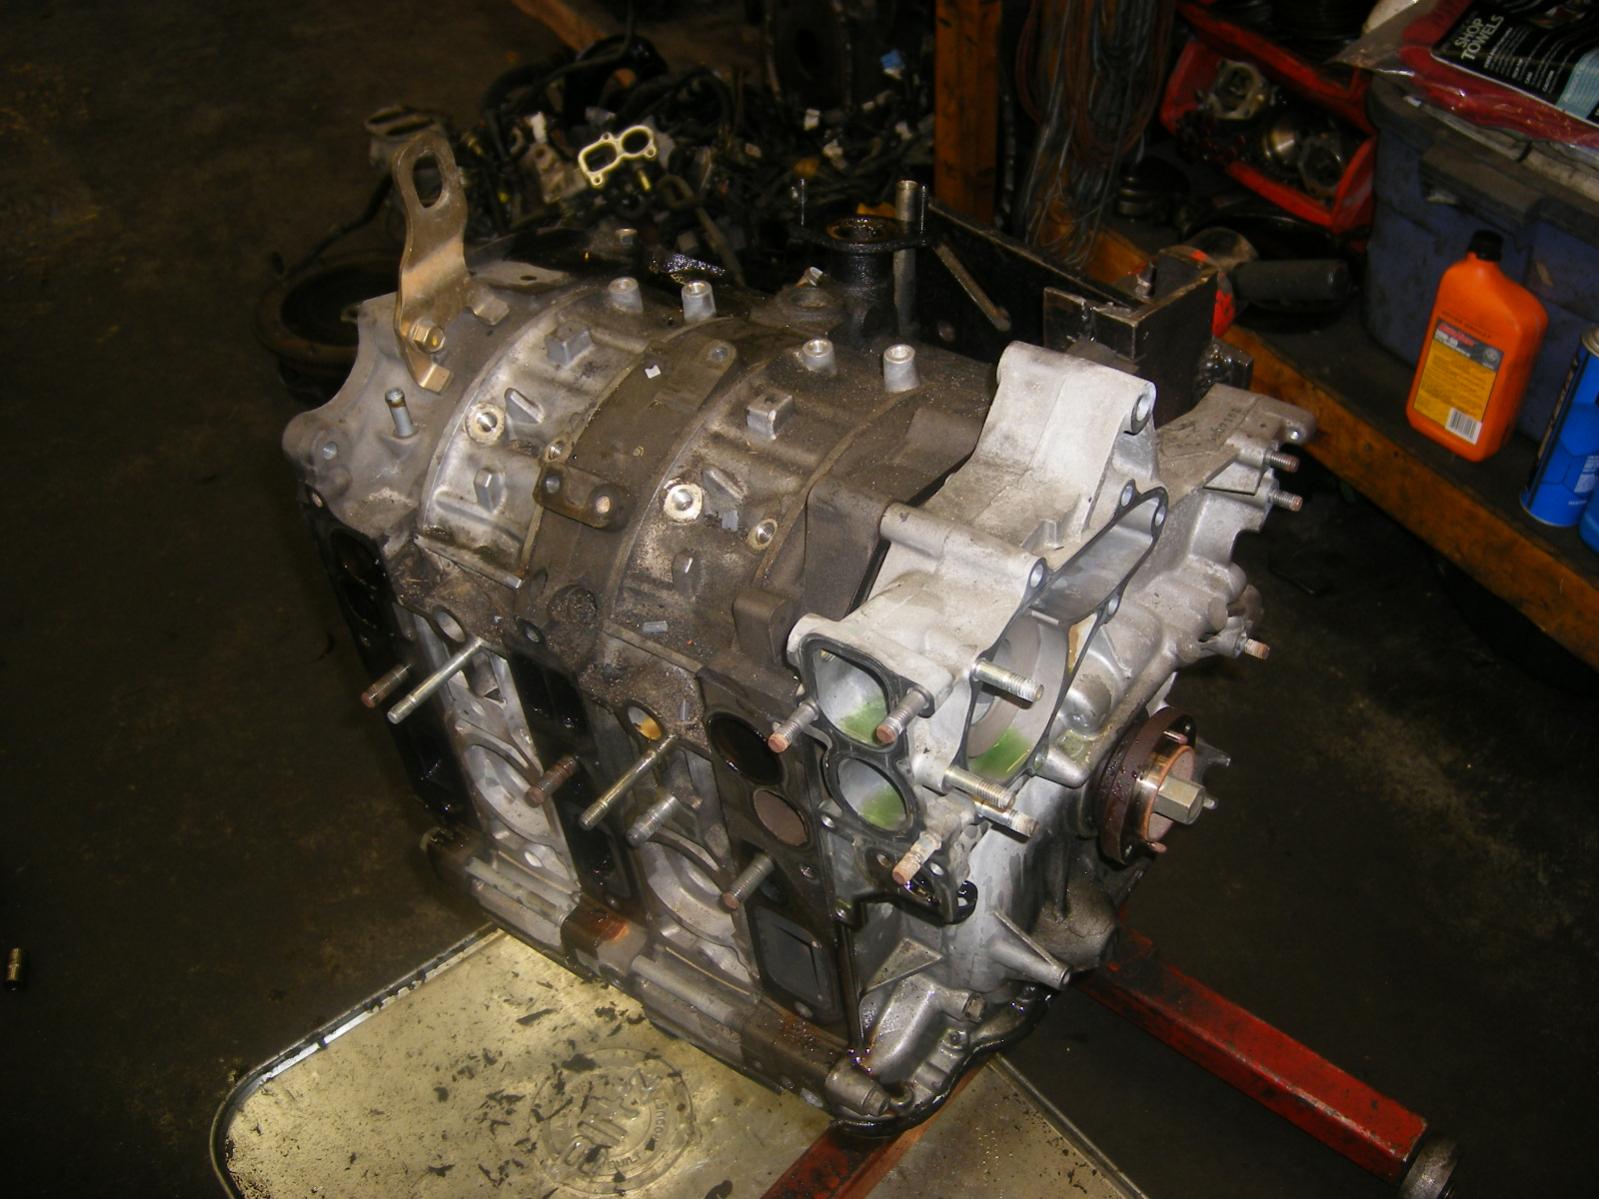
But you are correct in that there are 3 nuts holding the thermostat housing.
There is one in the back and two up front. Then you slide the housing off the studs.
It'll be easier if you remove the hoses connected to the thermostat, but its not necessary.
Here is a pic showing the engine with the thermostat removed. You can see the three studs (where the coolant is still visible):

I did want to do this next time I have to take one out, just haven't gotten to it.
But you are correct in that there are 3 nuts holding the thermostat housing.
There is one in the back and two up front. Then you slide the housing off the studs.
It'll be easier if you remove the hoses connected to the thermostat, but its not necessary.
Here is a pic showing the engine with the thermostat removed. You can see the three studs (where the coolant is still visible):
Last edited by Jon316G; 04-26-2010 at 09:10 PM.
04-27-2010, 08:46 AM
#62
Registered User
Join Date: Apr 2010
Posts: 10
Likes: 0
Received 0 Likes
on
0 Posts
Jon, thanks for the quick reply. I realize the video is "ver. 1.0," but it's still a HUGE asset. Really appreciate the photo, too. I obviously wasn't looking close enough as it seemed there was only one stud in front up top and I overlooked the lower one. Meanwhile I was struggling with how to access the lower one at the rear, which isn't even part of it! So thanks for clearing that up. By the way, the ACV pipe...Wanted to take that off but I couldn't get enough torque on the nut toward the back. Too corroded on my car even with a generous helping of Liquid Wrench. Think I rounded the nut a bit. Shame they couldn't have used something there, in an area prone to high heat and corrosion, that's bigger than 10mm. But that was a case where knowing I could flex the pipe, since I was able to see you do it in the video, was invaluable.
05-02-2010, 09:42 PM
#63
Registered User

Join Date: Apr 2009
Posts: 17
Likes: 0
Received 0 Likes
on
0 Posts
So i took on this task today..... wasnt too difficult..... I was wondering... how soon will i know if the fix worked? I started the car up, let it run for abit til it got warm so i could get coolant cycled through and what not..... the CEL never came back on... but then again, i didnt drive it anywhere.... so ill find out tomorrow when i drive to work.... How many days shouldi give this before i dont worry about it... and IF the CEL comes back on, where should i turn next?
05-03-2010, 06:19 AM
#65
Registered User
Join Date: Apr 2009
Posts: 17
Likes: 0
Received 0 Likes
on
0 Posts
Ok, well, drove to work this morning. The cel was back on before I ever pulled out of the driveway, so it came on at idle...... I check everything out yesterday while it was apart. As far as the impact swith, what's the process for testing that? The acutator seemed fine, but the impact switch seemed like it was constantly depressed and there was hardly any movement on the switch it self. Is it supposed to be like that??? Either way, my issue isn't fixed yet, I'm going to have the codes scanned again tonight to see if its the same issue or something different all together. Hoping for the best. Atleast its a learning process as far as knowing about the car itself. That's for the input, if there are other ideas, I'm open to them. Ill keep you posted on what I find.
05-03-2010, 06:23 AM
#66
You can actually feel the spring-loaded button on the switch and notice it depressing.
To test it, you need to disconnect the harness and check continuity with a meter.
I posted this earlier in this thread:
https://www.rx8club.com/showpost.php...7&postcount=41
Now if the impact switch is the only problem for you, the valve should still operator normally.
To test it, you need to disconnect the harness and check continuity with a meter.
I posted this earlier in this thread:
https://www.rx8club.com/showpost.php...7&postcount=41
Now if the impact switch is the only problem for you, the valve should still operator normally.
05-03-2010, 02:05 PM
#67

Here is mine was tough to get out and to spray a lot of carb cleaner and wiggle it to finally get it to budge out. Now with it all back together I have what I call a sifting noise coming from the intake area. Is it cause its so clean now lol?
https://www.rx8club.com/picture.php?...ictureid=17589
https://www.rx8club.com/picture.php?...ictureid=17589
05-03-2010, 08:20 PM
#69
I'm pretty positive everything is hooked up. I've looked it over many times. Don't know what it is or where its coming from. Its just in that general area of the ssv and intake chamber. When I first started driving it after doin the cleaning job it was like my coolant was disappearing out of no where but can't find any splatter spots. The coolant level is holding now so far but my light flickers on and off so guessin that sensor is gone or dirty.
05-04-2010, 08:03 AM
#70
Registered User
Join Date: Apr 2010
Posts: 10
Likes: 0
Received 0 Likes
on
0 Posts
I went back at this on Saturday. The SSV was a little resistant to sliding out at first but I used a little carb cleaner to loosen it per one of Jon's original posts. 2+ days now with the CEL off and all is working well (better acceleration at higher RPMs when the valve is operating). Got the car inspected with a passing grade yesterday (it had failed because of the CEL and this past Friday my 'probation' expired).
For this repair I took a slightly different approach than other folks who have had to deal with this. I used to do most all of my repairs (and everything else I could) out of a DIY spirit and to minimize the out-of-pocket expense. As free time has become a more precious and valuable commodity than it used to be I've been having certain work done so I could concentrate on other things. In this case, however, I definitely couldn't justify the near $3000 expense the dealerships had quoted, which included replacement of the manifold (a song and dance routine now familiar to everyone here). Of course, that was absurd. Although I knew there wasn't much to the switch and in all likelihood the actuator was okay, I decided that if I was going to take the time to pull everything apart to get in there, since the car has 83K+ miles I didn't want to have to revisit this problem again because either of those other parts later became an issue. I also didn't have the time to track down the component parts so I decided to start fresh and put in a new SSV. Again, I realize the guys who are constantly working on their engines would not go this route, but I weighed it as $300 vs. $3000 and in my situation it made sense. (Yes, I realize there was still the possibility of a solenoid issue impacting the problem but based on the dealership's initial determination regarding the code and the experience of others I decided the odds favored the valve etc.). Anyway, the reason I'm admitting this 'heresy' in a DIY forum is for the benefit of anyone in that very small minority who might choose to do the same. There is one small thing you should be aware of that held me up right as I was ready to install the valve and put everything back together. I was already aware that to help deal with the sticking problem Mazda had replaced the original SSV with a new one having a stronger actuator. However, I was so caught up in the repair that when I picked up the new part I failed to notice that the upper part of the flange is about twice as thick as on the original. (Whereas on the original SSV the upper bolt that secures the valve also secures the actuator, in the redesign the thicker flange provides the means to attach the larger actuator seperately with its own bolt.) As I was not given a longer bolt when I got the part, it wasn't until I was ready to install the thing that I realized the original M6 30mm bolt didn't even make it all the way through. It was late Saturday night when I reached this point, but I was able to get to Auto Zone before they closed and get a bolt (45mm). A flanged 40mm bolt would probably have been the ideal, but with a washer it did the job. Obviously, some folks would have caught this ahead of time or had the hardware floating around in their spare parts, but I just wanted to make note of this.
And yes, I'm definitely going to install a Greddy catch can right away.
Thanks again to Jon for the excellent video and to all who have contributed to this and related threads for making the job much more doable. This forum is an amazing resource.
05-04-2010, 01:38 PM
#71
Registered User
Join Date: Apr 2009
Posts: 17
Likes: 0
Received 0 Likes
on
0 Posts
When i had my valve out of the IM, i did fiddle with the inpact switch for a few minutes.... Im assuming that to piece covered by the dust boot it the actually switch itself, then ofcourse to small wiring harness and what not... My question is, on that switch, how far is it actually supposed to move when depressed? Because in examining mine, it didnt seem like that switch moved all that much when you pressed on it... maybe a few MM at best..... would it simply be that i was just to caught up and shallow at that particular moment that i simply reinstalled a bad impact switch? lol, it wouldnt surprise me, it was getting late and i needed the car back together to get to work the following day. If this is the case, would anybody have that part number handy to that switch so i could order a new one? i thought i saw something about it earlier in the thread and will read back through and double check after posting this...
05-04-2010, 01:56 PM
#72
Registered User
Join Date: Apr 2009
Posts: 17
Likes: 0
Received 0 Likes
on
0 Posts
I found the info on the switch part number. Ill just get one through the dealer, i can get parts at wholesale due to my job, so thats no big deal. I did want to state however, it does feel like acceleration above 6k rpms is a lot smoother since ive cleaned and reinstalled the SSV. And i know for a fact that it is working properly as you can feel the difference around the 6krpm range when the SSV kicks into action. So i feel that it is simply the switch that has given out. My car has almost 81k miles on it, so im sure theres plenty of wear and tear on the switch itself, especially considering its seen a few track days and several auto-x's and almost 20k miles of hard street driving in the year since i purchased it. Im also goign to have the codes read again, just to make sure its not something else in addition to this other issues... if i find other codes in the process, ill take notes and post up my findings....
05-04-2010, 03:24 PM
#73
stingray65- Thanks for sharing your experience.
The new valve is a good preventative measure to reduce the likelihood of this occurring in the future.
Though its too early to tell for sure how much longer this new valve will last verses the original, but it should outlast the life of the engine (unless a good amount of oil makes it onto the valve).
And the valve normally slides out without much resistance, so if you had to work it out, it was a good time to have it pulled out and cleaned.
ExBMWdrivr- I just checked my spare switch and it depressed roughly 1/4"
05-04-2010, 04:41 PM
#74
Super Moderator
Good work as always Jon...
Just thought I would put up the Part Number of the Modified Mazda SSV and Bolt..You Must also order the LONGER Bolt.
N3H5-20-160F SSV Valve .....Must be an F
9979-60-640 Bolt...Longer....Must use this bolt with this new SSV
N3H4-20-155A Gasket SSV
N3H1-13-996 Gasket , ACV (2, if needed for air pipe)