DIY: No Heat? Repair the Heater Control

 04-21-2014, 08:09 PM
#501
New Member

Join Date: Apr 2014
Posts: 1
Likes: 0
Received 0 Likes
on
0 Posts
Satisfied customer of Wingnut
Another satisfied customer here. I also had a $700+ estimate from the dealer to fix this before I found this thread. My solder joints looked fine but just added a drop of solder to each of the 3 posts on the back of the circuit board and now it is working fine. It was getting to where it would jump between 0 & 16 all the time on the A/C test so the whole heat/ac was pretty much useless.


 05-21-2014, 12:24 PM
#504
New Member

Join Date: May 2014
Posts: 2
Likes: 0
Received 0 Likes
on
0 Posts
It's stickied anyway so no harm in reviving that I can see...
I did this, and now the **** will select 0 to 16 when before is was solid zero.
Still no heat though. The next step is to flush the heater core right? Or is there something else I should try first.
I did this, and now the **** will select 0 to 16 when before is was solid zero.
Still no heat though. The next step is to flush the heater core right? Or is there something else I should try first.
06-04-2014, 07:38 AM
#505
New Member

Join Date: May 2014
Posts: 2
Likes: 0
Received 0 Likes
on
0 Posts
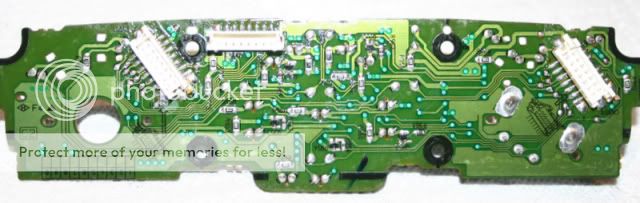
different Back of Heater Control
Hi guys my heater dosent work, i pulled out the heater control and mine looks different then i saw here, and i wanna solder it but i don't know wheres the ''3 things to solder'' in Back of my Heater Control.
I'm posting the photo of Back of my Heater Control,
can someone help me please?
I'm posting the photo of Back of my Heater Control,
can someone help me please?
06-26-2014, 04:10 PM
#506
Registered

I was going to ask a question with regards to the soldering points ( the 3 points ). Do I add solder onto the green portion of the board? I guess it would be, I just want to confirm that, since I don't want to make a mistake when soldering.
With regards to Jano's question, I really don't know...I cannot seem to find the three points on your board as well. What seemed to be obviously and apparently is not in your case...
With regards to Jano's question, I really don't know...I cannot seem to find the three points on your board as well. What seemed to be obviously and apparently is not in your case...
07-13-2014, 03:53 PM
#508
New Member

Join Date: Apr 2013
Posts: 4
Likes: 0
Received 0 Likes
on
0 Posts
Finally found a resolution to my issue - it was slightly different. Mine was stuck on hot, and the ac temp steps would only move between 13 and 16. After some testing, I determined that the potentiometer was good. I did some backtracing, and found a broken trace on the main faceplate board. Repaired it, and I have AC again!
Attached is a pic of the broken trace.
Attached is a pic of the broken trace.
07-14-2014, 12:36 PM
#509
Registered

Join Date: Jun 2013
Posts: 15
Likes: 0
Received 0 Likes
on
0 Posts
Hey, I had a question about this that may or may not be related to the heater control unit. My A/C is having two issues, so I will list them both:
1. Fan speed settings "1" and "2" both act as if it's set to "0." The A/C unit turns off as well as the fan. This was a gradual change. First 1 crapped out, then a few weeks later 2 went with it. I feel it may be the HCU as it will work if I have it set to 2 and press on it. Note that this is not jumping over to 3 as it has a lower CFM than 3.
2. When my A/C is running (haven't checked for heat, and my RX-8 is a state away getting its engine rebuilt), the driver's side gets about half of the air the passenger side does. It's also colder air coming out of the driver's side. If I have it set in the "blue" range but not all the way to cold, it can feel like it's getting more hot air in the passenger side than the driver's side. I assume this is not normal functionality.
As it's summertime in Oklahoma, I'll be leaving it on 4/coldest, so these issues are low priority. But they still persist. Thanks for any help in advance.
 07-20-2014, 09:19 PM
#511
New Member
Join Date: Apr 2013
Posts: 4
Likes: 0
Received 0 Likes
on
0 Posts
Hey, I had a question about this that may or may not be related to the heater control unit. My A/C is having two issues, so I will list them both:
1. Fan speed settings "1" and "2" both act as if it's set to "0." The A/C unit turns off as well as the fan. This was a gradual change. First 1 crapped out, then a few weeks later 2 went with it. I feel it may be the HCU as it will work if I have it set to 2 and press on it. Note that this is not jumping over to 3 as it has a lower CFM than 3.
2. When my A/C is running (haven't checked for heat, and my RX-8 is a state away getting its engine rebuilt), the driver's side gets about half of the air the passenger side does. It's also colder air coming out of the driver's side. If I have it set in the "blue" range but not all the way to cold, it can feel like it's getting more hot air in the passenger side than the driver's side. I assume this is not normal functionality.
As it's summertime in Oklahoma, I'll be leaving it on 4/coldest, so these issues are low priority. But they still persist. Thanks for any help in advance.
1. Fan speed settings "1" and "2" both act as if it's set to "0." The A/C unit turns off as well as the fan. This was a gradual change. First 1 crapped out, then a few weeks later 2 went with it. I feel it may be the HCU as it will work if I have it set to 2 and press on it. Note that this is not jumping over to 3 as it has a lower CFM than 3.
2. When my A/C is running (haven't checked for heat, and my RX-8 is a state away getting its engine rebuilt), the driver's side gets about half of the air the passenger side does. It's also colder air coming out of the driver's side. If I have it set in the "blue" range but not all the way to cold, it can feel like it's getting more hot air in the passenger side than the driver's side. I assume this is not normal functionality.
As it's summertime in Oklahoma, I'll be leaving it on 4/coldest, so these issues are low priority. But they still persist. Thanks for any help in advance.
07-23-2014, 04:40 PM
#512
Registered

Join Date: Jun 2010
Posts: 14
Likes: 0
Received 0 Likes
on
0 Posts
I was trying this DIY but I was unable to remove the radio. I managed to disconnect the first two connectors but I couldn't reach behind the radio to disconnect the last three connections. How did everyone do this? I don't even have fat hands =(
Anyone in the Toronto willing to help a poor guy out? Just don't feel like paying the dealership to get it fixed. Will to compensate for time and effort.
Thanks!
Alex
Anyone in the Toronto willing to help a poor guy out? Just don't feel like paying the dealership to get it fixed. Will to compensate for time and effort.
Thanks!
Alex
Last edited by lemonflavour; 07-23-2014 at 04:55 PM.
07-24-2014, 10:42 AM
#513
New Member

Join Date: Apr 2014
Posts: 2
Likes: 0
Received 0 Likes
on
0 Posts
I was trying this DIY but I was unable to remove the radio. I managed to disconnect the first two connectors but I couldn't reach behind the radio to disconnect the last three connections. How did everyone do this? I don't even have fat hands =(
Anyone in the Toronto willing to help a poor guy out? Just don't feel like paying the dealership to get it fixed. Will to compensate for time and effort.
Thanks!
Alex
Anyone in the Toronto willing to help a poor guy out? Just don't feel like paying the dealership to get it fixed. Will to compensate for time and effort.
Thanks!
Alex
I had to get a long skinny screwdriver to push the little locking tabs down. But it wasn't easy..... Good Luck!
08-13-2014, 12:07 PM
#514
New Member

Join Date: Aug 2014
Posts: 1
Likes: 0
Received 0 Likes
on
0 Posts
Thanks
No heat and only cooling, or only heat and no cooling, or erratic temperature control?
The temperature control **** seems to have quite a bit of issues for early RX8 owners where the system will cool only, and not provide heat despite the position of the control ****. This can also work in the opposite way, only heating and no cooling. After living with it for a season, I finally pulled the heater control unit out and repaired the circuit board. It was simple to repair and because I was going to have to pull the unit out anyway to replace it, it was not much extra work. The replacement unit (part FE01-61-190) retails for $350, some vendors on this site sell it for $240ish, and I hear there are some that sell used parts for $125ish. It is definitely covered under warranty for those lucky enough to be under warranty.
If you do not have heat, or only have heat, IMHO it is most likey the AC/heater control unit. This is the part which has the AC/heat control buttons and *****.
Easy Diagnosis:
The easiest way to verify this is to turn on the radio, press and hold the power on/off button and press and hold the scan-up button for a second (full second). The word "A/C TEMP" should appear on the left of the display and a number from 0 to 16 on the right. I suspect yours will have the number 0 (or 16 if heating only problem) displayed no matter where you turn the temperature control ****. If this is the case you could turn the temp. **** to full heat and see if it goes to 16 after pushing down or to the right on the ****.
In a working system, the number moves evenly in increments of 1, from 0 to 16 as you turn the temperature ****.
Easy Fix:
I was able to take mine out and solder 3 loose connections to fix it.
The beginning steps are the same as for any radio removal procedure. Instead of reinventing the wheel I would like to direct anyone to John Masone�s excellent DIY for radio removal at this DIY:
DIY: Radio Removal / Add an AUX Input - RX8Club.com
or directly linked here:
What's My IP Address? - Obsolete Browser Page
The procedure is basically the same until page 7, second frame. Here is the modified step at that phase:

Removal of Heater Control Unit
I did not take pictures of the next step which is basically removing the cover on the temperature **** side of the control which requires a small screwdriver to three plastic clips on the perimeter of the cover. This will be evident when you get it in front of you. I stripped the circuit board down further than you may need to because I was also repairing cracked defrost (windshield and rear) buttons with superglue.
Then re-solder the 3 joints indicated in the next photos. A little bit of heat and just a little extra solder and they should be good to go.

Front of Heater Control Circuit Board

Front of Temperature Control **** (3 connections noted)
Back of Heater Control Circuit Board

Back of Heater Control ****

3 Bad Solder Joints (Note cracks) Prior to Re-soldering
I did the power-button/up scan combination to get the head unit to display the dial position and it now travels even increments from 0 to 16, instead of jumping from 0 to 16 when pushed like before. And the temperature control works perfectly.
Good luck.
The temperature control **** seems to have quite a bit of issues for early RX8 owners where the system will cool only, and not provide heat despite the position of the control ****. This can also work in the opposite way, only heating and no cooling. After living with it for a season, I finally pulled the heater control unit out and repaired the circuit board. It was simple to repair and because I was going to have to pull the unit out anyway to replace it, it was not much extra work. The replacement unit (part FE01-61-190) retails for $350, some vendors on this site sell it for $240ish, and I hear there are some that sell used parts for $125ish. It is definitely covered under warranty for those lucky enough to be under warranty.
If you do not have heat, or only have heat, IMHO it is most likey the AC/heater control unit. This is the part which has the AC/heat control buttons and *****.
Easy Diagnosis:
The easiest way to verify this is to turn on the radio, press and hold the power on/off button and press and hold the scan-up button for a second (full second). The word "A/C TEMP" should appear on the left of the display and a number from 0 to 16 on the right. I suspect yours will have the number 0 (or 16 if heating only problem) displayed no matter where you turn the temperature control ****. If this is the case you could turn the temp. **** to full heat and see if it goes to 16 after pushing down or to the right on the ****.
In a working system, the number moves evenly in increments of 1, from 0 to 16 as you turn the temperature ****.
Easy Fix:
I was able to take mine out and solder 3 loose connections to fix it.
The beginning steps are the same as for any radio removal procedure. Instead of reinventing the wheel I would like to direct anyone to John Masone�s excellent DIY for radio removal at this DIY:
DIY: Radio Removal / Add an AUX Input - RX8Club.com
or directly linked here:
What's My IP Address? - Obsolete Browser Page
The procedure is basically the same until page 7, second frame. Here is the modified step at that phase:
Removal of Heater Control Unit
I did not take pictures of the next step which is basically removing the cover on the temperature **** side of the control which requires a small screwdriver to three plastic clips on the perimeter of the cover. This will be evident when you get it in front of you. I stripped the circuit board down further than you may need to because I was also repairing cracked defrost (windshield and rear) buttons with superglue.
Then re-solder the 3 joints indicated in the next photos. A little bit of heat and just a little extra solder and they should be good to go.
Front of Heater Control Circuit Board
Front of Temperature Control **** (3 connections noted)
Back of Heater Control Circuit Board
Back of Heater Control ****
3 Bad Solder Joints (Note cracks) Prior to Re-soldering
I did the power-button/up scan combination to get the head unit to display the dial position and it now travels even increments from 0 to 16, instead of jumping from 0 to 16 when pushed like before. And the temperature control works perfectly.
Good luck.
This fixed my problem. THANK YOU FOR SAVING ME ALOT OF MONEY!!!
09-13-2014, 07:46 PM
#515
New Member

Join Date: Sep 2014
Posts: 2
Likes: 0
Received 0 Likes
on
0 Posts
No heat no ac not blowing any air at all. nothing
Hey guys. I know you all are asking about the hot blowing cold or cold blowing hot problem but does anyone know what it might be if my air isn't blowing at all? no air, no hot no cold, doesn't turn on at all.... please help. The ac button won't even turn the light on. Shows "controls" as to where it is supposed to be blowing but not blowing anything anywhere. took the whole thing apart, my soldered areas are cracked a bit but I'm not getting anything blowing at all so I'm not sure what that problem may be. Also tried the "reset" with the radio controls. All are set to where they need to be but still nothing. My fuses look good but haven't tried changing them out yet. Any ideas on what else it could be? Thanks
Last edited by abutifulnightmare; 09-13-2014 at 07:56 PM.
09-13-2014, 07:52 PM
#516
New Member
Join Date: Sep 2014
Posts: 2
Likes: 0
Received 0 Likes
on
0 Posts
I was trying this DIY but I was unable to remove the radio. I managed to disconnect the first two connectors but I couldn't reach behind the radio to disconnect the last three connections. How did everyone do this? I don't even have fat hands =(
Anyone in the Toronto willing to help a poor guy out? Just don't feel like paying the dealership to get it fixed. Will to compensate for time and effort.
Thanks!
Alex
Anyone in the Toronto willing to help a poor guy out? Just don't feel like paying the dealership to get it fixed. Will to compensate for time and effort.
Thanks!
Alex
go under the steering wheel and pull off the black plastic. under that there will be a metal piece, unscrew it. After that take a flashlight and there is going to be a bolt far inside that screws into the radio that you have to remove before you can pull it out. I'm posting a ling it a youtube video, go to about 3 minutes and it will show you what you need to know.
Last edited by abutifulnightmare; 09-13-2014 at 07:54 PM.
09-13-2014, 08:05 PM
#517
You gonna eat that?
iTrader: (1)

He probably figured it out by now, but thanks for the link in case anyone should need it.
 10-09-2014, 12:02 AM
#518
New Member

Join Date: Oct 2014
Posts: 3
Likes: 0
Received 0 Likes
on
0 Posts
Help
Hi All
I cannot for the life of me figure out how to un-clip the wire plug as indicated in this photo. Is there a clip or something that I have to press on?
The plug is indicated in the circled photo.
Please help, this is really frustrating!
I cannot for the life of me figure out how to un-clip the wire plug as indicated in this photo. Is there a clip or something that I have to press on?
The plug is indicated in the circled photo.
Please help, this is really frustrating!
10-09-2014, 03:11 AM
#519
It's a clip. If you press up at the 6-o'clock part of it and push forward. It should slide out. Using a flat head will work also, you can guide it press then up on the tab and push it forward, it will slide out. That's how I remember when I removed it to fix my heater control ****.
10-10-2014, 03:36 PM
#520
New Member
Join Date: Oct 2014
Posts: 3
Likes: 0
Received 0 Likes
on
0 Posts
Got it!
It's a clip. If you press up at the 6-o'clock part of it and push forward. It should slide out. Using a flat head will work also, you can guide it press then up on the tab and push it forward, it will slide out. That's how I remember when I removed it to fix my heater control ****.
I used a tiny screwdriver used for sunglasses.
I have 2 connections remaining (see attached).
1. Do you know how to remove the antenna connection? It looks like it should be hand untightened!
2. The wire harness that remains. Do you know where the tab for this is?
10-11-2014, 03:29 AM
#521
You are welcome, I don't exact know what you are trying to do, are you trying to remove it? Seems like you have since unless that isn't your picture.
The antenna, you have to be careful removing. I broke the tip of mine trying to rush things. The harness circled #1 is directly at the center and the tab I think is at the 12 o'clock. If you remove the center vents, held by two phillips screws just above the radio, it will give you more room to reach over to the back of the unit. Disconnect the harness, which is the one below the antenna in the picture, connecting the unit to the LED screen will allow you to have slack so you could disconnect both the antenna and the radio harness.
I could make a step-by-step video but it is a bit late right now.
10-11-2014, 07:16 PM
#522
New Member
Join Date: Oct 2014
Posts: 3
Likes: 0
Received 0 Likes
on
0 Posts
Principles that I have learned
You are welcome, I don't exact know what you are trying to do, are you trying to remove it? Seems like you have since unless that isn't your picture.
The antenna, you have to be careful removing. I broke the tip of mine trying to rush things. The harness circled #1 is directly at the center and the tab I think is at the 12 o'clock. If you remove the center vents, held by two phillips screws just above the radio, it will give you more room to reach over to the back of the unit. Disconnect the harness, which is the one below the antenna in the picture, connecting the unit to the LED screen will allow you to have slack so you could disconnect both the antenna and the radio harness.
I could make a step-by-step video but it is a bit late right now.
The antenna, you have to be careful removing. I broke the tip of mine trying to rush things. The harness circled #1 is directly at the center and the tab I think is at the 12 o'clock. If you remove the center vents, held by two phillips screws just above the radio, it will give you more room to reach over to the back of the unit. Disconnect the harness, which is the one below the antenna in the picture, connecting the unit to the LED screen will allow you to have slack so you could disconnect both the antenna and the radio harness.
I could make a step-by-step video but it is a bit late right now.
I will tell everyone some principles when doing this work.
1. do not pull on a wire harness to unplug them without finding the locking tab. All wire connections have a tab! These little tabs in the wire harness are usually found in the 6 oclock position.
2. get an electronics screwdriver (small one) with a tiny head so you can press on the wire harness tabs!
3. you do not have to remove the entire radio to do this fix. The antenna and last wire harness DO NOT have to be removed. As long as you can remove the face plate, you are fine!
4. Use a small mirror to find the wire harness tabs. Don't try to pull a wire out without pressing a tab.
5. When you finally see the circuit board, the 3 connectors look fine to the naked eye, but use the fingernail to move them and you will see there is a minuscule space between the solder joint and the terminal. You can tell that the solder joint is broken!
Hope that helps people. This fix was a lot of work for me because of the confined work space.
NOTE: the last 2 connectors described in the previous posts did not have to be removed. I got away without removing them.
Last edited by imseppl; 10-11-2014 at 07:20 PM.
11-02-2014, 04:43 PM
#524
New Member

Join Date: Oct 2014
Posts: 2
Likes: 0
Received 0 Likes
on
0 Posts
I just got done trying this, and it worked perfectly. The most annoying part for me was finding (yes finding !?!) the bolt to undo the radio.
After looking around under the steering column for half an hour or so and not quite being able to get my head in the right spot to see the bolt, I finally removed the metal part that goes across the bottom of the column (you can see it in the bottom picture on page 4 in the radio removal DIY). It is held on with 4 screws. With that out of the way, I was able to see the bolt and get at it much easier.
Also, the part about being careful about not dropping the bolt is important. I was being very careful right up until I dropped it into a bottomless pit.
11-02-2014, 07:54 PM
#525
New Member

Join Date: Nov 2014
Posts: 2
Likes: 0
Received 0 Likes
on
0 Posts
We started out with cold air on the drivers side, and lukewarmish air on the passenger side. We did this fix, and now we have lukewarmish air on the drivers side, and warmER air on the passenger side, but nothing like actual HEAT.
BUT the Radio/Scan button 0-16 are also now working perfectly. We let the car idle for a very long time to ensure it was fully at temperature, but still not getting the roast you out of the car heat.
Any ideas on what to do next?
BUT the Radio/Scan button 0-16 are also now working perfectly. We let the car idle for a very long time to ensure it was fully at temperature, but still not getting the roast you out of the car heat.
Any ideas on what to do next?

