DIY: How to replace ignition coils
 11-11-2011, 09:30 PM
#51

HERES MY THREAD, diy made some years ago
https://www.rx8club.com/series-i-do-yourself-forum-73/diy-mazda-ignition-coils-pics-178515/
youre welcome, shouldve searched before you posted a new thread
https://www.rx8club.com/series-i-do-yourself-forum-73/diy-mazda-ignition-coils-pics-178515/
youre welcome, shouldve searched before you posted a new thread
 12-06-2011, 06:52 PM
#52
Registered

Join Date: Sep 2011
Posts: 11
Likes: 0
Received 0 Likes
on
0 Posts
No idle after change
So I changed all the coils 1 at a time. Car starts right up but will stall on idle. So basically no idle. I drove it around for 15 minutes and it seems to be idling now. Does the computer have to re-learn after the change? Thanks for answers
 12-22-2011, 08:39 PM
#54
Certified Jedi

Thought I had to change my coils as it was misfiring and such after I had changed the plugs.... Long story short I decided to double and triple check all the connections to make sure everything was fully seated while cleaning the packs. After disconnecting and reconnecting and using one of my weapons cleaning kit bristle brushes to get off any dirt and residue off the metal bracket (don't know the actual name that the packs sit on) it now works fine. I did initially throw a CEL upon startup but after cruising for about an hour it went away not to mention it feels a lot smoother and my original issue of my 05' AT stalling randomly when I stopped (would hold a 500 RPMs for a sec then die) isn't there anymore. Epic win for using a bit of common sense. Still gonna invest in purchasing the BHR ignition system though.
12-24-2011, 01:47 PM
#55

Thanks
Just wanted to say thanks for the DIY, it was extremely helpful and made the process quick and painless. I ended up removing the air filter box completely just to have more room.
Thanks again!
Thanks again!
12-24-2011, 03:26 PM
#56
Registered Maniac

Join Date: Dec 2011
Location: Sterling, VA
Posts: 70
Likes: 0
Received 0 Likes
on
0 Posts
I just finished doing mine this morning. All went well except that I dropped one of the nuts into my engine bay. It didn't go all the way through to the driveway unfortunately, and I can't see it anywhere. Hopefully it just falls out once I start driving. I got an exact match from Home Depot and was good to go.
Lastly, man those 3rd and 4th plugs are hard to get to! Especially the 4th (closest to the windshield). I need much tinier hands! I was able to get the plug off with a flathead screwdriver.
Oh, the car fires up much smoother and idles better! I thought it was great before!
It didn't go all the way through to the driveway unfortunately, and I can't see it anywhere. Hopefully it just falls out once I start driving. I got an exact match from Home Depot and was good to go.Lastly, man those 3rd and 4th plugs are hard to get to! Especially the 4th (closest to the windshield). I need much tinier hands! I was able to get the plug off with a flathead screwdriver.
Oh, the car fires up much smoother and idles better! I thought it was great before!
12-25-2011, 09:14 AM
#57
Registered

Join Date: May 2010
Posts: 18
Likes: 0
Received 0 Likes
on
0 Posts
I just finished doing mine this morning. All went well except that I dropped one of the nuts into my engine bay. It didn't go all the way through to the driveway unfortunately, and I can't see it anywhere. Hopefully it just falls out once I start driving. I got an exact match from Home Depot and was good to go.
Lastly, man those 3rd and 4th plugs are hard to get to! Especially the 4th (closest to the windshield). I need much tinier hands! I was able to get the plug off with a flathead screwdriver.
Oh, the car fires up much smoother and idles better! I thought it was great before!
It didn't go all the way through to the driveway unfortunately, and I can't see it anywhere. Hopefully it just falls out once I start driving. I got an exact match from Home Depot and was good to go.Lastly, man those 3rd and 4th plugs are hard to get to! Especially the 4th (closest to the windshield). I need much tinier hands! I was able to get the plug off with a flathead screwdriver.
Oh, the car fires up much smoother and idles better! I thought it was great before!
 12-25-2011, 09:38 AM
#58
Registered

I just finished doing mine this morning. All went well except that I dropped one of the nuts into my engine bay. It didn't go all the way through to the driveway unfortunately, and I can't see it anywhere. Hopefully it just falls out once I start driving. I got an exact match from Home Depot and was good to go.
It didn't go all the way through to the driveway unfortunately, and I can't see it anywhere. Hopefully it just falls out once I start driving. I got an exact match from Home Depot and was good to go..
 02-07-2012, 12:41 AM
#60
Registered

Join Date: Jun 2011
Posts: 15
Likes: 0
Received 0 Likes
on
0 Posts
Did my coils today, but it turns out that the 2003 Jap import ECU has a HEAP more codes and checking in the ECU and rejected my new coils, (CEL) p0351 p0352 p0353 p0354, I decided to post this in here so that others will know.
While these CEL codes don't show up on a lot of mazdas code list they are legit and refer to each individual coil. After spending a while on the phone to Mazda they confessed that the Jap import (RHD) does have an ECU containing many non-standard codes.
Turns out that the above codes are usually disabled in the USA and EU and most UK AUS models not imported from Japan and hence when you replace the coils with the new 2003-2011 coils they don't throw a CEL.
So how do you fix this if you have a Jap Import (like most 2003s in NZL) ... This is a very good question ! The coils work fine with no issues just the ECU doesn't see it as a genuine Mazda coil.. Im expecting that they will probably have to re-flash the ECU but I'm still waiting to hear.
The performance is much better than my old coils, the only difference i can see is one set of numbers
Stock : N3H1-18-100B A1C-1355 0434
New : N3H1-18-100C A1C-1355 1066
I tested these coils with a Multimeter looking at the resistance as per mazdas check sheet and all test fine.
02-12-2012, 04:47 AM
#61

Just wanted to add I did this last week without removing anything. it was a little annoying and i got some scrapes, but for anyone that doesn't know how to remove anything else they can follow a DIY and skip the airbox removal etc... just find a good place to get at everything go slow, and remove the nuts by hand (after loosening with a socket). getting everything back in was the worst part. more experienced people might find this stupid but I thought it was worth sharing that it is possible!
 04-30-2012, 01:44 PM
#63
 09-07-2012, 07:48 PM
#64
Registered

Join Date: Jun 2009
Location: The Great Pagoda of Funn
Posts: 35
Likes: 0
Received 0 Likes
on
0 Posts
No offense, and mine isn't going to be worded well as im going to rush this but that guide to removing coils is way too involved. I try to avoid pulling the airbox at all costs as it is a pain in the ***, also there's no reason to disconnect the battery, while a "standard procedure" for electrical work it's not really necessary.
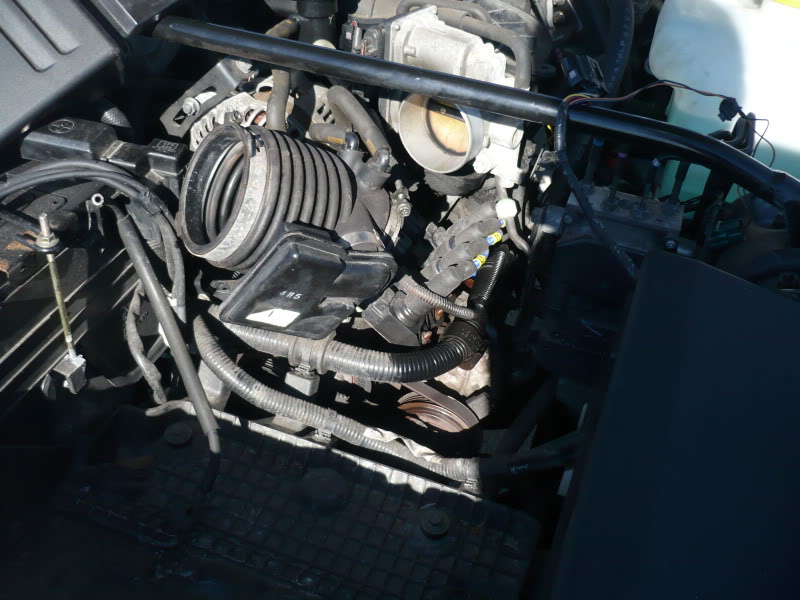
All you really need is to remove the 10mm hose clamp on the square plastic box to the right of the TB, unclip the small plastic hose attached to it. Then remove the black box.
You'll be able to see the coils rather clearly. There is a clip for the harness attached to the coil mounting plate, with a firm one hand push downward it will bend out of the way of the first coil's nut making all 4 easily accessible.
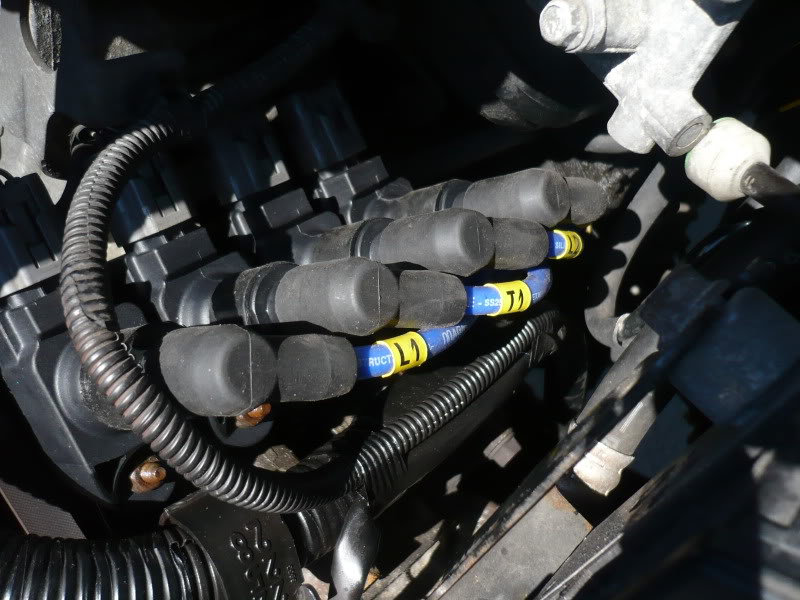
Now remove the spark plug wires from the coils, easiest way to do this is (standing over the fender) rock them towards the front and back of the car, then with your hand on the boot using one finger grab the lip of the boot and try peeling it up while lifting the boot, this is to break the seal between the rubber and the coil (due to the heat they become semi bonded)
After that use a 1/4" ratchet with a decent size extension (i use an extension that reaches over the hoodline so i dont have to lean over at all, im just lazy) also a 1/4" swivel adapter and 10mm deep socket. May want to have a magnet handy to grab the 4 nuts when you remove them.
Now with the nuts removed you should be able to pivot the bolt hole portion of the coil up and over the stud, there will be enough slack in the wiring to pull it slightly towards you and make disconnecting the connector easier.
To reassemble proceed in reverse order.
Thats how i do it daily, makes changing all 4 coils about a 5-10 minute affair.
also remember the coils, from firewall forward, are t2,l2,t1,l1.
kevin.
All you really need is to remove the 10mm hose clamp on the square plastic box to the right of the TB, unclip the small plastic hose attached to it. Then remove the black box.
You'll be able to see the coils rather clearly. There is a clip for the harness attached to the coil mounting plate, with a firm one hand push downward it will bend out of the way of the first coil's nut making all 4 easily accessible.
Now remove the spark plug wires from the coils, easiest way to do this is (standing over the fender) rock them towards the front and back of the car, then with your hand on the boot using one finger grab the lip of the boot and try peeling it up while lifting the boot, this is to break the seal between the rubber and the coil (due to the heat they become semi bonded)
After that use a 1/4" ratchet with a decent size extension (i use an extension that reaches over the hoodline so i dont have to lean over at all, im just lazy) also a 1/4" swivel adapter and 10mm deep socket. May want to have a magnet handy to grab the 4 nuts when you remove them.
Now with the nuts removed you should be able to pivot the bolt hole portion of the coil up and over the stud, there will be enough slack in the wiring to pull it slightly towards you and make disconnecting the connector easier.
To reassemble proceed in reverse order.
Thats how i do it daily, makes changing all 4 coils about a 5-10 minute affair.
also remember the coils, from firewall forward, are t2,l2,t1,l1.
kevin.

Took less than an hour, being careful, taking breaks. So glad I didn't have to remove the airbox, etc. to get this done. My engine, which had been idling rough and this week suddenly starting sounding like a cross between a lawn mower and a vacuum cleaner, is now running perfectly again. After I get a wobble extension, on to the plugs !
 02-07-2013, 03:28 PM
#67
Registered User

Join Date: Dec 2012
Posts: 1
Likes: 0
Received 0 Likes
on
0 Posts
ignition coil replacement
Just changed my spark plugs after a bit of a missfire at a cost of �120  even worse it hasnt fixed the problem . Have ordered ignition coils now in the hope that this will sort my agony out , hope to install them this weekend after reading how to do it from a fellow rx8 owner , wish me luck and i will let you all know how it goes ...
even worse it hasnt fixed the problem . Have ordered ignition coils now in the hope that this will sort my agony out , hope to install them this weekend after reading how to do it from a fellow rx8 owner , wish me luck and i will let you all know how it goes ...
02-07-2013, 05:17 PM
#68

Just wanted to add that you CAN do the coils without removing the airbox but i'm sure the time taken to remove it must be half the extra time taken to do it with it in place.
I did my coils the other day and found the extra visability and space given by doing this VERY usefull.
I did my coils the other day and found the extra visability and space given by doing this VERY usefull.

 07-11-2013, 01:18 PM
#70
New Member

Join Date: May 2009
Location: Westlake Village, CA
Posts: 5
Likes: 0
Received 0 Likes
on
0 Posts
No offense, and mine isn't going to be worded well as im going to rush this but that guide to removing coils is way too involved. I try to avoid pulling the airbox at all costs as it is a pain in the ***, also there's no reason to disconnect the battery, while a "standard procedure" for electrical work it's not really necessary.
All you really need is to remove the 10mm hose clamp on the square plastic box to the right of the TB, unclip the small plastic hose attached to it. Then remove the black box.
You'll be able to see the coils rather clearly. There is a clip for the harness attached to the coil mounting plate, with a firm one hand push downward it will bend out of the way of the first coil's nut making all 4 easily accessible.
Now remove the spark plug wires from the coils, easiest way to do this is (standing over the fender) rock them towards the front and back of the car, then with your hand on the boot using one finger grab the lip of the boot and try peeling it up while lifting the boot, this is to break the seal between the rubber and the coil (due to the heat they become semi bonded)
After that use a 1/4" ratchet with a decent size extension (i use an extension that reaches over the hoodline so i dont have to lean over at all, im just lazy) also a 1/4" swivel adapter and 10mm deep socket. May want to have a magnet handy to grab the 4 nuts when you remove them.
Now with the nuts removed you should be able to pivot the bolt hole portion of the coil up and over the stud, there will be enough slack in the wiring to pull it slightly towards you and make disconnecting the connector easier.
To reassemble proceed in reverse order.
Thats how i do it daily, makes changing all 4 coils about a 5-10 minute affair.
also remember the coils, from firewall forward, are t2,l2,t1,l1.
kevin.
I followed the approach given by Kevin (teknics) in post #5 above. It worked just fine. I did not even need a wobbly or universal socket extension, just straight extensions worked fine. I think it took me well over an hour, but I'm always a very slow "mechanic."
Here are a few tips that might help you avoid some pain and suffering:
1. If you don't have a Craftsman telescoping magnet or a magnetized 10mm socket or something like that, then I would go buy one to prevent dropping the coil nuts into the engine compartment. I unscrewed each nut with a socket wrench almost all the way, then I used the telescoping magnet like a wrench to twist the nut off and carefully pull it up out of the engine bay. When reassembling, I used the magnet again to start each nut before finishing with a socket wrench (preferably a 1/4-inch drive torque wrench set to 62-86 in-lbf). The magnet fits into the confined spaces much better than your hands, and of course your finger tips are sadly not magnetized.
2. Probably the hardest part was removing the wiring connector from behind each coil. I recommend you use the longest flat tip screwdriver that you have to pry them off. Take your time and be as gentle as possible, and they should all just pop off with no trouble.
3. Make sure you have at least 12-inches of extension(s) that fit your torque wrench; otherwise you'll have to tighten the nuts by feel and be very careful not to over-tighten them and crack the plastic part of the coil. And a 1/4-inch drive torque wrench should give you the proper range of 62-86 in-lbf; a 1/2-inch drive torque wrench probably won't go below 120 in-lbf (10 ft-lbf), if that low.
By the way, the black box that needs removed in this approach is the air intake resonance chamber (part # 13-195), which is apparently some sort of muffler.
Thanks to Kevin and the others for their help.
Scott
07-11-2013, 02:11 PM
#71

I followed the approach given by Kevin (teknics) in post #5 above. It worked just fine. I did not even need a wobbly or universal socket extension, just straight extensions worked fine. I think it took me well over an hour, but I'm always a very slow "mechanic."
Here are a few tips that might help you avoid some pain and suffering:
1. If you don't have a Craftsman telescoping magnet or a magnetized 10mm socket or something like that, then I would go buy one to prevent dropping the coil nuts into the engine compartment. I unscrewed each nut with a socket wrench almost all the way, then I used the telescoping magnet like a wrench to twist the nut off and carefully pull it up out of the engine bay. When reassembling, I used the magnet again to start each nut before finishing with a socket wrench (preferably a 1/4-inch drive torque wrench set to 62-86 in-lbf). The magnet fits into the confined spaces much better than your hands, and of course your finger tips are sadly not magnetized.
2. Probably the hardest part was removing the wiring connector from behind each coil. I recommend you use the longest flat tip screwdriver that you have to pry them off. Take your time and be as gentle as possible, and they should all just pop off with no trouble.
3. Make sure you have at least 12-inches of extension(s) that fit your torque wrench; otherwise you'll have to tighten the nuts by feel and be very careful not to over-tighten them and crack the plastic part of the coil. And a 1/4-inch drive torque wrench should give you the proper range of 62-86 in-lbf; a 1/2-inch drive torque wrench probably won't go below 120 in-lbf (10 ft-lbf), if that low.
By the way, the black box that needs removed in this approach is the air intake resonance chamber (part # 13-195), which is apparently some sort of muffler.
Thanks to Kevin and the others for their help.
Scott
I found unplugging the connector on the back of the coils the hardest part. To start with it took me a while to figure out just where to press to remove the latch (press down at the rear of the top of the plug). I did then use a flat bladed screwdriver to carefully pry #3 and #4 off since I could not reach them well enough to squeeze and pull.
I did the leads at the same time. I reached through the wheel well to unplug the leads from the two further plugs
All in, it took at least an hour and probably an hour and a half. Not something I want to do again any time soon - the space is painfully tight.
07-14-2013, 12:22 PM
#72
New Member
Join Date: May 2009
Location: Westlake Village, CA
Posts: 5
Likes: 0
Received 0 Likes
on
0 Posts
Rough Idle, CELs, and Stalling Problems Solved
So here's what happened to my 2004 RX-8 and how I fixed it...
At just over 59,000 miles (spirited daily driving, but sadly no track time at all), still with the original spark plugs, wires, and coils, the engine was running fine except for a bit of a rough idle. Then last Sunday, I got on the freeway and the check engine light (CEL) started flashing and the car is accelerating/decelerating unexpectedly. After getting off the freeway, the car stalls a couple times at traffic lights. Then on the drive home everything is fine again. The next day I go buy a code reader at Sears for $49. It reads one code: P0301 pending, which is misfire, cylinder 1. That afternoon (Monday) I ordered the spark plugs from RockAuto.com (cost including basic USPS shipping and a 5% discount was $65.83). The plugs would arrive on Thursday...not bad. On Tuesday, the car stalled at a traffic light and wouldn't start until the engine cooled for about 15 minutes; after it started I drove it a few blocks to a public parking lot, during which it is sounding rough (like maybe running on only one cylinder or at least not all 4 plugs firing) and smells maybe like unburned gas. After this, the code reader read 3 codes: P0300, P0301 pending again, and P0171 pending. P0171 seemed to suggest a vacuum leak, but I ignored that possibility for now. So I parked it and had AAA tow it 3 miles back to my house, where I didn't start it again until Friday after I had replaced the plugs, wires, and coils, and sprayed the MAF Sensor with CRC MAF Sensor Cleaner. I also inspected the crankshaft position sensor as best I could, but it didn't look dirty so I decided not to remove it to clean it, since it is such a PITA to reach. I was afraid running it would damage something else, especially the catalytic converter. Since installing the new plugs, wires, and coils, I have test driven it 3 times for over 40 miles, including a few near-red lines, and it seems to be running like new, including a smooth idle. I used my code reader again after the fix, and it just read P0300, which I erased, and so far the CEL has not come back on. Total cost for plugs, wires, coils, and MAF sensor cleaner (all from the local NAPA store with 10% AAA discount, except for the plugs which came from RockAuto.com): $241.78.
I guess the lesson I learned is that once you start noticing a rough idle, you should think about changing your spark plugs right away before it gets worse.
One other tip from my experience...I bought a wire spark plug gap tool and checked the new NGK Laser Iridium plugs. Three out of four were fine (between 0.045 and 0.050), but the fourth plug was less than 0.044, so I used the gap tool to widen it to match the other three, which was very easy to do. I was very careful not to touch the center electrode, but just gently bent the ground electrode out a bit. Interestingly, the offending plug was the one in a slightly damaged box, which I suspect had been dropped.
Sorry for the long post, but maybe it will help somebody else...
Scott
Last edited by ScottRX008; 07-14-2013 at 12:33 PM. Reason: Corrected typo.
07-15-2013, 10:29 PM
#73
Lakeland, FL Rx-8.

Had the general idea of how to change coils, been trying to figure out the air filter box being in the way before I change them tommorrow even tried to pull it out earlier just so I'm prepared...This helped a lot. Thank you!
07-24-2013, 09:53 PM
#74
New Member

Join Date: Jan 2013
Posts: 3
Likes: 0
Received 0 Likes
on
0 Posts
Thanks for the write-up
Just replaced my coils, wires and plugs and she's driving like a dream. Once I saw how fouled the first coil was (not to mention the plugs) I knew I should've done this 10k miles ago, maybe sooner.
I, like others did not remove the airbox, didn't even jack up the driver side or remove the tire. This can be done from above, no big deal. Just took off the black box and away I went. Took about an hour to do the whole thing while chasing my 2-year old around the garage (hence no jack). Probably would've taken 1/2 hour were I alone.
The guide was useful to get me started, but before long it becomes common sense. Google'd "spark plug wire diagram" to make sure I had them all in the right place. Anyway, thanks OP - good job!
09-08-2013, 01:04 PM
#75
New Member

Join Date: Aug 2012
Posts: 3
Likes: 0
Received 0 Likes
on
0 Posts
Just did my first coil, wire, spark plug change. It's up and running!! lol, i didn't need take any parts out with the K&N intake, just took out those 10mm nut from the side easily. As for the plug, It is impossible to take out those nuts on my wheel with man power  so I decided to raise the front up and slide in from bottom (scary...lol).
so I decided to raise the front up and slide in from bottom (scary...lol).