DIY: Flywheel/Clutch Removal and Replacement


 06-11-2015, 08:39 AM
#129
Too old for PC
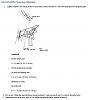
But actually I disagree with Mazdatrix a little on this. Based on my experience in removing a few dozen flywheels over the years, this actually works quite well ---> Dead Blow Hammer - 4 Lb. Neon Orange
Note it's the biggest one, but even on the FWs that have never previously been removed, a half-dozen or so whacks moving around the circumference and it's loose.
06-30-2015, 05:04 PM
#130
Registered

Join Date: Aug 2009
Location: Rowlett, Texas
Posts: 16
Likes: 0
Received 0 Likes
on
0 Posts
Rattle, Help!!
I reinstalled the tranny, and it worked and shifted beautifully, but there is now a rattle at idle. I could be wrong, but I think it’s the clutch fork rattling against the throw out bearing. For some reason, and this may be normal, but I can push the slave cylinder pushrod in with my finger. Doing this means there’s no pressure against the clutch fork so the fork is free and rattles against the throw out bearing. I’ve pulled the tranny back out just to make sure I installed everything right and it all looks right. Any ideas?
Here's a video (for sound) of the rattle. You can hear it at 10, 24, 37, 52, 1:05, 1:15, and 1:28 seconds
06-30-2015, 07:10 PM
#132
Registered
Join Date: Aug 2009
Location: Rowlett, Texas
Posts: 16
Likes: 0
Received 0 Likes
on
0 Posts
Thanks. Is there supposed to be so much play between the throw out bearing and the clutch fork? I know there should be some, but it seems like there's too much, causing the rattle.
06-30-2015, 08:35 PM
#134
Registered
Join Date: Aug 2009
Location: Rowlett, Texas
Posts: 16
Likes: 0
Received 0 Likes
on
0 Posts
I sure did, and the clutch itself felt great when driving, but sitting at an idle, when the a/c would kick on and off, the fork rattles. I'm not sure if I should just put it all back together and drive it, or keep trying to figure this out.
07-01-2015, 08:53 AM
#138
Registered

Join Date: Jul 2009
Location: Eastern Canada
Posts: 171
Likes: 0
Received 0 Likes
on
0 Posts
Could the shift fork also cause a squeaking sound when car is in neutral? I just installed new clutch and now it sometimes makes a squeaking sound in neutral or until clutch is engaged
08-16-2015, 10:40 AM
#139
New Member

Join Date: Aug 2015
Posts: 2
Likes: 0
Received 0 Likes
on
0 Posts
Do you guys have experience and tips on how to put the clutch fork and slave cylinder in place? I tried to change out the throwout bearing and now I got no pressure on the clutch. The oem slave cylinder has a rod that goes through the fork but I think there's another stopper or something to pull/push the fork, right now the clutch fork has no affects with the clutch slave cylinder...
08-19-2015, 04:20 PM
#140
Much Crazy. Such Wow!

Theres a ball behind the fork, and on the fork theres a little clip that latches onto it to give it that spring. It makes a pivot point for the fork. The slave cylinder bolts onto the transmission. I don't know what you did, but it shouldn't be too much of an issue..
09-19-2015, 11:24 PM
#141
Registered

For the love of Pete, I cannot get the transmission lined up with the engine to reinstall it. I've tried wiggling, jiggling, cursing, you name it. I did use the clutch alignment tool so I feel good about that, I am using a transmission jack so I have the ability to move it up and down in small increments, etc. I have a feeling this is one of those things you just have to move it around until it finally fits together.
Suggestions or tricks for getting the transmission aligned to reinstall it?
Suggestions or tricks for getting the transmission aligned to reinstall it?
09-20-2015, 08:58 PM
#142
Registered
I can now answer my own question and will add a couple points that may help folks giving this a shot in the future. HUGE thanks to fellow forum mebmer, blu3dragon, for the use of his tools and advice. I owe you one!!!
First, like has been said before, read the entire OP's comments AND download (and print) the manual. If you do both you will be able to successfully complete this job. I did the job by myself with air tools and a transmission jack, and standard jackstands (no lift). This was my first time doing the clutch on an RX8 and it took me, all in, about 15 hours. If I were to do it again, I'm confident I could it in 8 hours solo. I did an aluminum flywheel, new clutch, pressure plate, and bearings. I was doing this on a Series 1 (2004).
Preface
I cannot stress enough how much patience and taking breaks will help you. When you get frustrated, and you will, take a break. The more you try and force things, the less likely they will be to work. Seriously. Think about that one when you are at your breaking point. Honestly, the best thing I did was leave the transmission alone the end of day one. When I went back the next day it came together easily. The only thing that changed was my state of mind.
Jacking the car up / Preparation
Be sure you have a really good jack (I used a 3 ton) with as long a reach as possible. Ideally it can lift to 19+ inches. Also get yourself some extra large jack stands, not the standard little ones. You will want to raise the car enough to comfortable work underneath, but keep in mind if you raise it too high it will be tough to reach the slave cylinder bolts and top two transmission bolts. You will probably need to raise it enough to remove the transmission, but I left the transmission under the car and changed the throwout bearing with it underneath the car. Do get all your tools ready before you start. It will make life much easier.
Transmission and PPF Removal
For the PPF, airtools made a huge difference. If you don't have the use of airtools, a breaker bar will be very helpful. When replacing the PPF, I used a jackstand to hold one end while I loosely tightened all the bolts. Separating the transmission from the engine is the first place that requires lots of patience. Once the bolts are free take your time. Small wiggles back and forth are key (assuming you are using a transmission jack with wheels). Dont jerk it around, you will just break something. If your are not using a transmission jack, or yours does not have a strap, be careful. It does tend to rotate on the jack if not centered properly. You can get a new transmission, not a new head...
Flywheel Removal
I used the Racing Beat flywheel stopper and flywheel nut removal tool. They worked great, flywheel removal only took a few minutes. Like others a few whacks with a proper hammer did the trick. And made my ears ring like hell...warning.
Transmission Installation
This is the second part that takes patience. Reconnecting the transmission to the engine is not difficult, but if you get angry and try and force it, the transmission will win. I found supporting the engine with a jack (that allow slight elevation changes) helps tremendously. Second, I put the the transmission jack toward the front of the transmission and used a second floor jack on the tail end of the transmission to control the horizontal lineup of the transmission and engine. Finally, when I got the two lined up and close enough, I used the long bolt and nut from the starter to pull the two together and another long bolt on the other side. Incremental adjustments on either side using the bolts to pull the two together for the final half inch worked for me. The key is getting the near perfectly aligned.
Slave Cylinder Installation
Make sure your clutch pedal is not on the floor - you will want it in the up position. This allows you to depress the piston in the slave cylinder which makes life much easier for you. Also, you might consider bolting the slave cylinder to the transmission before you fully bolt the transmission to the engine. Not critical, but makes it easier later on.
Clutch Pedal Adjustment
When I bolted everything back up, I could not get the car in gear. I pressed the pedal, but it was not engaging the clutch and thus wouldn't go into gear when running. This was quickly solved by adjusting the clutch pedal inside the car.
Good luck, you can do this job. Enjoy.
09-21-2015, 11:13 AM
#143

Thanks for updating^ Nice to see people update when their problems are solved instead of disappearing. A transmission jack makes this job MUCH easier for those that are attempting.
First time I did it I used a large HF low profile jack and 2x4 although it worked fine I had to wrestle the transmission over to a creeper to move it around without worrying about it rolling off the jack. Not the ideal situation you wanna be in lol. Now I've acquired a unnecessarily huge transmission jack but I think next time I do the clutch/flywheel it'll be with the engine out.
Also TIP: idk if theres an easier way to get to the top 2 bolts holding the transmission to the engine but I used a half inch drive ratchet with maybe 3 feet of extensions since there was no other way to reach it. A local buddy of mine said it can be reached with the UIM removed. I haven't tried it but it seems plausible.
Last edited by GK1707; 09-21-2015 at 11:16 AM.
09-22-2015, 10:03 PM
#144
Registered
idk if theres an easier way to get to the top 2 bolts holding the transmission to the engine but I used a half inch drive ratchet with maybe 3 feet of extensions since there was no other way to reach it. A local buddy of mine said it can be reached with the UIM removed. I haven't tried it but it seems plausible.
02-04-2016, 09:34 AM
#145

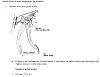
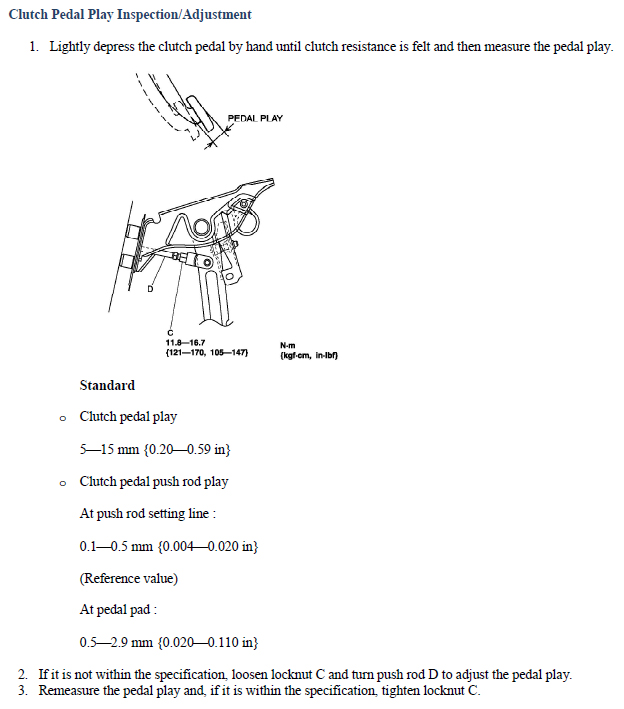
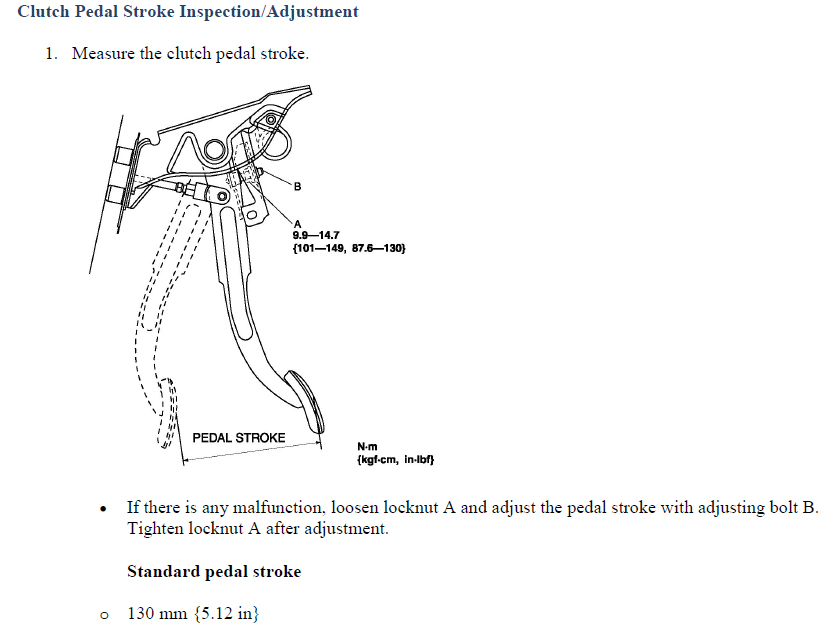
Have you verified and/or adjusted the clutch pedal play and stroke?
I've had issues bleeding the slave in the past where I couldn't get the fluid past the master cylinder from the reservoir.
I had to fill the master cylinder with fluid, then reconnect the line and bleed the slave cylinder.
I've had issues bleeding the slave in the past where I couldn't get the fluid past the master cylinder from the reservoir.
I had to fill the master cylinder with fluid, then reconnect the line and bleed the slave cylinder.
Last edited by Jon316G; 02-04-2016 at 09:51 AM.
 04-07-2016, 01:24 PM
#147
I just got here.

Join Date: Nov 2005
Location: San Diego, CA
Posts: 7
Likes: 0
Received 0 Likes
on
0 Posts
??? ---> https://www.mazdatrix.com/faq/flywheelremoval.htm
But actually I disagree with Mazdatrix a little on this. Based on my experience in removing a few dozen flywheels over the years, this actually works quite well ---> Dead Blow Hammer - 4 Lb. Neon Orange
Note it's the biggest one, but even on the FWs that have never previously been removed, a half-dozen or so whacks moving around the circumference and it's loose.
04-09-2016, 06:37 AM
#148
Too old for PC
IIRC, they're not 10mm, and the FSM dictates a puller, not just running the bolts down to the flange. And grabbing the plastic dead-blow hammer off the pegboard and whacking it a couple times offers no more risk and takes a fraction of the effort and time. If it makes you feel better and prefer that way I'm happy. Stop with the sanctimony.
Last edited by Signal 2; 04-09-2016 at 06:52 AM.
05-18-2016, 10:02 AM
#149
Registered

Join Date: May 2016
Posts: 11
Likes: 0
Received 0 Likes
on
0 Posts
I've been wailing on my flywheel for about 45 minutes lol, is there some trick I'm missing to getting it to pop off?
The 2x4 I put against has been beat down to almost half it's original thickness. Could really use some help here.
Edit: So I tried threading two bolts into the holes near the center of the flywheel, to push against the flange behind it and hopefully pop the flywheel off. I've threaded the bolts to the point I need a breaker bar to turn it, but before I go forward, is there any potential damage I could do? Don't want to **** this car up more than it's fucked me. Already put the nut back on a few turns so it doesn't fall on my face
Last edited by Noct; 05-18-2016 at 11:26 AM.
05-18-2016, 01:07 PM
#150
Dark Moderator
iTrader: (18)

The only thing you should have to do is take a 2 or 3lb sledge and a 2x4. Put the 2x4 on the face of the FW close to the top, give it one or two good whacks. Adjust and do it on the face closer to the bottom. It should pop loose pretty quickly.
Travis
Travis