
DIY: evil or flying M with pics


Thread Starter
Registered User
Joined: Aug 2011
Posts: 35
Likes: 0
DIY: evil or flying M with pics
I seen a post earlier today where someone asked how to make the flying m or where to order it.
I sit down tonight and did mine and took pics so people can do it.
Things you will need.
1 - a old pocket knife (around a 4in blade or longer)
2 - a lighter
3 - a nail file to smooth out the edges.
4 - 8mm and 10 mm socket and rachet.
5 - primer paint and color of your choice paint.
6 - hair dryer
7 - fishing line
To start out, pop your hood open.
Between the bumper and radiator support there is a black plastic pieces held on by push on clips, remove all 6 and take off the panel.
Next, remove the 4 10mm bolts under the panel. (2 on each side)
Then move to the front wheel of your choice. And take out the front splash shield(push in clips.
At the tip of the bumper where it meets the fender is a 8 mm bolt, remove it. (Do the same on the other side)
Now remove the clips and bolts along the bottom of the bumper and your ready to pull the bumper cover off.
Once off, sit it down on something that won't scratch it. On the back side of the emblem is two metal rings that clamp onto two prongs attached to the emblem. After those are off come back to the front and heat the emblem up so the double sided tape is melted some.
Then take the fishing line between the emblem and bumper to remove it.
Now this part I did just to try and it worked great. Take the pocket knife and heat it up with the lifgter. Once its pretty hot, press it where you want the M shaped at.
I'm half asleep right now and this isn't very detailed, I will upload pics and add more details tomorrow.
If any questions. Please ask...
http://i285.photobucket.com/albums/l...s/IMAG0339.jpg
http://i285.photobucket.com/albums/l...s/IMAG0333.jpg
http://i285.photobucket.com/albums/l...download-1.jpg
Last edited by firefighter1133; Aug 24, 2011 at 11:22 PM. Reason: Added Pictures
I seen a post earlier today where someone asked how to make the flying m or where to order it.
I sit down tonight and did mine and took pics so people can do it.
Things you will need.
1 - a old pocket knife (around a 4in blade or longer)
2 - a lighter
3 - a nail file to smooth out the edges.
4 - 8mm and 10 mm socket and rachet.
5 - primer paint and color of your choice paint.
6 - hair dryer
7 - fishing line
To start out, pop your hood open.
Between the bumper and radiator support there is a black plastic pieces held on by push on clips, remove all 6 and take off the panel.
Next, remove the 4 10mm bolts under the panel. (2 on each side)
Then move to the front wheel of your choice. And take out the front splash shield(push in clips.
At the tip of the bumper where it meets the fender is a 8 mm bolt, remove it. (Do the same on the other side)
Now remove the clips and bolts along the bottom of the bumper and your ready to pull the bumper cover off.
Once off, sit it down on something that won't scratch it. On the back side of the emblem is two metal rings that clamp onto two prongs attached to the emblem. After those are off come back to the front and heat the emblem up so the double sided tape is melted some.
Then take the fishing line between the emblem and bumper to remove it.
Now this part I did just to try and it worked great. Take the pocket knife and heat it up with the lifgter. Once its pretty hot, press it where you want the M shaped at.
I'm half asleep right now and this isn't very detailed, I will upload pics and add more details tomorrow.
If any questions. Please ask...


Registered
Joined: Sep 2017
Posts: 13
Likes: 2
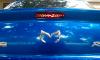
might just be me, but i think the evil m on the front looks like a weird nose.
https://cimg8.ibsrv.net/gimg/www.rx8...f071d1218c.jpg
https://cimg8.ibsrv.net/gimg/www.rx8...f071d1218c.jpg

Thread
Thread Starter
Forum
Replies
Last Post
Banner
Series II Exterior Appearance and Body Kits
5
Mar 31, 2010 11:51 AM
nez
Series I Exterior Appearance and Body Kits
9
Aug 5, 2006 01:39 AM