DIY: Dry CF console side plate wrap
 04-07-2010, 05:39 PM
#1
DIY: Dry CF console side plate wrap
This DIY is for anyone that wants to wrap up their side plates on the console not just for looks (in case any person dubs this as a ricer move) but for better protection contrast to the stock aluminum color that can get scuffed quite easily. I'll also be attempting to wrap the aluminum colored ring that goes around the shifter boot to match up with the console side plates.
I want to give props to the Rev (The Reverend) for tossing URL's of some forums that had DIY's doing CF wrapping on interiors showing what they used, what worked well and the finished product so I could pick something cost effective that looks and feels as good as CF. This is my 1st attempt at wrapping anything so it helped out tremendously. Here is the main site I used for the wrap I went with:http://www.clublexus.com/forums/is-s...s-of-pics.html Very basic, no wet CF style using epoxy (I have plenty of experience doing that with fiberglass molds), straight forward and should get me the look I want keeping the final part solid.
This will save people the money of spending a couple hundred dollars instead of buying the Mazda CF console kit just for the CF look and protection from getting them scuffed by whatever hits them. Since I like to be a tease, I'll be updating this thread hourly tonight with the goal of finishing the product tomorrow evening if I can't finish the project tonight.
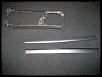
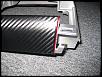
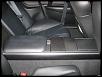
Below are some pics of the rear part of the driver side plate that got scuffed up along with tools you will need...The wrap is Neffy Dry CF wrap which you can find here http://www.neffywrap.com/ and I've seen used on many other forums. It's cheap, works, feels and looks great like CF. You will need something razor sharp to cut through this stuff.
I also selected to use the 3M Super 77 Multipurpose adhesive that is also sold on their site but I bought it at Lowe's for about half the price. Total cost is in the $40-$50 range for the wrap and the adhesive.....not counting the rum.
I decided to use newspapers because I had to wipe my ***..............no seriously I'm pretty particular about keeping things clean so I used them to cover up the front console frame that separates from the rear. The front console frame keeps both sides together and is used for mounting 2 small panels near your and the passenger legs as well as the ashtray or RB gauge pod if you have one so I don't want the adhesive getting on it.
The rum is for, well me when I decide to say screw it, I've had enough.

I would set aside a weekend to do this, I don't foresee this being doable in 1 day unless you work on it for 12+ hours.
I want to give props to the Rev (The Reverend) for tossing URL's of some forums that had DIY's doing CF wrapping on interiors showing what they used, what worked well and the finished product so I could pick something cost effective that looks and feels as good as CF. This is my 1st attempt at wrapping anything so it helped out tremendously. Here is the main site I used for the wrap I went with:http://www.clublexus.com/forums/is-s...s-of-pics.html Very basic, no wet CF style using epoxy (I have plenty of experience doing that with fiberglass molds), straight forward and should get me the look I want keeping the final part solid.
This will save people the money of spending a couple hundred dollars instead of buying the Mazda CF console kit just for the CF look and protection from getting them scuffed by whatever hits them. Since I like to be a tease, I'll be updating this thread hourly tonight with the goal of finishing the product tomorrow evening if I can't finish the project tonight.
Below are some pics of the rear part of the driver side plate that got scuffed up along with tools you will need...The wrap is Neffy Dry CF wrap which you can find here http://www.neffywrap.com/ and I've seen used on many other forums. It's cheap, works, feels and looks great like CF. You will need something razor sharp to cut through this stuff.
I also selected to use the 3M Super 77 Multipurpose adhesive that is also sold on their site but I bought it at Lowe's for about half the price. Total cost is in the $40-$50 range for the wrap and the adhesive.....not counting the rum.
I decided to use newspapers because I had to wipe my ***..............no seriously I'm pretty particular about keeping things clean so I used them to cover up the front console frame that separates from the rear. The front console frame keeps both sides together and is used for mounting 2 small panels near your and the passenger legs as well as the ashtray or RB gauge pod if you have one so I don't want the adhesive getting on it.
The rum is for, well me when I decide to say screw it, I've had enough.
I would set aside a weekend to do this, I don't foresee this being doable in 1 day unless you work on it for 12+ hours.
Last edited by Vlaze; 04-12-2010 at 06:51 AM.
 04-07-2010, 05:40 PM
#2
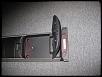
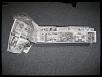
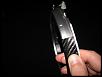
Ok, basically this part requires removing the shifter, the shift boot portion of the console along with dissecting most of it.
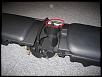
First off, you need to rotate the shift **** counter clock wise to remove it from the threaded shift shaft, it's that simple. Now after doing so, you need to remove the front portion of the console. In the 1st picture I've circled a tab that Mazda suggests to pop first which is gained access to by popping the tab in the 3nd picture shown. I never did it this way but if you want to then there you go. The other tabs that pop off you can easily see in white in the 1st picture. You pretty much just grab hold of the shift boot and pull up to disengage them. After you do this, IF you have the trim(s) that contain the heated seats do NOT forget to unplug them so you're not yanking on the poor bastard wondering why it's not coming off.
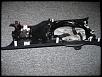
WARNING I suggest you give medium strength or more when pulling this boot w/ console off. I tried babying it the first time I went through with it and wound up tearing 2 slits that hook the boot in the console down I fixed this by slitting two more opening near the ones that were ripped. Anyhow, this should pop right out with moderate effort.
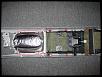
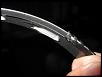
Next you need to remove the screws highlighted in the bottom of the picture below that hold down the ashtray or RB gauge pod if you have one in place and then pull to disengage the tabs from the console frame. Also don't forget to disconnect any wires with the ashtray or RB gauge pod when removing. You also need to remove the screws circled on top that fix the console frame to the dash. Two more screws attach the console frame itself to the car frame (not pictured) which are behind the shifter.
Next you need to remove all screws that attach the console compartment to the car to keep it simple. In detail, the screws in the front only attach the middle console portion (in black) to the console frame itself while the rear connects to the actual car frame. To get access to the ones farthest in the rear, you have to remove the access panel to the trunk. Just remove all screws, there are around 6 total, see the pictures below. For the picture on the left, only one of the holes farthest to the right (circled in red) was used while the one above it not circled was not used when I took it apart. Do not forget in the picture on the left to pop up the small panel for the 12V connector and disconnect it, or you can wait until you lift the whole console assembly to disconnect it (is what I did)
Now, the last thing left is you have to pull down and pull out the 2 small panels near the drivers right leg and the passenger's left leg from the dash panels (these are the ones farthest down near the carpet). Once you do this DO NOT try and remove them from the console frame itself, there are 2 screws connecting them to the console frame for each one.

Once you've done this you should be able to lift, shift and start moving the entire console assembly back towards the rear and then upward. What I did was lift the rear up first to get some room to move back more so that the front panels near the legs I mentioned earlier were away from the dash to lift and rotate the assembly. Also, you will need to flex the console frame itself to get around the E-Brake. Now I'm not sure how some people did it, but the middle section cannot be removed from the rear side plates until you unscrew them from the bottom. I was initially under the impression that the entire center portion was screwed onto both the front console frame and the rear side plates. So basically I said screw that, as I didn't want to disassemble it in my car and I wound up moving the passenger seat forward and lifting the entire thing up, rotating and removing from the car.
First off, you need to rotate the shift **** counter clock wise to remove it from the threaded shift shaft, it's that simple. Now after doing so, you need to remove the front portion of the console. In the 1st picture I've circled a tab that Mazda suggests to pop first which is gained access to by popping the tab in the 3nd picture shown. I never did it this way but if you want to then there you go. The other tabs that pop off you can easily see in white in the 1st picture. You pretty much just grab hold of the shift boot and pull up to disengage them. After you do this, IF you have the trim(s) that contain the heated seats do NOT forget to unplug them so you're not yanking on the poor bastard wondering why it's not coming off.

WARNING I suggest you give medium strength or more when pulling this boot w/ console off. I tried babying it the first time I went through with it and wound up tearing 2 slits that hook the boot in the console down
I fixed this by slitting two more opening near the ones that were ripped. Anyhow, this should pop right out with moderate effort.Next you need to remove the screws highlighted in the bottom of the picture below that hold down the ashtray or RB gauge pod if you have one in place and then pull to disengage the tabs from the console frame. Also don't forget to disconnect any wires with the ashtray or RB gauge pod when removing. You also need to remove the screws circled on top that fix the console frame to the dash. Two more screws attach the console frame itself to the car frame (not pictured) which are behind the shifter.

Next you need to remove all screws that attach the console compartment to the car to keep it simple. In detail, the screws in the front only attach the middle console portion (in black) to the console frame itself while the rear connects to the actual car frame. To get access to the ones farthest in the rear, you have to remove the access panel to the trunk. Just remove all screws, there are around 6 total, see the pictures below. For the picture on the left, only one of the holes farthest to the right (circled in red) was used while the one above it not circled was not used when I took it apart. Do not forget in the picture on the left to pop up the small panel for the 12V connector and disconnect it, or you can wait until you lift the whole console assembly to disconnect it (is what I did)


Now, the last thing left is you have to pull down and pull out the 2 small panels near the drivers right leg and the passenger's left leg from the dash panels (these are the ones farthest down near the carpet). Once you do this DO NOT try and remove them from the console frame itself, there are 2 screws connecting them to the console frame for each one.

Once you've done this you should be able to lift, shift and start moving the entire console assembly back towards the rear and then upward. What I did was lift the rear up first to get some room to move back more so that the front panels near the legs I mentioned earlier were away from the dash to lift and rotate the assembly. Also, you will need to flex the console frame itself to get around the E-Brake. Now I'm not sure how some people did it, but the middle section cannot be removed from the rear side plates until you unscrew them from the bottom. I was initially under the impression that the entire center portion was screwed onto both the front console frame and the rear side plates. So basically I said screw that, as I didn't want to disassemble it in my car and I wound up moving the passenger seat forward and lifting the entire thing up, rotating and removing from the car.
Last edited by Vlaze; 04-12-2010 at 08:34 AM.
04-07-2010, 05:42 PM
#3
Woo....that rum is good...oops, where was I...
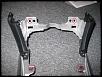
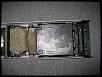
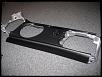
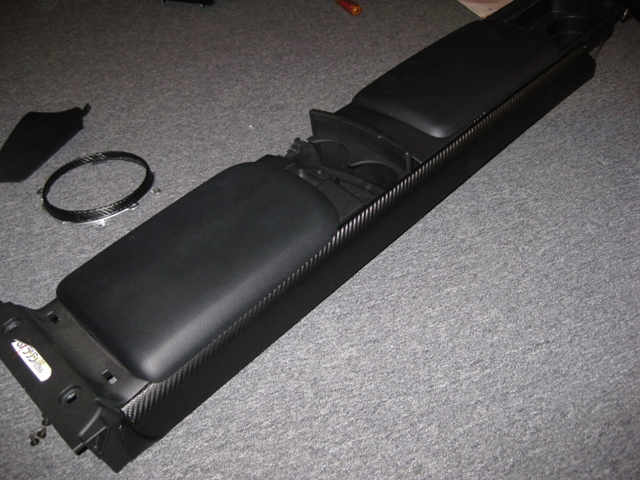
Here's what the whole assembly looks like when removed from the car:
Now you need to remove the screws underneath to get the center portion of the assembly (in black) off the console rear side plates. Highlighted in red are the screws for the rear:
And the some more screws to remove. The 2 farthest to the right are hidden by the padding. Also, you need to pop out two tabs for the front of the rear side plates highlighted in the middle of this picture. The 4 tabs circled in the very front (farthest left) of the assembly belong to the center console portion for removing from the front console frame itself.
As you can see, likely the better way to disassemble this assembly is once you remove the top screws in the rear to disconnect it from the car frame you would pop out the entire center console section w/ rear side plates still attached from the front console frame and remove. This way you have more room to maneuver the piece when removing it from the car. Once you do this, then shift and remove the front console frame. Having no idea with no pictures on what I was dealing with I just found it safer at the time to remove the entire thing and disassemble later to see what I was working with.
*Skip this step if you've decided to disassemble it as suggested above.*
After you pop out the 2 tabs for the rear side plates and remove them, pop out the 4 tabs for the center console and remove the entire thing from the front console frame itself and this is what you'll have.
Here's what the whole assembly looks like when removed from the car:
Now you need to remove the screws underneath to get the center portion of the assembly (in black) off the console rear side plates. Highlighted in red are the screws for the rear:

And the some more screws to remove. The 2 farthest to the right are hidden by the padding. Also, you need to pop out two tabs for the front of the rear side plates highlighted in the middle of this picture. The 4 tabs circled in the very front (farthest left) of the assembly belong to the center console portion for removing from the front console frame itself.

As you can see, likely the better way to disassemble this assembly is once you remove the top screws in the rear to disconnect it from the car frame you would pop out the entire center console section w/ rear side plates still attached from the front console frame and remove. This way you have more room to maneuver the piece when removing it from the car. Once you do this, then shift and remove the front console frame. Having no idea with no pictures on what I was dealing with I just found it safer at the time to remove the entire thing and disassemble later to see what I was working with.
*Skip this step if you've decided to disassemble it as suggested above.*
After you pop out the 2 tabs for the rear side plates and remove them, pop out the 4 tabs for the center console and remove the entire thing from the front console frame itself and this is what you'll have.

Last edited by Vlaze; 04-08-2010 at 09:50 AM.
04-07-2010, 05:42 PM
#4
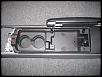
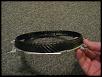
This next part here is for those who want to attempt and wrap the outer shift boot ring that goes outside of the shift boot itself. The inner boot ring where the boot itself latches to simply unscrews from the base of the front center console section that was removed at the start of this DIY. 4 screws once removed allow you to slide the inner boot ring with the boot itself out of the center console. Now you have 4 tabs shown via arrows that keep the outer aluminum colored ring in place.
WARNING: Do NOT bend the tabs back to remove the outer shift boot ring. This is what I attempted since common thinking working with other parts is that the tabs are flexible to bend back to remove the ring; this is NOT the case with this part. IF you do this, you will break them like old man river broke his back. You must flex the outer shift boot ring away from the tabs (inward) and pull out of them one at a time. I wound up breaking one thinking the tabs worked like every other one I've worked with, they don't
After you've done this now you have all your parts disassembled ready for preparation. Generally I would use alcohol wipes to clean it down but seeing I surprised myself by being out of them, I just used old fashion warm water and wiped it down. For the front console frame I used the dust spray that you can buy at any typical PC store for blowing crap out of the groves that run along inside the side panels. I used the newspapers for wrapping the middle portion of the front console frame up for the 1st spraying on both sides to prevent it from going all haywire on the entire thing. This is not required, I just try to keep things as clean as I can when doing this. Keep in mind you will be spraying the inner portion of the side plates on this frame during the 2nd spraying which is why I tried to cover them up so they wouldn't have hardened adhesive on them from the 1st spraying.
After this it's pretty straight forward. Unroll the Neffy wrap (or whatever wrap you chose), lay out the side plates on it and cut sparingly to leave enough to wrap around the edges towards the inside of all parts . Remember, when you do something like this trying to be a perfectionist as in having the wrap only as long as the part's shape itself to be dead on will hit you back in the ***. Use it sparingly and wrap that **** around it for a clean professional look.
I took a few shots of the width I used for the outer shift boot ring. It worked out to around 21" long in length and somewhere around 1-1/4" wide. I debated whether to let the edge of the wrap slide past where the vertical portion of it the ring ends and bends perpendicular but decided not to because the front center console section itself will cover up most of this corner. Plus I can work with it after applying the wrap to get it as close as possible.
After this I put a piece of scotch tape on one end of the wrap to stick to the outer shift boot ring and wrapped it up holding it in place to see what it would look like and folded the edges over inspecting the width. I wound up cutting the width of it shorter to make it easier in assembly although you can use more if you want. Keep in mind you have the boot itself sliding through the inner portion of this ring. Too much material may create a tightness resulting in dragging the shift boot on the CF wrap and possibly pull it out of place.

WARNING: Do NOT bend the tabs back to remove the outer shift boot ring. This is what I attempted since common thinking working with other parts is that the tabs are flexible to bend back to remove the ring; this is NOT the case with this part. IF you do this, you will break them like old man river broke his back. You must flex the outer shift boot ring away from the tabs (inward) and pull out of them one at a time. I wound up breaking one thinking the tabs worked like every other one I've worked with, they don't
After you've done this now you have all your parts disassembled ready for preparation. Generally I would use alcohol wipes to clean it down but seeing I surprised myself by being out of them, I just used old fashion warm water and wiped it down. For the front console frame I used the dust spray that you can buy at any typical PC store for blowing crap out of the groves that run along inside the side panels. I used the newspapers for wrapping the middle portion of the front console frame up for the 1st spraying on both sides to prevent it from going all haywire on the entire thing. This is not required, I just try to keep things as clean as I can when doing this. Keep in mind you will be spraying the inner portion of the side plates on this frame during the 2nd spraying which is why I tried to cover them up so they wouldn't have hardened adhesive on them from the 1st spraying.

After this it's pretty straight forward. Unroll the Neffy wrap (or whatever wrap you chose), lay out the side plates on it and cut sparingly to leave enough to wrap around the edges towards the inside of all parts . Remember, when you do something like this trying to be a perfectionist as in having the wrap only as long as the part's shape itself to be dead on will hit you back in the ***. Use it sparingly and wrap that **** around it for a clean professional look.
I took a few shots of the width I used for the outer shift boot ring. It worked out to around 21" long in length and somewhere around 1-1/4" wide. I debated whether to let the edge of the wrap slide past where the vertical portion of it the ring ends and bends perpendicular but decided not to because the front center console section itself will cover up most of this corner. Plus I can work with it after applying the wrap to get it as close as possible.

After this I put a piece of scotch tape on one end of the wrap to stick to the outer shift boot ring and wrapped it up holding it in place to see what it would look like and folded the edges over inspecting the width. I wound up cutting the width of it shorter to make it easier in assembly although you can use more if you want. Keep in mind you have the boot itself sliding through the inner portion of this ring. Too much material may create a tightness resulting in dragging the shift boot on the CF wrap and possibly pull it out of place.

Last edited by Vlaze; 04-08-2010 at 10:20 PM.
04-07-2010, 05:43 PM
#5
Just a quick note; depending on what you're looking for pattern wise there are two different looks that can be achieved. You can cut the pattern in the same direction for all parts so that the entire console looks like it was wrapped with the flow of the pattern going in the same direction from driver side to passenger side. If you want to have the pattern flow from the front to the rear or vice versa then you'll have to cut it differently. You would cut 2 pieces for the driver's side in one direction and 2 pieces for the passenger side in the perpendicular direction for this effect.
It would be way too messy to take pictures of every single itsy bitsy step so I just took what followed applying the 3M adhesive and the CF wrap. At first I wasn't sure what to expect since dealing with anything like this that was remotely close was vinyl lettering/graphics on my race car panels back in the day. When those things got an air bubble or wrinkle in it, it was a bitch to work out since it stuck so well to the panels. This CF wrap is way more friendlier. After applying 2 light-medium coats of 3M on the parts and on the CF wrap itself I placed it on and was easily able to work the bubbles and wrinkles towards the edges smoothing it out with just my fingers.
The URL I used for reference at the start of this DIY says he used 2 hours to wait for the adhesive to set in to a fixed state. After an hour I would suggest checking the parts and smoothing over the CF very tightly on the edges of the part. Try lifting the loose CF ends and see if it pops off of the side plate easily or sticks to it well. If it pops off, take the 3M adhesive and very slightly but up close, get a small spray in there and rub it back down.
WARNING: Make sure you do NOT spray the adhesive on the aesthetic side of the CF wrap that shows the pattern, it will mess it up. If you get a tad bit here or there on it, get it off with some some licking action on your finger and rub it off. If you get a good amount of spray on it, toss the cut out away and make another one.
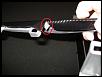
The biggest PITA was obviously, the outer shift boot ring. Depending how particular you are about having it look, you may decide to wrap the end of it over the start of when you applied it or do like I did and cut it to meet the ends together. You can stretch this keep in mind if you cut it a wee short as I did. Don't forget to smooth out where the ends meet to try to eliminate as much of the visual of it as you can. I would suggest to keep the parting line on the end facing the dash to keep it out of view as much as possible. Unfortunately I was too focused on my application I forgot this and had it facing the passenger slightly but I think I pressed it in good enough to hide most of it. Here's a picture of it. The parting line is directly above my ring finger.

Afterwards, you will want to likely cut small slits in the loose end of the CF wrap to fold over correctly without creating any humped over pattern resulting in sharp corners and completely ruining the look due to wrapping around a cylindrical part. This is after you've applied the CF wrap and are getting ready to wrap it around to the interior of the ring. More on detail when I finish this up tomorrow.

It would be way too messy to take pictures of every single itsy bitsy step so I just took what followed applying the 3M adhesive and the CF wrap. At first I wasn't sure what to expect since dealing with anything like this that was remotely close was vinyl lettering/graphics on my race car panels back in the day. When those things got an air bubble or wrinkle in it, it was a bitch to work out since it stuck so well to the panels. This CF wrap is way more friendlier. After applying 2 light-medium coats of 3M on the parts and on the CF wrap itself I placed it on and was easily able to work the bubbles and wrinkles towards the edges smoothing it out with just my fingers.

The URL I used for reference at the start of this DIY says he used 2 hours to wait for the adhesive to set in to a fixed state. After an hour I would suggest checking the parts and smoothing over the CF very tightly on the edges of the part. Try lifting the loose CF ends and see if it pops off of the side plate easily or sticks to it well. If it pops off, take the 3M adhesive and very slightly but up close, get a small spray in there and rub it back down.
WARNING: Make sure you do NOT spray the adhesive on the aesthetic side of the CF wrap that shows the pattern, it will mess it up. If you get a tad bit here or there on it, get it off with some some licking action on your finger and rub it off. If you get a good amount of spray on it, toss the cut out away and make another one.
The biggest PITA was obviously, the outer shift boot ring. Depending how particular you are about having it look, you may decide to wrap the end of it over the start of when you applied it or do like I did and cut it to meet the ends together. You can stretch this keep in mind if you cut it a wee short as I did. Don't forget to smooth out where the ends meet to try to eliminate as much of the visual of it as you can. I would suggest to keep the parting line on the end facing the dash to keep it out of view as much as possible. Unfortunately I was too focused on my application I forgot this and had it facing the passenger slightly but I think I pressed it in good enough to hide most of it. Here's a picture of it. The parting line is directly above my ring finger.

Afterwards, you will want to likely cut small slits in the loose end of the CF wrap to fold over correctly without creating any humped over pattern resulting in sharp corners and completely ruining the look due to wrapping around a cylindrical part. This is after you've applied the CF wrap and are getting ready to wrap it around to the interior of the ring. More on detail when I finish this up tomorrow.
Last edited by Vlaze; 04-11-2010 at 09:53 PM.
04-07-2010, 07:09 PM
#6
Here is the outer shift boot ring when you add some cuts to the loose end of the wrap so that you can fold the pattern over without bulging up the wrap on the top edge of the ring. My cuts were around every 1". Make sure you don't cut too far otherwise the cut may slightly show on top of the ring. I would suggest folding the wrap horizontally towards the inside of the ring when you cut it so you wind up cutting it slightly short of this. All depends how finicky you are about getting things to look good.

The inside of the ring was still very slightly tacky from the night before so I was able to rub the wrap once cut over inside the boot to get an idea what the finished part would look like. So far I'm very happy with this wrap.
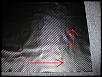
Now comes the trickiest part of this DIY. On the front console frame when you pull it apart, you will see the grooves and bends that this wrap is going to have to be cut around in order to wrap the rest of it on the inner side. Luckily I felt that a lot of people aren't as patient or finicky as I am so I've tried to include as much details on here in hopes you will walk away happy with this. You're going to need something alike to a pencil or pen, with a sharp end to push the wrap into the grooves and then run it along the bottom of the groove to form a pattern that you will need to see to cut the excessive wrap along. I have a special tool you can buy from Radio Shack that allows me to change the end with multiple variating razor shapes, as well as sharp pointy ends and is what I used this entire DIY for cutting and shaping the wrap. I tried to show with arrows where the pattern is. It is a curve that the picture makes it hard to see and I didn't want to draw a red line otherwise you wouldn't see what I was referring to. You can make the shape out between the arrows; it's just enough of a pattern once you run the sharp instrument you chose along the length to form it.
On the front corner of the front console frame side plate, you will have to basically "eye" it so to speak on how much material to cut along the side plate shape so it wraps well around it. Anytime you're skeptical on cutting, start small and work your way up. You can always take away material but you can't add it back without it looking like a patch job. Also cut where the edges will meet a bit at a time folding it over the side plate testing until you got it to where they will fold together without forming a bulge on the corner once wrapped. Keep in mind once again, this is just the perfectionist in me, it can have a bulge and you likely won't see it hardly at all on the car.
When you're all done, push the wrap back into the grooves you worked one earlier, and try to fold over the wrap on the front of the side plate to place on the lower panel that came off when you removed this piece from the car to see what it looks like.

Now onto the passenger side

The inside of the ring was still very slightly tacky from the night before so I was able to rub the wrap once cut over inside the boot to get an idea what the finished part would look like. So far I'm very happy with this wrap.

Now comes the trickiest part of this DIY. On the front console frame when you pull it apart, you will see the grooves and bends that this wrap is going to have to be cut around in order to wrap the rest of it on the inner side. Luckily I felt that a lot of people aren't as patient or finicky as I am so I've tried to include as much details on here in hopes you will walk away happy with this. You're going to need something alike to a pencil or pen, with a sharp end to push the wrap into the grooves and then run it along the bottom of the groove to form a pattern that you will need to see to cut the excessive wrap along. I have a special tool you can buy from Radio Shack that allows me to change the end with multiple variating razor shapes, as well as sharp pointy ends and is what I used this entire DIY for cutting and shaping the wrap. I tried to show with arrows where the pattern is. It is a curve that the picture makes it hard to see and I didn't want to draw a red line otherwise you wouldn't see what I was referring to. You can make the shape out between the arrows; it's just enough of a pattern once you run the sharp instrument you chose along the length to form it.

On the front corner of the front console frame side plate, you will have to basically "eye" it so to speak on how much material to cut along the side plate shape so it wraps well around it. Anytime you're skeptical on cutting, start small and work your way up. You can always take away material but you can't add it back without it looking like a patch job. Also cut where the edges will meet a bit at a time folding it over the side plate testing until you got it to where they will fold together without forming a bulge on the corner once wrapped. Keep in mind once again, this is just the perfectionist in me, it can have a bulge and you likely won't see it hardly at all on the car.

When you're all done, push the wrap back into the grooves you worked one earlier, and try to fold over the wrap on the front of the side plate to place on the lower panel that came off when you removed this piece from the car to see what it looks like.

Now onto the passenger side
Last edited by Vlaze; 04-12-2010 at 06:47 AM.
04-07-2010, 07:53 PM
#7
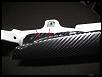
The passenger side front console frame side plate unfortunately has a small patch job. You will have to do everything I just showed you on the driver's side as well as add some cuts and material to your wrap. Here's what I'm referring to..
Highlighted in the circle is an extra bend you will have to get around. You have two choices here: you either decide to do something about it or feel that the E-brake shifter cover (remember it has a curved cover at the base) will cover enough of this and you don't care. There is no way around this because you have 2 bends on the inside of this side plate. No matter how you cut it, either that piece will show or you cut it farther down in an attempt to cover it and wind up taking away material from the backside of the side plate having to add more to that instead. I'm not sure how much the E-brake cover will hide so I chose to add a small piece of the wrap onto it. You won't see the parting lines in this area hardly at all I believe because it will mostly be hidden by the E-brake cover.
After you're done with this, there's a few other places to add a simple cut here and there to fold over the wrap elsewhere on this side. Just use common sense. Do the same thing on the front of the side plate as you did on the other side and cut out the pattern for the groove. After you're done with all this, all that remains is the other end of the front console frame side plates that connect to the rear side plates. Push the wrap in the corner here and cut along it to get a smooth line. Make sure you push the wrap in or if cutting it without doing so, that you leave enough material to cover the bend to the corner. Better to have more material around it that will be covered up by the rear side plates when they attach than cut too much and have some of it show. Cut the rest of the excessive wrap off and notch the corners to eliminate as much bulge as you can as mentioned earlier when wrapping it around both edges.
The rear side plates are pretty straight forward, they wrap right around. Add the notch cuts on the corners to eliminate bulging, test wrap them around, check, cut, check, etc.
Now, there is one issue that I didn't pick up on until later of course after I already had cut the wrap out and applied it at the beginning of this DIY. When you open the cup holder cover, it will show the inside of those rear side plates. I didn't have THAT much excessive wrap left to cover it all up. So what I did was make sure the edge of the wrap ran parallel with the top edge for a smooth look. As much of a perfectionist I am, I can live with this because 99/100 times no one is in the back seat of my vehicle and out of that 1 time I doubt they'll use the cup holder. If they do at least make it look uniform to pull it off. Just make sure you have equal wrap amounts going over both rear side plates to match them up to look good.
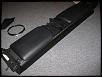
After this, I would suggest reattaching the front center console shift cover to the front console frame and the rear side plates to the rest of the center console to see how it looks before doing the final steps. This is what you should hopefully have..

Highlighted in the circle is an extra bend you will have to get around. You have two choices here: you either decide to do something about it or feel that the E-brake shifter cover (remember it has a curved cover at the base) will cover enough of this and you don't care. There is no way around this because you have 2 bends on the inside of this side plate. No matter how you cut it, either that piece will show or you cut it farther down in an attempt to cover it and wind up taking away material from the backside of the side plate having to add more to that instead. I'm not sure how much the E-brake cover will hide so I chose to add a small piece of the wrap onto it. You won't see the parting lines in this area hardly at all I believe because it will mostly be hidden by the E-brake cover.
After you're done with this, there's a few other places to add a simple cut here and there to fold over the wrap elsewhere on this side. Just use common sense. Do the same thing on the front of the side plate as you did on the other side and cut out the pattern for the groove. After you're done with all this, all that remains is the other end of the front console frame side plates that connect to the rear side plates. Push the wrap in the corner here and cut along it to get a smooth line. Make sure you push the wrap in or if cutting it without doing so, that you leave enough material to cover the bend to the corner. Better to have more material around it that will be covered up by the rear side plates when they attach than cut too much and have some of it show. Cut the rest of the excessive wrap off and notch the corners to eliminate as much bulge as you can as mentioned earlier when wrapping it around both edges.

The rear side plates are pretty straight forward, they wrap right around. Add the notch cuts on the corners to eliminate bulging, test wrap them around, check, cut, check, etc.
Now, there is one issue that I didn't pick up on until later of course after I already had cut the wrap out and applied it at the beginning of this DIY. When you open the cup holder cover, it will show the inside of those rear side plates. I didn't have THAT much excessive wrap left to cover it all up. So what I did was make sure the edge of the wrap ran parallel with the top edge for a smooth look. As much of a perfectionist I am, I can live with this because 99/100 times no one is in the back seat of my vehicle and out of that 1 time I doubt they'll use the cup holder. If they do at least make it look uniform to pull it off. Just make sure you have equal wrap amounts going over both rear side plates to match them up to look good.

After this, I would suggest reattaching the front center console shift cover to the front console frame and the rear side plates to the rest of the center console to see how it looks before doing the final steps. This is what you should hopefully have..

Last edited by Vlaze; 04-10-2010 at 09:45 AM.
04-07-2010, 07:54 PM
#8
While I didn't take pictures applying the last spray since it would of obviously been too messy I have a few tips for those when you're ready to go through with the final steps:
- Keep the nozzle very close to where you're spraying. Reason is because with the CF already applied, you do not want this spray going onto the pattern side.
- Work with small taps on the nozzle to get a slight spray on the area you are working on.
- When folding over the wrap around the top and bottom of the side plates, push on the edge and slide your thumb along the plates to gradually work the wrap over. Do NOT push the entire thing over right away and work it over. This will likely result in trapped air or bulging of your CF on the top and bottom edges and will make it a PITA to smooth over right.
- Whichever fingers are not applying the pressure, make sure you keep note of them so you don't touch the pattern side of the wrap with your fingers that are getting sticky unless you want it to rub all over your pretty pattern you've worked all this time to achieve.
- You are going to get some adhesive on your fingers in these final steps. I would suggest not using gloves to keep it as clean as possible and just wash your hands when you're done applying the wrap.
- Check the parts when all done to make sure the corners are not bulging out, and if any extra trimming needs to be done.
- Let everything set and dry for a few hours or more. Mine were not assembled until the next night due to other work on the car but I intended on letting them set overnight. The longer the better.
- When you're ready to assemble, remember this is going to result in a tighter fit so be ready to use some extra force when putting everything together.
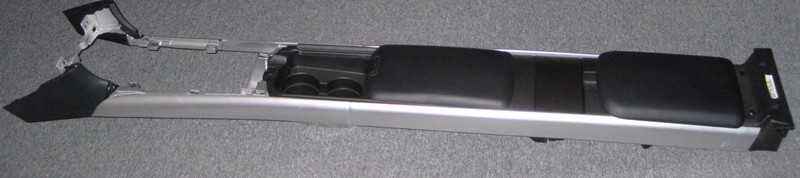
Now that is out of the way, here is the end product:
End note; I am VERY happy with this wrap and how it turned out. For the price and looks it's one of the best to get. I'll update this thread in the fall to conclude on how durable it was holding up under the summer heat and normal wear
Good luck.
- Keep the nozzle very close to where you're spraying. Reason is because with the CF already applied, you do not want this spray going onto the pattern side.
- Work with small taps on the nozzle to get a slight spray on the area you are working on.
- When folding over the wrap around the top and bottom of the side plates, push on the edge and slide your thumb along the plates to gradually work the wrap over. Do NOT push the entire thing over right away and work it over. This will likely result in trapped air or bulging of your CF on the top and bottom edges and will make it a PITA to smooth over right.
- Whichever fingers are not applying the pressure, make sure you keep note of them so you don't touch the pattern side of the wrap with your fingers that are getting sticky unless you want it to rub all over your pretty pattern you've worked all this time to achieve.
- You are going to get some adhesive on your fingers in these final steps. I would suggest not using gloves to keep it as clean as possible and just wash your hands when you're done applying the wrap.
- Check the parts when all done to make sure the corners are not bulging out, and if any extra trimming needs to be done.
- Let everything set and dry for a few hours or more. Mine were not assembled until the next night due to other work on the car but I intended on letting them set overnight. The longer the better.
- When you're ready to assemble, remember this is going to result in a tighter fit so be ready to use some extra force when putting everything together.
Now that is out of the way, here is the end product:


End note; I am VERY happy with this wrap and how it turned out. For the price and looks it's one of the best to get. I'll update this thread in the fall to conclude on how durable it was holding up under the summer heat and normal wear
Good luck.
Last edited by Vlaze; 04-11-2010 at 10:15 PM.
04-07-2010, 08:26 PM
#9
n0 pants

Join Date: Aug 2009
Location: NYC Metro
Posts: 268
Likes: 0
Received 0 Likes
on
0 Posts
Sweet. I've seen this done before on a number of cars but never a good DIY. I'm always hesitant with these types of things because I don't rate my custom fab skills much above that of a 4 year old.
04-08-2010, 10:00 AM
#10

OH, this is so exciting! I can't wait to see the finished product!
So... how much rum did you get through during these first portions of the DIY? haha Note: be careful with the Super 77, you CAN glue your fingers together....I learned that the hard way when mounting artwork
So...
how much rum did you get through during these first portions of the DIY? haha Note: be careful with the Super 77, you CAN glue your fingers together....I learned that the hard way when mounting artwork


 04-09-2010, 07:46 AM
#15
n0 pants
Join Date: Aug 2009
Location: NYC Metro
Posts: 268
Likes: 0
Received 0 Likes
on
0 Posts
Question, how much Neffy wrap did you buy?
editz: I decided to order just 1 qty (yard) of it, It looked like plenty. I'm just going to do the console sides and the window/doorpanel switch cover thingy.
The brushed aluminum switches would be a really nice touch but they're like...expensive. At least for window switches!
editz: I decided to order just 1 qty (yard) of it, It looked like plenty.
I'm just going to do the console sides and the window/doorpanel switch cover thingy.The brushed aluminum switches would be a really nice touch but they're like...expensive. At least for window switches!
Last edited by Frosty288; 04-09-2010 at 07:56 AM.
04-09-2010, 08:02 AM
#16
Question, how much Neffy wrap did you buy?
editz: I decided to order just 1 qty (yard) of it, It looked like plenty. I'm just going to do the console sides and the window/doorpanel switch cover thingy.
The brushed aluminum switches would be a really nice touch but they're like...expensive. At least for window switches!
editz: I decided to order just 1 qty (yard) of it, It looked like plenty.
I'm just going to do the console sides and the window/doorpanel switch cover thingy.The brushed aluminum switches would be a really nice touch but they're like...expensive. At least for window switches!
04-09-2010, 08:08 AM
#17
The wrap is for a lack of better word, somewhat like stiff spandex cloth. It will stretch slightly and after I applied it on the side plates I pulled on both ends back and forth working from end to end to get rid of the wrinkles and then just smooth it over with your fingers. Just make sure you don't stretch the material too much or cut it so short it can't compensate because it will shorten the width if you pull too hard and wrinkles will be evident that you stretched the material. I was on the borderline of stretching it a bit too far on the outer shift boot ring but pulled it off barely. The key is to make sure you are not real close with the spray when applying it for the 1st application. Apply a few coats so alike to paint it uniformly is covering the side you're applying the wrap to and allow at least 30 seconds to a minute before applying the wrap.
Last edited by Vlaze; 04-11-2010 at 10:19 PM.


 04-11-2010, 09:41 PM
#24
Yes, I think you can. On a scale of 1-10, where 1 is no flex and 10 being spandex flex, it's about a 3. The thickness is about the same as a dress shirt. Don't think the cuffs or collar since those are thicker, think the rest of the shirt. Softness is practically like clothing.
Last edited by Vlaze; 04-11-2010 at 09:55 PM.

