Sandpaper damage on headlight: AT CLOSE RANGE
#1
Sandpaper damage on headlight: AT CLOSE RANGE

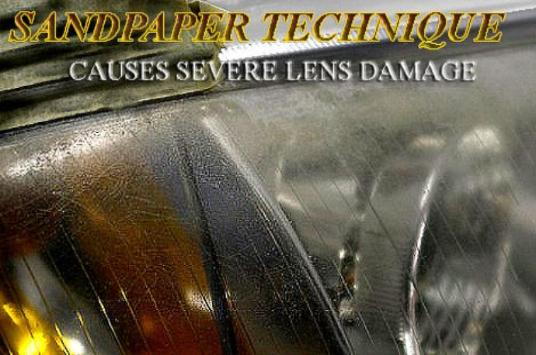
This is an extreme close up showing the abrasive damage inflicted on this headlight from operator induced abrasive cleaning. Most headlight cleaning images don't get this close so people don't get to see how damaging it is to use sandpaper on a headlight.
The problem of what to do about clouding headlights persists, as does the misinformation about how easy it is to clean them by simply using sandpaper.
Using sandpaper is more than a notion, it is time consuming and it takes lot of work and concentration.
Nobody talks about the reality of damage that is being induced, only the happy ending.
This picture shows the aftermath AT CLOSE RANGE.
#4
Polish would be a better alternative to sandpaper.
Abrasive damage is generally reduced to clouding or hazing over the surface.
The protective UV layer is weakened by this method.
There is a limited amount of time you can use this method before the damage becomes more of a problem then the oxidation and you have to replace the headlight.
A Deoxidizer would be the best choice for a number of reasons
A DIY type system that's safe fast and easy.
you don't have to be skilled at anything to use it.
you can do every light on your car in the time it would take to polish one headlight.
It does not create new damage while removing the oxidation and you can repeat the process indefinitely with no abrasive damage ever.
#5
I would disagree with using alcohol on the headlight because of a chemical conflict which causes polycarbonate acrylic to weaken sometimes inducing micro fractures in the lens.
The main point that is overlooked here is that removal of the oxidation on the lens surface by this method is designed to destroy the part of he headlight lens that is necessary to combat UV damage,
This layer that sits between the oxidation and lens is important and you want to preserve it.
This layer can be cleaned easier than it can be removed and left intact on the lens surface by using a non abrasive method to remove the oxidation.
To just arbitrarily sand it off because it's covered with oxidation it not giving the process as a whole much independent thought.
#6
SARX Legend
iTrader: (46)
I used to have mine done professionally and the more it got done, the less time the clean look would last. Used to last 6 months and by the time I got rid of them it would only last a month before it needed to be done again. I hate hazy headlights so when I got the new ones, I had a film put on them from day one.


#9
9k if you don't mind me asking where did you go for your headlight purchase? I've run into the same issue and I'm wondering if you purchased the entire assembly or just the lens/cover or whatever it is called.
#10
No respecter of malarkey
iTrader: (25)
Had mine done professionally on my Honda Ridgeline truck using a non-abrasive method maybe 4 years ago and they still look like new. It sits outside non-garaged, but doesn't get lots of mileage now like it did before ... 
Wish I had taken a before picture. They were so stained and cloudy I never thought they would they could be clear again. The difference was amazing. Seemed like it was cheap too, maybe $50 - $60 total. It also had to sit for an hour after they were done so a final UV protective coating could dry. For the cost and quality would never even bother to do it myself

Wish I had taken a before picture. They were so stained and cloudy I never thought they would they could be clear again. The difference was amazing. Seemed like it was cheap too, maybe $50 - $60 total. It also had to sit for an hour after they were done so a final UV protective coating could dry. For the cost and quality would never even bother to do it myself
#11
SARX Legend
iTrader: (46)
Thanks man, I try to keep her as clean as possible at all times.
Because Racecar.
You can get them on Amazon, etc. Mine are Halogen complete Koito assemblies (cheaper) even though my car came with Xenons, and then I just installed a Murimoto HID kit (which performs better than the factory Xenons). At the time, OEM Xenons were going for $800.00 each and I just couldn't justify spending for times as much on them. But I did lose the auto leveling feature since the Halogen headlight unit sod not have the motor in them, and in some places like the UK, that is required o be working so some should be aware of that.
Yeah I think I did mine once with the turtle wax kit and it worked very well, but the girl and guy that would come to do mine only charged $30.00 and did a great job. headlights vary too, I had my GF's Nissan Juke done last year because I noticed they started to oxidize in some areas and they still look brand new, no signs of them oxidizing again.
Had mine done professionally on my Honda Ridgeline truck using a non-abrasive method maybe 4 years ago and they still look like new. It sits outside non-garaged, but doesn't get lots of mileage now like it did before ... 
Wish I had taken a before picture. They were so stained and cloudy I never thought they would they could be clear again. The difference was amazing. Seemed like it was cheap too, maybe $50 - $60 total. It also had to sit for an hour after they were done so a final UV protective coating could dry. For the cost and quality would never even bother to do it myself

Wish I had taken a before picture. They were so stained and cloudy I never thought they would they could be clear again. The difference was amazing. Seemed like it was cheap too, maybe $50 - $60 total. It also had to sit for an hour after they were done so a final UV protective coating could dry. For the cost and quality would never even bother to do it myself
Last edited by 9krpmrx8; 04-02-2015 at 11:04 AM.
#14
Registered
Factory headlights are clear coated.
Aways start with the least abrasive product. Most oxidation can be removed by mild polish that does not damage clear coat.
Also wax the headlights afterward.
Aways start with the least abrasive product. Most oxidation can be removed by mild polish that does not damage clear coat.
Also wax the headlights afterward.
#15
I agree with the least abrasive method approach, however I hesitate at following up with a wax, primarily because wax has a tendency to build up, yellow and dull on the headlight causing another problem. Better to use an acrylic conditioner that is designed for surface protection that won't build up or dull.
#17
I know this is an old thread, but I need to call BS on the sandpaper causing damage. First off, YES, sandpaper IS an ABRASIVE. However, using proper technique, allowing the sandpaper to do the work, and following with higher grit paper and finally with COMPOUND (not polish) will yield results that can challenge new headlights. There are many kits on the market to do such things, and depending on the severity of the damage to your headlights before restoration (faded only don't need such aggression, while headlights with sand pitting will need a rougher grit paper). I find the 3M kit to be good. There are 3 kits available from 3M on amazon; look closely at the differences. One comes with everything you need, one comes with everything except masking tape, and one comes without masking tape or compound. You will need all of those things, but if you have painters tape or some compound already, go ahead and order the cheapest kit.
Basically follow the steps in the instructions. You are WET sanding these headlights. Water serves as a lubricant but also keeps the plastic from getting too hot. After the pass with the first grit, the second grit works to reduce the SCRATCHES (yes scratches, that is supposed to occur) that the first grit applied. Following that, the next grit reduces those. So if you with 500 grit, the 800 grit will reduce the 500 grit scratches to 800. Following that, the 3000 grit pad reduces the 800 grit scratches to 3000 grit scratches.
Once you have 3000 grit scratches, they can be removed with compound. Compound is an ABRASIVE liquid. If it wasn't, then it wouldn't reduce scratches (DUH). Using the compound on a cutting pad removes the 3000 grit scratches (which are very fine, not something a fingernail would ever catch, more of a haze than anything). At this point, your headlights look like new, and the instructions on the kit are done.
BUT WAIT, there's more! That was a lot of work! In the process of removing the fadedness or other defects, you removed the UV coating (protection from the sun) from your headlights. If your lights were pealing or yellow, that protection had already failed. You want to protect your new-looking headlights, so apply some of this or similar product with UV inhibitors:
An extra 10 bucks will keep your headlights looking new for years to come.
***disclaimer. I am not affiliated with 3M or sylvania. This is my first post because I felt the first post is a bit misleading. The damage in the photo looks more like coating failure, stress cracks, or something else, not scratches from sanding and therefore, not a result of the abrasive itself.
Thread
Thread Starter
Forum
Replies
Last Post
Jst4fun
RX-8 Parts For Sale/Wanted
18
04-17-2021 07:43 AM
ShellDude
RX-8 Parts For Sale/Wanted
5
10-01-2015 09:55 PM
Austin22
New Member Forum
5
09-23-2015 04:46 PM


