When you click on links to various merchants on this site and make a purchase, this can result in this site earning a commission. Affiliate programs and affiliations include, but are not limited to, the eBay Partner Network.
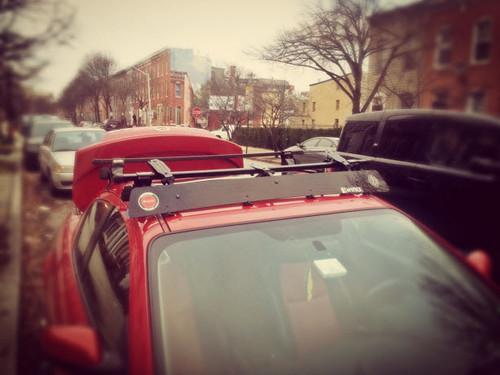
Picked up an INNO roof rack for the RX8 this week.
So I actually picked up from Craigslist, a rack that is made for a 2010 Legacy, and it fit perfectly, minus the cross bar.
I shortened the cross bar from 54 inches to 48 inches.
INNO INSU
Crossbar: INB 137
Fit hooks: K320
Fairing: Large
Please note that INNO states that the kit recommended for RX8 is Crossbar: INB 117, Fit hooks: K163, and a Medium Fairing.
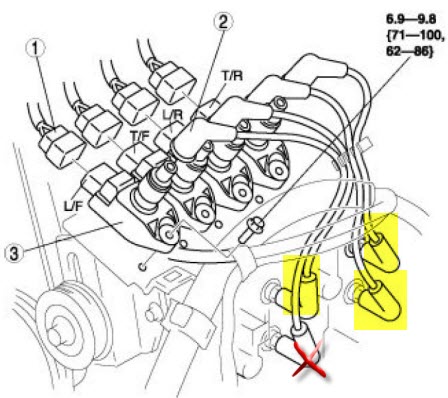
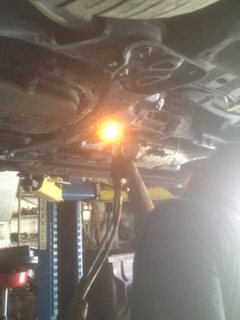
Note: Front Lower (Leading) plug threads are damaged and will need to be re-threaded and or milled. Did not replace that plug because I did not want to damage it anymore. Will take to Mazda to have repaired.
The arrow is where the plugs are located. If you look at my last post on spark plugs there is a better image of the issue.
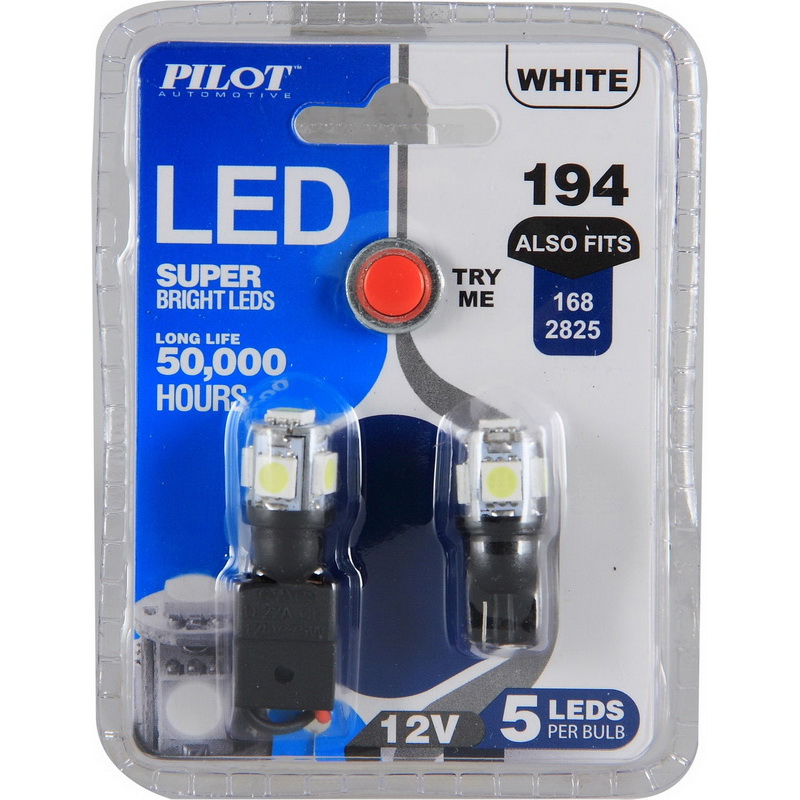
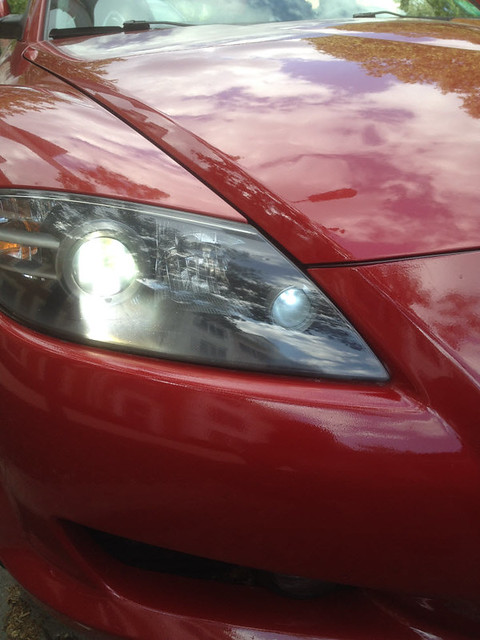
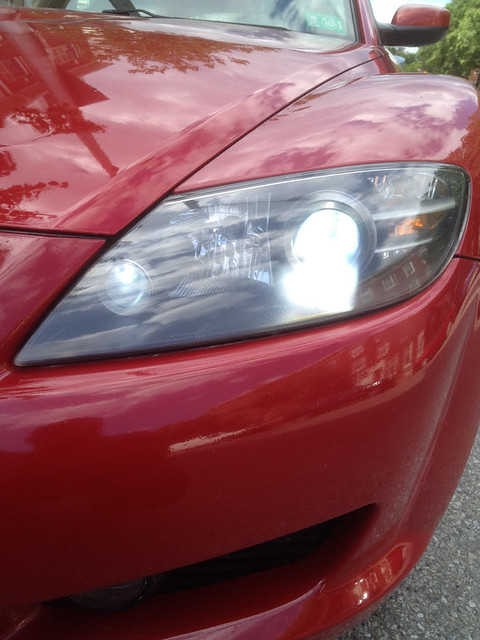
Picked up these LED bulbs for the Front Parking Lights, from Advance Auto for $12.99...Below is a link to Pilots site. Pilot LED Replacement Bulb, IL-194W-5
While changing bulbs and getting car wash, I decided to get the headlights restored as well.
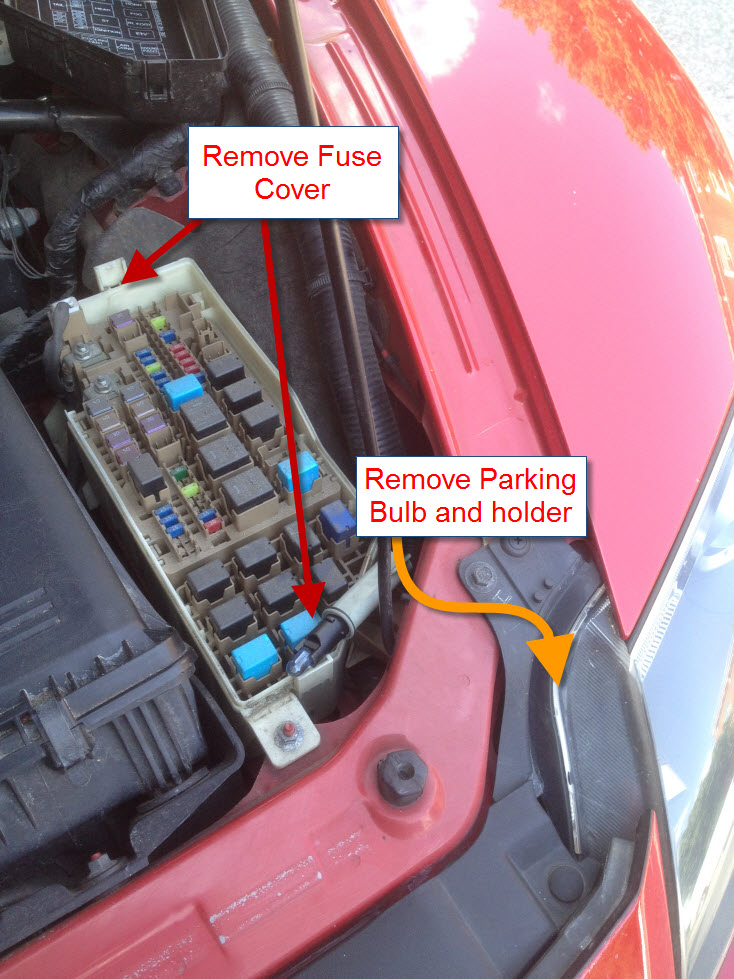
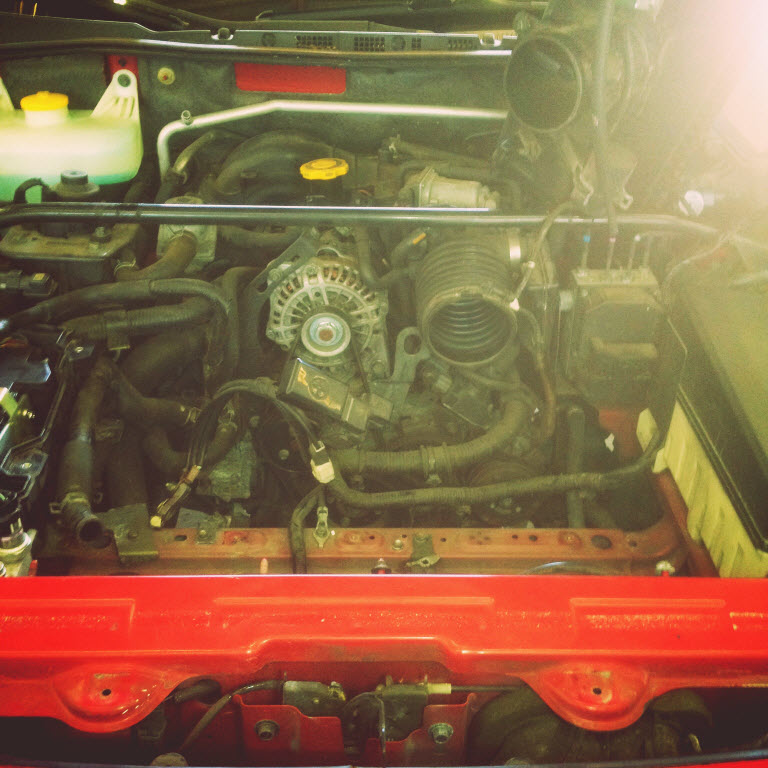
1. Remove ECU Cover on passenger side. There are 3 screws, 2 zip tie clips, 2 case clips and 1 hose, holding it down.
2. Remove fuse box cover on driver side. There are just 2 case clips holding it down.
Im at 106K. If you arent experiencing problems just keep on truckin. If you worried go have a compression test done. That will give you an indication of how the motor is doing.
Pay no mind to Mizu products, the fan pack sucked and failed right away. The radiator worked well but they don't sell it anymore. And one note to add is that you can unbolt the lower brackets for the rad as well, it makes it a tad bit easier to drop out.
I have since updated to a FAL (420) dual setup and it is probably the best cooling mod I have done.
Oh and if you decide to run an OEM radiator (you should) look at getting one for a 2009+ Rx-8. It was improved (thicker and fans were improved too) and will fit no problem.
Oh and if you decide to run an OEM radiator (you should) look at getting one for a 2009+ Rx-8. It was improved (thicker and fans were improved too) and will fit no problem.
Thanks for the info 9krpmrx8. I ended up going OEM from Mazmart.
DIY:
1. Remove intake box
2. Remove battery and battery holder
3. Remove radiator reservoir (It will start to leak at this point so make sure you are in a place where you can messup the floors. Also cover all of the connectors before the antifreeze gets all over them)
4. Remove all fan connectors and any surrounding connectors. I had an issue removing the clips which hold the connectors to the radiator fan.
5. Remove 2 bolts which holds radiator to vehicle...located at top right below where the reservoir is and where the intake whole is. You will need a 10mm swivel socket and extender.
6. Remove clips that hold radiator fan to radiator. (Our goal is to slide out Fan just as you are sliding out the radiator, leaving the A/C condenser in place.)
7. lift Car
8. Under neath you will removed all nuts, bolts, and grommets which hold the under carriage tray in place. Aim for the passenger side, so we can bend away the carriage and let it hand on the passenger side.
9. Remove 2 bolts which hold A/C condensor cover guard.
10. Remove passenger lower radiator bracket, 2 12mm bolts.
11. Carefully slide out the radiator with the fan attached.
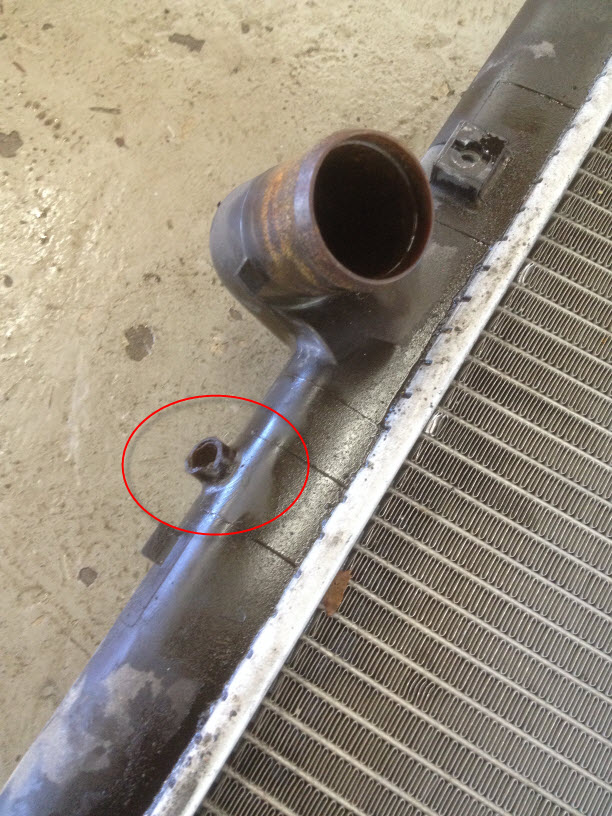
Old radiator nipple broke off and was stuck in reservoir.
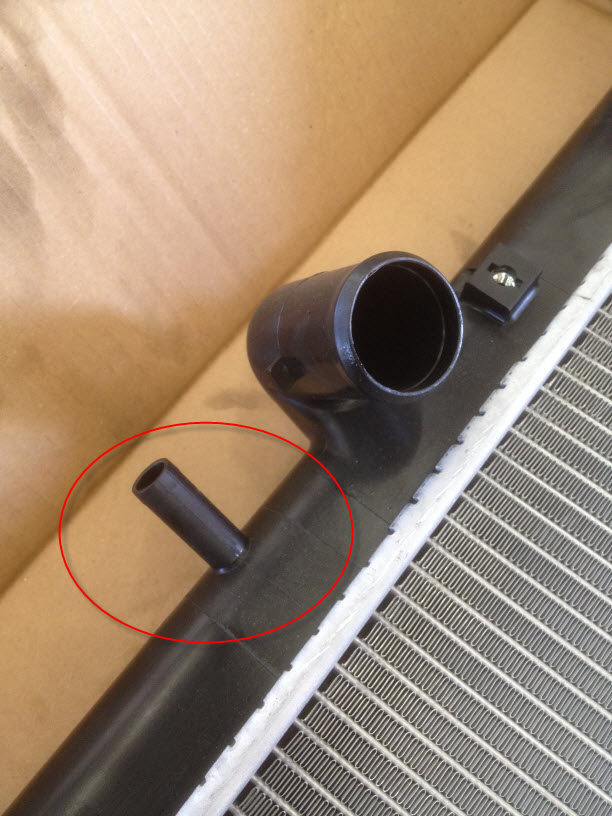
New radiator
Took me 4 hours because I went slow, so I didnt forget where all my screws came fro.
Pretty common problem. I think the OEM radiator gets worn pretty easy. Mine had a stress crack on top, at the very top of the plastic, not even the nipple.
Replaced it with a CSF full aluminum and no problems since. Took roughly the same install time as you did. ~4 hours ish.
Make sure you replace the foam surrounding and under the rad.
GK1707, can you send me a link to your CSF full aluminum radiator, and also what foam around the edges are you talking about? For the stock radiator I didn't see any foam.
Originally Posted by GK1707
Pretty common problem. I think the OEM radiator gets worn pretty easy. Mine had a stress crack on top, at the very top of the plastic, not even the nipple.
Replaced it with a CSF full aluminum and no problems since. Took roughly the same install time as you did. ~4 hours ish.
Make sure you replace the foam surrounding and under the rad.
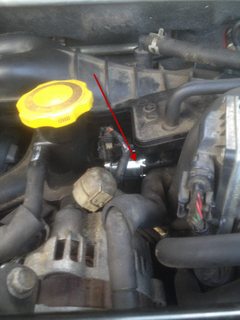
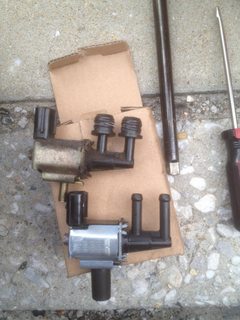
Well the other day I got the Check Engine Light code P0443 - Purge Valve Solenoid. Vehicle still drove fine, but I hate CEL so I purchased and changed it today.
PVS part number Z504-18-741A. I purchased one from Advance Auto for $94.
1. I located the PVS tucked between the intake manifold and the intake body.
2. Used a flat had to push on towards the firewall, and it was able to slide out of the two wholes.
3. I exchanged the nipples from the old to the new PVS.
4. Installed then cleared the CEL code, and went for a drive.
I am hopeful that the issues has been resolved.
--------------------
UPDATE: Aug 11th, 2015
OH MY GOSH, IF YOU HAVENT REPLACED YOUR PVS DO IT NOW.
The 8 has so much more power now. Drives like new, I thought I needed a new clutch but apparently not.
This is a very impressive thread. I got my rx8 for my fianc�, but she wasn't comfortable with it, she felt it was too temperamental, and was worried that she would break it. Instead, I daily drive it and she got my 2014 Mazda 6. Not the worst deal in the world.
This is a very impressive thread. I got my rx8 for my fianc�, but she wasn't comfortable with it, she felt it was too temperamental, and was worried that she would break it. Instead, I daily drive it and she got my 2014 Mazda 6. Not the worst deal in the world.
BigBadChris, my wife actually purchased this 8, before we were even dating back in 2009. I think with the right tools and time, the 8 can last a very long time. Since she has had it, it has been city street parked, and all the work after warranty ended has been preformed by me on the street. I started this thread so I can keep track of everything and every problem I tackle, so that everyone who has to deal with it can use it as well.
BigBadChris, the best think I would recommend anyone to do is get an OBD2 reader, that puppy has helped me sooooo much in diagnosing issues.
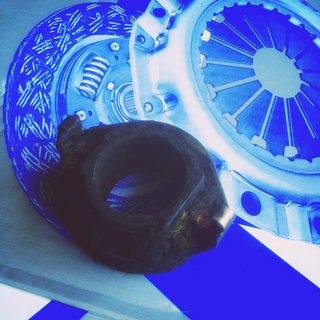
Well...the throw-out bearing is screaming like crazy, so time to order the clutch kit and flywheel... Hopefully by next week the clutch job will be complete and I can post some pictures. Wish m luck folks.
9krpmrx8, it was very silly of me to order a new flywheel, just figured I should have one since the shop near me couldn't resurface it. So when we got it all of, the flywheel was fine and didn't even need to be resurfaced...a few minor hot spots, but nothing bad.
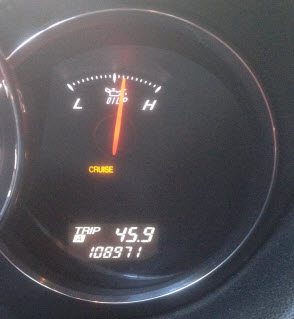
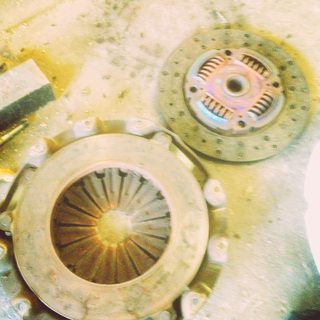
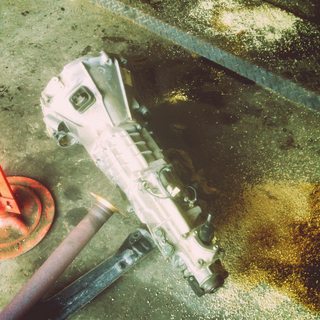
So yesterday, I was able to get my local shop to help me replace my clutch in the Rx8. The Rx8 had been making some crazy noises which would go away when I pressed the clutch...so figured it was about time. I believe the clutch had never been changed...at over 100k miles (109,177 miles), it was about time.
Tip 1. Dont ever work with anyone who rushes. The guys here were great, but when rushing they broke my neutral switch...an annoyance. The code didnt appear until I was on the road, thinking oh the bad idle is the ECU relearning...NOPE broken neutral switch...the car drank 13 gallons of gas in 50 miles, yap that is 4 miles per gallon. Dont ever mess that switch up...
Found that the clutch, pressure plate, and release bearing were all shot, well over the required time to replaced. Honestly though the car drove fine...every now and then on a hill it would slip just a little bit...feeling like if I was not pressing the gas peddle...it was bad to me, I have had other cars and know I know what a bad slipping transmission is...this wasn't it.
Tip 2. If you hear any noise coming from transmission after new clutch install, most likely didn't grease the throw-out bearing enough, left dust in transmission chamber, or didn't resurface your flywheel...I did all three...opes.
Well new clutch is OEM, so no pedal feel difference...its a easy to press as butter. Bleed the lines and everything and still butter. My wife loves it...=D
Here are some pictures:
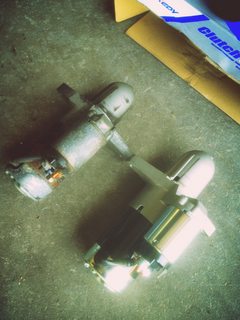
I also took this time to install that starter I got way back when...I posted about it...Note my original starter(over 100k old) was still going strong...I replaced it now because I was here and didnt want to have to do it later.
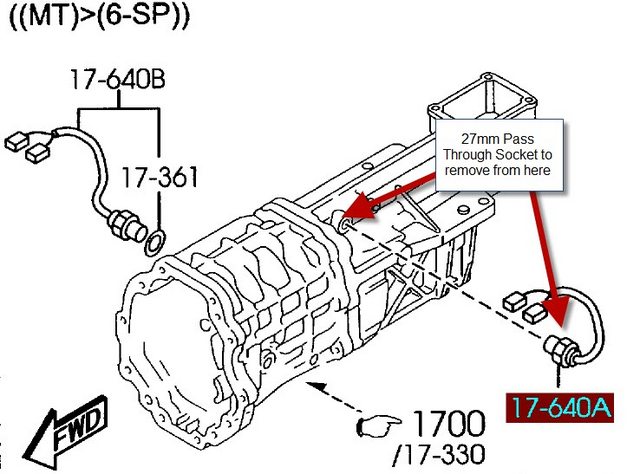
So I was able to fix the neutral switch on my own with the transmission in the car. Tigth fit but with Husky's Universal Pass-Through sockets it was a breeze.
Order from Mazmart.com RX-8 Neutral & Park Switch (2004-2008) - Manufacturer part number: Y612-17-640B - $95 part+2 day shipping
Also pickedup Husky Universal Pass-Through socket set, used then returned it back to home depot...all within 2 hours. You need a 27mm Pass-Through socket. - $130 (But I returned it so $0)
1. Jack up the driver front side of the car.
2. Support with Jack stand for safty.
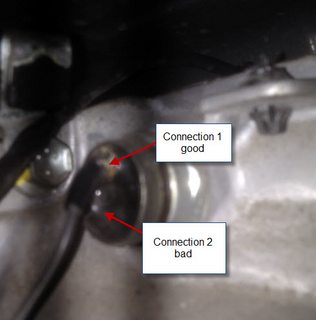
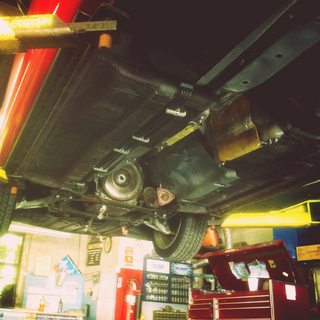
3. Locate the neutral switch shown below
4. Disconnect 2 white clips
5. Thread clips through pass-through socket - 27mm
6. Carefully remove neutral switch
7. Install new switch
8. Remove jack stand and jack
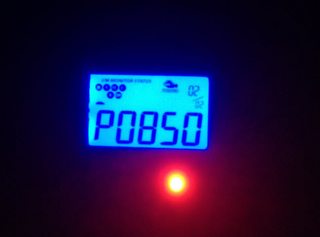
9. Clear the CEL P0850 code
10. Have a bear and then go for a ride
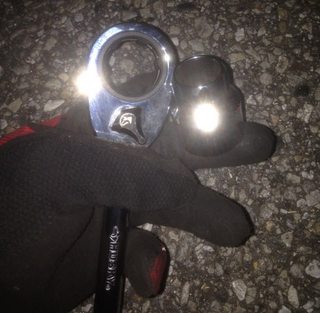
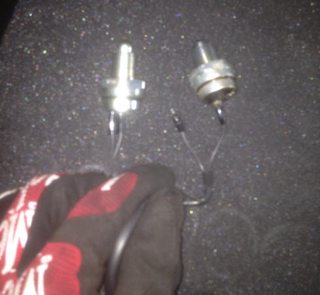
New on left vs Old on right
***If your car is idling weirdly and using a lot of gas and you got CEL P0850, do your self a favor and replace the neutral switch asap.***
I still love reading through your thread!
I had recently replaced my ignition coil and spark plugs to the SakeBomb coil kit and man...my Rusty was so rusted all over the place ( bolts and everything ), it took me much longer than I think it would have taken. I had a hard time fitting in the bracket and routing all the harnesses as well.
At one point I didn't install it properly, and thought I was going to be stranded on the driveway. Fortunately I got it all figured out and was able to start the car up...PHEW!!


 12-13-2014, 07:26 PM