My mild HPDE/Track/Time Trials build
 04-26-2016, 11:00 PM
#1
Registered
Thread Starter

Join Date: Feb 2016
Location: Carson City, NV
Posts: 74
Likes: 0
Received 0 Likes
on
0 Posts
I've started this build thread on another forum and am trying to keep both up to date. So far I've been digging around this car for about 2 months in my not-very-ample spare time, so the first few posts will be simple catch-up posts.
For the last few years I ran low mileage, nice MR2 Turbo for Auto-X and some SCCA Club Trials (Time Trials for street legal cars for those who don't speak fluent SCCA). While I like the car, it was not ideal for me and given that it's a fairly low mileage car in good shape I'd rather pass it on to someone who appreciates it for what it is.
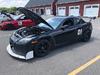
I've always been curious about RX8s after owning one of each generation RX7 in the past so after a long search I found a pretty decent one that would make a good starting point. It passed the compression test with flying colours and I decided that it was now or never. Hey, I still had two months to the first event at this point, what could possibly go wrong?
Here it is, in all its glory:

The build has begun, but at the moment I'm mainly doing catch-up maintenance. It's been looked after better than most in my price range (below 8k-ish) but there's still plenty to do.
While I was waiting for my Mazdaspeed team support membership approval, I decided to do something about the headlights. Just because I have a cataract doesn't mean my car has to have two of them, too. Before and after:
<img src="https://cp6cna.dm2302.livefilestore.com/y3mjld1_uSft1EG_sN60ic1nQEyrTiHttul4pqeYT5swvtCmmx NQQdFu9Nw8psZv9BwjkpOjgzpaNUEP8xeMsC0fi3xJeJMe6V8a XsfcEVopA8QgDqDoBq_q-yF-aw8QxbN1NrFyeGEvdm1Vo2Kh_0wcAW4KAGhhJr58E6vdlCKZQ8 ?width=1024&height=768&cropmode=none" />
<img src="https://cz6cna.dm2302.livefilestore.com/y3mnj45RyZCP26K1B6WVHNNL8qyD7G-iasro5yN1Lfsn72nedV9ODfhZPAQJyJd4pxm6kVuvwanZ47aP4 dP0kAcG8myCdD2qGNWcyNRIs1ciaJcVgdvZLTJulqeU1yw8-sKNU3wjnFLvrU788TIoPobjWP81TYX67euTP995cpJJXs?widt h=1024&height=768&cropmode=none" />
Unfortunately they're already starting to yellow a bit again, I think I may have to clearcoat them.
It has the advanced keyless entry system with the credit card sized "keys" and of course both were dead. New batteries ressurected one of the two, the other one remained dead, most likely because someone inserted the previous battery the wrong way around <img src="/media/img/icons/smilies/whatthe-18.png" class="smiley" alt="" />. Oh well, one will do for now.
What wouldn't do was the broken cap over the ignition lock (common fault) - initial research suggested that Mazda really wants you to buy a complete steering lock, but a bit more digging brought up a TSB and a part number just for the cap's base.
Here's the part number if someone else runs into the same issue:
<img src="https://ep4dqq.dm2302.livefilestore.com/y3mvesgxwqWdpXBrLDeLlGekPcRhSSlVUbdIIzE3YKVha5GM5U wNwY3nvdJdiQeUF6MhY2CRtDJe5EAjQ-UfwrOqT5urEgrQIPLJfQdc4k1oVul_rSCyMNUffskkrLrSN3Lb nNmvecJxqClLBqZYIEx3KM0DJn3x2nRA1revpVmPHs?width=1 024&height=768&cropmode=none" />
And it's not falling off the steering lock anymore!
<img src="https://ez4dqq.dm2302.livefilestore.com/y3mvK5Haj9mwFydLbvnJxvXy2bc85BTcUVRf8E1B11ZomxXZzM hOW6SqJTgEoylqlHyAQtNFyTLInWCXoyv1xSNYCBuNd4bGZPWY eRhj4RpjJGVWTKEetMtVCvJUrfobPjAby2lmyhi0I19nvKPeb6 lssKFulCmeWf7Sh5HWyXZ_kM?width=600&height=800&crop mode=none" />
At this point the parts started piling up from Mazda and Tire Rack, but I was also waiting for this important part, NLA from Mazda:
<img src="https://ej4dqq.dm2302.livefilestore.com/y3m6W9R8tfguxP_Zb67CXm729mWs7N4suZfNSfQ9NXQlJL5Gvb N9l5O5cHF6Ma94SaSKldAaT-4kjPHi05dqofob8KiZPVi-0i82i_SKaftVQASeGYLPfqUMHzJIujmaogQbneSHq71z-1letMcxhItMkArhvxb-BMv3KYE6TgUkEU?width=600&height=800&cropmode=none" />
Did I say pile of parts? OK, small pile - most of the cooling system stuff hasn't arrived yet, and what feels like half the US supply of Idemitsu rotary engine oil and premix isn't in the picture.
<img src="https://d54dqq.dm2302.livefilestore.com/y3mHykOQbDMtqDfTWgHdd2Nw_Ff57v0TXXE9e6dVMKNLtshdM6 Htn2oxnP1PB5dgOtYytl9uTF-M59cg3WBRauyT7_FUUkGHzdKkP9axedFOt_k2Iomfj3IzxNGr7 rJyE47SAowpIaWpQET-C-OfWM9lsFh0-pNlpd8DBMBsgJGPck?width=800&height=698&cropmode=no ne" />
For the last few years I ran low mileage, nice MR2 Turbo for Auto-X and some SCCA Club Trials (Time Trials for street legal cars for those who don't speak fluent SCCA). While I like the car, it was not ideal for me and given that it's a fairly low mileage car in good shape I'd rather pass it on to someone who appreciates it for what it is.
I've always been curious about RX8s after owning one of each generation RX7 in the past so after a long search I found a pretty decent one that would make a good starting point. It passed the compression test with flying colours and I decided that it was now or never. Hey, I still had two months to the first event at this point, what could possibly go wrong?
Here it is, in all its glory:
The build has begun, but at the moment I'm mainly doing catch-up maintenance. It's been looked after better than most in my price range (below 8k-ish) but there's still plenty to do.
While I was waiting for my Mazdaspeed team support membership approval, I decided to do something about the headlights. Just because I have a cataract doesn't mean my car has to have two of them, too. Before and after:
<img src="https://cp6cna.dm2302.livefilestore.com/y3mjld1_uSft1EG_sN60ic1nQEyrTiHttul4pqeYT5swvtCmmx NQQdFu9Nw8psZv9BwjkpOjgzpaNUEP8xeMsC0fi3xJeJMe6V8a XsfcEVopA8QgDqDoBq_q-yF-aw8QxbN1NrFyeGEvdm1Vo2Kh_0wcAW4KAGhhJr58E6vdlCKZQ8 ?width=1024&height=768&cropmode=none" />
<img src="https://cz6cna.dm2302.livefilestore.com/y3mnj45RyZCP26K1B6WVHNNL8qyD7G-iasro5yN1Lfsn72nedV9ODfhZPAQJyJd4pxm6kVuvwanZ47aP4 dP0kAcG8myCdD2qGNWcyNRIs1ciaJcVgdvZLTJulqeU1yw8-sKNU3wjnFLvrU788TIoPobjWP81TYX67euTP995cpJJXs?widt h=1024&height=768&cropmode=none" />
Unfortunately they're already starting to yellow a bit again, I think I may have to clearcoat them.
It has the advanced keyless entry system with the credit card sized "keys" and of course both were dead. New batteries ressurected one of the two, the other one remained dead, most likely because someone inserted the previous battery the wrong way around <img src="/media/img/icons/smilies/whatthe-18.png" class="smiley" alt="" />. Oh well, one will do for now.
What wouldn't do was the broken cap over the ignition lock (common fault) - initial research suggested that Mazda really wants you to buy a complete steering lock, but a bit more digging brought up a TSB and a part number just for the cap's base.
Here's the part number if someone else runs into the same issue:
<img src="https://ep4dqq.dm2302.livefilestore.com/y3mvesgxwqWdpXBrLDeLlGekPcRhSSlVUbdIIzE3YKVha5GM5U wNwY3nvdJdiQeUF6MhY2CRtDJe5EAjQ-UfwrOqT5urEgrQIPLJfQdc4k1oVul_rSCyMNUffskkrLrSN3Lb nNmvecJxqClLBqZYIEx3KM0DJn3x2nRA1revpVmPHs?width=1 024&height=768&cropmode=none" />
And it's not falling off the steering lock anymore!
<img src="https://ez4dqq.dm2302.livefilestore.com/y3mvK5Haj9mwFydLbvnJxvXy2bc85BTcUVRf8E1B11ZomxXZzM hOW6SqJTgEoylqlHyAQtNFyTLInWCXoyv1xSNYCBuNd4bGZPWY eRhj4RpjJGVWTKEetMtVCvJUrfobPjAby2lmyhi0I19nvKPeb6 lssKFulCmeWf7Sh5HWyXZ_kM?width=600&height=800&crop mode=none" />
At this point the parts started piling up from Mazda and Tire Rack, but I was also waiting for this important part, NLA from Mazda:
<img src="https://ej4dqq.dm2302.livefilestore.com/y3m6W9R8tfguxP_Zb67CXm729mWs7N4suZfNSfQ9NXQlJL5Gvb N9l5O5cHF6Ma94SaSKldAaT-4kjPHi05dqofob8KiZPVi-0i82i_SKaftVQASeGYLPfqUMHzJIujmaogQbneSHq71z-1letMcxhItMkArhvxb-BMv3KYE6TgUkEU?width=600&height=800&cropmode=none" />
Did I say pile of parts? OK, small pile - most of the cooling system stuff hasn't arrived yet, and what feels like half the US supply of Idemitsu rotary engine oil and premix isn't in the picture.
<img src="https://d54dqq.dm2302.livefilestore.com/y3mHykOQbDMtqDfTWgHdd2Nw_Ff57v0TXXE9e6dVMKNLtshdM6 Htn2oxnP1PB5dgOtYytl9uTF-M59cg3WBRauyT7_FUUkGHzdKkP9axedFOt_k2Iomfj3IzxNGr7 rJyE47SAowpIaWpQET-C-OfWM9lsFh0-pNlpd8DBMBsgJGPck?width=800&height=698&cropmode=no ne" />
 04-26-2016, 11:01 PM
#2
Registered
Thread Starter
Join Date: Feb 2016
Location: Carson City, NV
Posts: 74
Likes: 0
Received 0 Likes
on
0 Posts
One of the issues with this build is that I pretty much have to be my own rotary specialist. When I owned the 7s I had a well respected specialist not too far away who could look after the cars, this time it's all on me.
Yesterday was mostly spent addressing issues that didn't require me to move it as the battery is currently on the charger. First order of the day, coils. Pulling coil #1 out didn't look too good, look at the burn mark on the bracket:
<img width="800&height=600&cropmode=none" src="https://dp4dqq.dm2302.livefilestore.com/y3merQv-enph3mJUDXObVmwDCDJskqR3p9b8B6_5ahR3XtA6EAJnjaiZ3Z 0ZyLcDY7QVwStP2M8JeCqRiY4WV96rfDnIxVroEAB97XNdmvyk ueeYyswV4C3ySRFz7w94uwsqPcl3uKf3B7e8MAGrWfVg9srTFd kWLweOPEHwsyChzg?width=800&height=600&crop mode=none" height="600&cropmode=none" />
Coil wasn't looking too hot either, but that wasn't a surprise - the PO never changed the coils so there was a good chance they were still the originals - compare it with a brand new one:
<img width="800&height=600&cropmode=none" src="https://dz4dqq.dm2302.livefilestore.com/y3mmgAFZbhY_Dvtt-Rd7pJwbLQKkGVMyXehjt5TpNqvQVq0DNNuqa2fl0LQr0wKOcbr OI-RqCTf5O6x1EgDLUUqxz4tixeFx8rNOSt-WPtv0PmrIWzypdqN0HSXY0nKTNdv-dkY2wDlPubJGy0w9FnRsvRbpDfduh2WGAa1DcKJuF0?width=8 00&height=600&cropmode=none" height="600&cropmode=none" />
The other coils didn't look much better either, in fact the further back I got the worse they were. It'll be interesting to see how it starts now - and yes, it'll also get new wires and plugs, but for that I have to get under the car. While I had the airbox out to get at the coils, I also replaced the air filter - the dealer inspection had a note on there saying "air filter slightly dirty". That was the understatement of the year, it was properly filthy.
Speaking of properly filthy, the a/c filters were also a little overdue for replacement, although I have to say the dried fruit that almost prevented me from getting the filter out was a nice touch.
<img width="800&height=611&cropmode=none" src="https://dj4dqq.dm2302.livefilestore.com/y3m0VDnbq4NBYzmkQJDLRJ7S5TJgMDsgTD4a33g3MuGM8BhTDg HLf-eh0jmBpvgIUVlKKGCByZgaH7FrnUeOHN_22Xd39cgSlJ0Oncg5 ySuHck1eFceXTzxtbnHPtwIzLt2KQNCJ-d7M2B5sr0_LPim8dZLJk3KpeHDe5nQNX3GbDY?width=800&am p;height=611&cropmode=none" height="611&cropmode=none" />
While I was poking around the interior I also replaced the worn through vinyl shift boot with a leather one from Redlinegoods. Unfortunately the mounting ring and the top of the OEM boot was broken so the install isn't as neat as I would like, but it's an improvement. I also found out that the PO really seemed to like sugary drinks that leave sticky residue all over the place. Yuck.
<img width="800&height=600&cropmode=none" src="https://c54dqq.dm2302.livefilestore.com/y3mK5nE53FAhRbVB10ruUuon8gAac0EMYE36BSTUk6H3xdbsAb ZCRDTo0TdNcWh1lXKExqgz3oOqHsy0vc97w7meYWFtRrj_k0yM 0uxrFDYlnhcVAmAyWr0OfCljfLPa90ANeMyvs4DmOLExWkujmL n5IUSe8VsjmGebSbkYfn5BYM?width=800&height=600& amp;cropmode=none" height="600&cropmode=none" />
For today, it's time to play the garage shuffle to get this one into the garage and do the brakes, plugs and wires.
04-26-2016, 11:03 PM
#3
Registered
Thread Starter
Join Date: Feb 2016
Location: Carson City, NV
Posts: 74
Likes: 0
Received 0 Likes
on
0 Posts
Spent most of the afternoon in the garage yesterday with not much to show for it, but I deliberately took it slow with an emphasis on doing things right.
Someone got a lot of use out of the brakes:
<img width="800&height=606&cropmode=none" src="https://cz4dqq.dm2302.livefilestore.com/y3mATXPBkZ2dZV9HUpH6SALTHcgMsbK5qXSgxVB_aC1EQxhXJW-tAzFEw0mZZgGdMN0pIZgdeXuR2k_ciJ50zGRX99XmrYkU1iBZF 5L_4nJVe8GfyCUEE15wIiXUxBcjFG2wyr8eOfVKnotKulwPgDv fwSVsJXje7nMvV-kl4CgmOE?width=800&height=606&cropmode=non e" />
<img width="600&height=800&cropmode=none" src="https://cp4dqq.dm2302.livefilestore.com/y3mWMfy_fQ9v2koBaRF8-KXgbbPSdrImSoFZW0m9UBDUq3Y1O4dzmH7-6b6SjwViWgO2rx5wd_kjo7kmR6ub59Bx3DiVjN7DHV8_1lGiU5 E4TEHQ30Qcv7URDPkJOb58-du4Ll7W-LUUHh6rFEVeoa3vL0nRTwAP0VOSL3-E1viN1w?width=600&height=800&cropmode=none " />
Took a while to get the disk off as it was corroded onto the hub a little, but not as bad as I've seen in the UK. PB Blaster and a rubber mallet eventually got it off. Cleaned up the hub as best as I could, let's hope the disk is sitting on properly (there is minimal "grinding" with the pads on that suggests slight runout, but I lost my nice dial indicator when I moved from the UK and haven't replaced it yet, so that's a guess).
While I was in there I swapped out the brake line for a Goodridge stainless steel one - the workshop manual calls for disconnecting the brake line when replacing the disks and after ignoring it, I now know why - it's much easier that way...
While I was in there I pulled out the spark plugs and as expected, those also didn't have much life left:
<img width="800&height=701&cropmode=none" src="https://ez64hq.dm2302.livefilestore.com/y3mzne24weFuQHiv69JjUVmSxb3LOMu5DvDsOJ5pVL1yCsDB--5gH0bEdei42zUGYgBjHT3CBedoO3ECQNuVPnYwadYvUcGjOQfu 7lLp9Ni3jGeA9lCkao9t0iyciAy56WQC-Pu-iDFcUN2VIJ9xCr9ZVYWQiotyCIm0-ZQxiZ9qjc?width=800&height=701&cropmode=no ne" />
The electrodes on the trailing ones were noticeably worn compared to the new plugs. I'm pretty impressed it started and runs as well as it does.
Hopefully between now and Friday I'll managed to replace the remaining three brake disks and get to bleed the brakes and clutch (shared reservoir, yuck). We've got the annual track and Auto-X tech on Saturday and I hope to get the car through there rather than having to try and get it teched at the first event.
04-26-2016, 11:03 PM
#4
Registered
Thread Starter
Join Date: Feb 2016
Location: Carson City, NV
Posts: 74
Likes: 0
Received 0 Likes
on
0 Posts
Progress update - spent my alloted garage hour last night digging around the garage for tools instead of working on the car. I think I'll need to spend an evening cleaning up that mess first.
Passenger front disk is baked on the hub as badly or worse than the driver's side one so I took off all the brackets, loosened the mounting screws and gave it a few squirts of PB Blaster. Another squirt before I leave for work and hopefully it'll come off tonight. Goal for tonight is to have passenger side front done, then do the rears tomorrow and Thursday night.
Passenger front disk is baked on the hub as badly or worse than the driver's side one so I took off all the brackets, loosened the mounting screws and gave it a few squirts of PB Blaster. Another squirt before I leave for work and hopefully it'll come off tonight. Goal for tonight is to have passenger side front done, then do the rears tomorrow and Thursday night.
04-26-2016, 11:04 PM
#5
Registered
Thread Starter
Join Date: Feb 2016
Location: Carson City, NV
Posts: 74
Likes: 0
Received 0 Likes
on
0 Posts
Got the disk off finally after being sidelined by a disagreement with lunch. Oh well.
Progress seems to be typical for one of my projects - not as much progress as I would like, but more swearing than I had hoped. Fortunately, nothing major so far, but enough to cause unwanted delays. Especially unwanted because I ended up missing annual tech and the car is going to reside on axle stands for another week or three. Oh well, I still have a month to the first event. *gulp* <img src="/media/img/icons/smilies/whatthe-18.png" alt="" />.
Rear disks came off relatively easily, but a tire shop replaced one of the rear wheel studs and it looks like I suspected - backplate mangled to get the stud in, and I don't think it's quite the right thread either as I could barely get the nut off. In the end I had to recut thread before putting the wheels back on.
<img width="600&height=800&cropmode=none" src="https://dp64hq.dm2302.livefilestore.com/y3m0r28gXEFsNW7xuwndjHH9XRsJ0f0FtJH-eduNHptQpFuYbG_SOZYxDjIQR_aXqudmTRkzxaYWmUTIkXRRM_ TW8lusokD-x7rh35ps5nj4YrDtjcgundY9MqVwVAIrYvd2ZZ5ZRGxcGQPuwg GVAcr50lzJwi2Y2JpoLW3U1VdXV0?width=600&height= 800&cropmode=none" />
Plus, it looks like some Neanderthal wound back the piston on the rear drivers side with a chisel and marked a couple of the slots. Fortunately there is enough left for the HF wind-back tool to bite and do it's job.
That wasn't the case on the passenger side, the piston turns with a fair amount of effort but doesn't wind back in. Looks like it's berkeleyed, local NAPA can't get one for 4-5 days minimum so I guess I have to bite the bullet and get one via Mazda Team Support - more expensive but that one should definitely be here before next weekend. Plus that'll allow me to order the various filler and drain plug gaskets the local Mazda dealer doesn't have in stock.
Oh, and both rear shocks are leaking . I had hoped to be able to run the car on stock suspension for its first event but it looks like it's coilover time early. That's $2500 I really didn't want to spend right now, especially as I also still have to get track tires and wheels.
<img width="600&height=800&cropmode=none" src="https://d564hq.dm2302.livefilestore.com/y3mH9jUGY_xclM_4g8f_Zt1Ei4dGI9FO3CODMA-SFpIWlls7FwvYTzCoHfZkDLU8gwUZBeg6EVd0eoXU6UKwLBRJ2 FXBpA1CDqh91kPKMTs2ygGv361wiwUTig0ZZFJK2c0hw5IC7wq lhsDY5dWqqSQluQGn0XOnlyIiL1ta3u0rSk?width=600& height=800&cropmode=none" />
Progress seems to be typical for one of my projects - not as much progress as I would like, but more swearing than I had hoped. Fortunately, nothing major so far, but enough to cause unwanted delays. Especially unwanted because I ended up missing annual tech and the car is going to reside on axle stands for another week or three. Oh well, I still have a month to the first event. *gulp* <img src="/media/img/icons/smilies/whatthe-18.png" alt="" />.
Rear disks came off relatively easily, but a tire shop replaced one of the rear wheel studs and it looks like I suspected - backplate mangled to get the stud in, and I don't think it's quite the right thread either as I could barely get the nut off. In the end I had to recut thread before putting the wheels back on.
<img width="600&height=800&cropmode=none" src="https://dp64hq.dm2302.livefilestore.com/y3m0r28gXEFsNW7xuwndjHH9XRsJ0f0FtJH-eduNHptQpFuYbG_SOZYxDjIQR_aXqudmTRkzxaYWmUTIkXRRM_ TW8lusokD-x7rh35ps5nj4YrDtjcgundY9MqVwVAIrYvd2ZZ5ZRGxcGQPuwg GVAcr50lzJwi2Y2JpoLW3U1VdXV0?width=600&height= 800&cropmode=none" />
Plus, it looks like some Neanderthal wound back the piston on the rear drivers side with a chisel and marked a couple of the slots. Fortunately there is enough left for the HF wind-back tool to bite and do it's job.
That wasn't the case on the passenger side, the piston turns with a fair amount of effort but doesn't wind back in. Looks like it's berkeleyed, local NAPA can't get one for 4-5 days minimum so I guess I have to bite the bullet and get one via Mazda Team Support - more expensive but that one should definitely be here before next weekend. Plus that'll allow me to order the various filler and drain plug gaskets the local Mazda dealer doesn't have in stock.
Oh, and both rear shocks are leaking
. I had hoped to be able to run the car on stock suspension for its first event but it looks like it's coilover time early. That's $2500 I really didn't want to spend right now, especially as I also still have to get track tires and wheels.<img width="600&height=800&cropmode=none" src="https://d564hq.dm2302.livefilestore.com/y3mH9jUGY_xclM_4g8f_Zt1Ei4dGI9FO3CODMA-SFpIWlls7FwvYTzCoHfZkDLU8gwUZBeg6EVd0eoXU6UKwLBRJ2 FXBpA1CDqh91kPKMTs2ygGv361wiwUTig0ZZFJK2c0hw5IC7wq lhsDY5dWqqSQluQGn0XOnlyIiL1ta3u0rSk?width=600& height=800&cropmode=none" />
Last edited by elford_tim; 04-26-2016 at 11:09 PM.
04-26-2016, 11:05 PM
#6
Registered
Thread Starter
Join Date: Feb 2016
Location: Carson City, NV
Posts: 74
Likes: 0
Received 0 Likes
on
0 Posts
So with the mangled rear caliper I made yet another call to Mazdaspeed and put the project on hold until this guy showed up:
<img width="1024&height=768&cropmode=none" src="https://ej64hq.dm2302.livefilestore.com/y3m6bxhDEsU6JIT4qPU0s2WjzREgQK8Dsd7BqoPWjAkMg2sHkF ZjIUyaR1UlbAPSwMkOJY44S9KLvA89i8h4_J7vk2YJLTfEfd6N-1rHm672s1wSf8HQ48yej55cvE6G1WGjd6pXlQZk72hDdgL2lm-7zUWsXkME-UN21SPOVjA_qw?width=1024&height=768&cropmo de=none" />
Everything went together well after this. Flushed the brake fluid and drained the diff and transmission fluid. I don't think I've ever seen diff oil as black as the one that came out of this diff, looked like well used engine oil. Anyway, after all the usual swearing when filling up the transmission and diff, I buttoned up things under the car. With the new plugs, leads and spark plugs it fired up much better and when idling there was no discernible movement from the engine - it did rock a little when I bought the car, so I guess I figured out why it did that.
Last job under the car, put some of the good stuff in:
<img width="600&height=800&cropmode=none" src="https://dz64hq.dm2302.livefilestore.com/y3mwZHAmzsHBPn6fqUa27aOSh5PPPyngkdzD0ERdCyGSPZ9kth q_L1iq6-0-56-xfQNYn-OK3__TspFXGsN62Ep76z52wN-MJHKwlcWY01x43Df4gt2cCCMsR65KY2l4oJVjsGWAZ8Gyjh_l9 2khyJ3RvGlS3qZSaOucDODdBNaNfA?width=600&height =800&cropmode=none" />
Yes, I know it's synthetic and I also know it's the "wrong" viscosity. Idemitsu also happened to make the oil that Mazda ran in the 787B...
At this point I was eager to get all of this buttoned up and drive the car. I was also getting tired and cranky, which should've been a hint that I needed to take a break. Well, I didn't and this happened:
<img width="1024&height=768&cropmode=none" src="https://dj64hq.dm2302.livefilestore.com/y3mjL8jS3XKrFFHTFPRrKsD1xUkG2qrsEiIk_cFrTqnhyuGjHJ kWBc_vxd2LTkiGSgE9-e5PjE-RYJbStYrqmhRj4dN050STid5idff4-kGAXf0KmGVg0o6FoFWAx-H3WtkPb5B9ZMvuQKfTiX92-k9MHnB8-Lx6aW8baLGM__Owrg?width=1024&height=768&cr opmode=none" />
I have to put the RX8 on a set of low Race Ramps to get my jack underneath it. Didn't want to start the engine so I hopped in the drivers seat, stuck a foot out the door and gave it a push. Only that in my addled state I spaced and didn't close the door soon enough. Hey, I mean the bike was only parked there for the whole winter.
Even with the damage, I got lucky - if you look closely at the picture you'll notice that both stands had snapped up. Fortunately the bike was leaning against the wall just enough and didn't topple over when I carefully extricated the RX8. Damage to the RX8 is annoying, but should be relatively easy to sort out for a decent bodyshop:
<img width="600&height=800&cropmode=none" src="https://cp64hq.dm2302.livefilestore.com/y3mrM3LFKAfmE0CEzmRfjl2yrnboT2_yMJY4jlrIcwaJxiIYVP 4DGnaowmu7cat6ZHxpwWqrGGtitzPS1fZThxkmGGdImAziQsZd HFsFNmUlcpQiIAkkAWLwzEjekXXmOUNsb4l5zA0DO8-sxa9MmF5sXMD9kbhpzBZmjd4OLFlFOU?width=2448&hei ght=3264&cropmode=none" />
The bike didn't fare too badly either, at least on the side I can see. Didn't have the heart to pull the bike out and check for damage on the other side yet. The main problem is going to be finding a good replacement side panel - not sure if they're even still available from BMW and used ones usually have damaged mounting lugs:
<img width="1024&height=768&cropmode=none" src="https://c564hq.dm2302.livefilestore.com/y3mhzoYS4Kt-GK--ss9t8-zkdtoBU1EwYfyvBYaYlcYQbybyWShqnltFMz8totHA7fbLMEK8 ya0jCYYrpfU8crEWNc8gc4JPYmZVyaS_AppoTjgVwvtAMV5dwj D4oXBTPZ9FhfTxeN5bUyQB2obRRQjalxE1M-IbznBQDASj7s62v8?width=1024&height=768&cro pmode=none" />
So, not taking a break cost me a few hundred bucks . Listen to your body, folks.
Edit: Since I wrote this, I actually took the RX to one of the good local bodyshops. Looks like between the damage on the bike and one the car, I'm looking at well over a grand to fix. Grrrr.
<img width="1024&height=768&cropmode=none" src="https://ej64hq.dm2302.livefilestore.com/y3m6bxhDEsU6JIT4qPU0s2WjzREgQK8Dsd7BqoPWjAkMg2sHkF ZjIUyaR1UlbAPSwMkOJY44S9KLvA89i8h4_J7vk2YJLTfEfd6N-1rHm672s1wSf8HQ48yej55cvE6G1WGjd6pXlQZk72hDdgL2lm-7zUWsXkME-UN21SPOVjA_qw?width=1024&height=768&cropmo de=none" />
Everything went together well after this. Flushed the brake fluid and drained the diff and transmission fluid. I don't think I've ever seen diff oil as black as the one that came out of this diff, looked like well used engine oil. Anyway, after all the usual swearing when filling up the transmission and diff, I buttoned up things under the car. With the new plugs, leads and spark plugs it fired up much better and when idling there was no discernible movement from the engine - it did rock a little when I bought the car, so I guess I figured out why it did that.
Last job under the car, put some of the good stuff in:
<img width="600&height=800&cropmode=none" src="https://dz64hq.dm2302.livefilestore.com/y3mwZHAmzsHBPn6fqUa27aOSh5PPPyngkdzD0ERdCyGSPZ9kth q_L1iq6-0-56-xfQNYn-OK3__TspFXGsN62Ep76z52wN-MJHKwlcWY01x43Df4gt2cCCMsR65KY2l4oJVjsGWAZ8Gyjh_l9 2khyJ3RvGlS3qZSaOucDODdBNaNfA?width=600&height =800&cropmode=none" />
Yes, I know it's synthetic and I also know it's the "wrong" viscosity. Idemitsu also happened to make the oil that Mazda ran in the 787B...
At this point I was eager to get all of this buttoned up and drive the car. I was also getting tired and cranky, which should've been a hint that I needed to take a break. Well, I didn't and this happened:
<img width="1024&height=768&cropmode=none" src="https://dj64hq.dm2302.livefilestore.com/y3mjL8jS3XKrFFHTFPRrKsD1xUkG2qrsEiIk_cFrTqnhyuGjHJ kWBc_vxd2LTkiGSgE9-e5PjE-RYJbStYrqmhRj4dN050STid5idff4-kGAXf0KmGVg0o6FoFWAx-H3WtkPb5B9ZMvuQKfTiX92-k9MHnB8-Lx6aW8baLGM__Owrg?width=1024&height=768&cr opmode=none" />
I have to put the RX8 on a set of low Race Ramps to get my jack underneath it. Didn't want to start the engine so I hopped in the drivers seat, stuck a foot out the door and gave it a push. Only that in my addled state I spaced and didn't close the door soon enough. Hey, I mean the bike was only parked there for the whole winter.
Even with the damage, I got lucky - if you look closely at the picture you'll notice that both stands had snapped up. Fortunately the bike was leaning against the wall just enough and didn't topple over when I carefully extricated the RX8. Damage to the RX8 is annoying, but should be relatively easy to sort out for a decent bodyshop:
<img width="600&height=800&cropmode=none" src="https://cp64hq.dm2302.livefilestore.com/y3mrM3LFKAfmE0CEzmRfjl2yrnboT2_yMJY4jlrIcwaJxiIYVP 4DGnaowmu7cat6ZHxpwWqrGGtitzPS1fZThxkmGGdImAziQsZd HFsFNmUlcpQiIAkkAWLwzEjekXXmOUNsb4l5zA0DO8-sxa9MmF5sXMD9kbhpzBZmjd4OLFlFOU?width=2448&hei ght=3264&cropmode=none" />
The bike didn't fare too badly either, at least on the side I can see. Didn't have the heart to pull the bike out and check for damage on the other side yet. The main problem is going to be finding a good replacement side panel - not sure if they're even still available from BMW and used ones usually have damaged mounting lugs:
<img width="1024&height=768&cropmode=none" src="https://c564hq.dm2302.livefilestore.com/y3mhzoYS4Kt-GK--ss9t8-zkdtoBU1EwYfyvBYaYlcYQbybyWShqnltFMz8totHA7fbLMEK8 ya0jCYYrpfU8crEWNc8gc4JPYmZVyaS_AppoTjgVwvtAMV5dwj D4oXBTPZ9FhfTxeN5bUyQB2obRRQjalxE1M-IbznBQDASj7s62v8?width=1024&height=768&cro pmode=none" />
So, not taking a break cost me a few hundred bucks
. Listen to your body, folks.Edit: Since I wrote this, I actually took the RX to one of the good local bodyshops. Looks like between the damage on the bike and one the car, I'm looking at well over a grand to fix. Grrrr.
Last edited by elford_tim; 04-26-2016 at 11:08 PM.
04-26-2016, 11:10 PM
#7
Registered
Thread Starter
Join Date: Feb 2016
Location: Carson City, NV
Posts: 74
Likes: 0
Received 0 Likes
on
0 Posts
At this point I took it out for a test drive (well, I needed to get cat litter to soak up the remaining oil mess from the oil changes) - it does run much better than before, and the brakes with the new Hawk Street/Race pads are pretty spectacular. I even drove it to work the last two days and it's running really well. However I did notice that it appeared to be losing coolant. That's never a good sign with a rotary...
After parking it this evening I checked underneath for oil leaks and noticed a drip from the front of the car. Didn't smell like oil and looking a bit closer showed it was coolant. It wasn't hot enough to push coolant out of the overflow, but I also noticed the bumper undertray was a little wet.
Well, here's the reason for the coolant loss:
<img width="1024&height=768&cropmode=none" src="https://cz64hq.dm2302.livefilestore.com/y3mvi0V7fCBWN9wuC_5UxqpE2IAPfJGB8YbjbHMpNeS6__xszd lW7REclprlfUorO-c7Bu39x7GhtBIGY9Ixutqn3gSD7P4Jcwgsltx7Yt1hRwSaV31O-IefN9EjdtG1cy2YEWtnlO1K0PtxD2Mhbq9pq_T4A0jCpEYu1Xp aeD6wWw?width=1024&height=768&cropmode=non e" height="768&cropmode=none" />
Yep. Radiator leak. The foam between the radiator and the body is soaking wet, too.
Now the good news is that I do have a Koyo on order with Mazdaspeed, the bad news is that they won't be able to get it to me in time for the first time trials event of the year. Guess I'll have to check with Goodwin tomorrow if they have either a Koyo or a CSF radiator in stock. Heck, at least I found the problem before taking it autocrossing as I had originally planned for Sunday.
04-26-2016, 11:11 PM
#8
Registered
Thread Starter
Join Date: Feb 2016
Location: Carson City, NV
Posts: 74
Likes: 0
Received 0 Likes
on
0 Posts
Kudos and many thanks to Goodwin Racing, they did have the Koyo 37mm in stock and managed to get it to me just in time for this weekend's wrenching session. I'm aware of people complaining about fitment issues with both the Mishimoto and the Koyo (the original Mishimoto seems to have been extremely bad). However at this point in time I don't have much of a choice  unless I want to risk using another OEM radiator.
unless I want to risk using another OEM radiator.
04-26-2016, 11:12 PM
#9
Registered
Thread Starter
Join Date: Feb 2016
Location: Carson City, NV
Posts: 74
Likes: 0
Received 0 Likes
on
0 Posts
So instead of working on the car most of the day yesterday, I had to clean up the mess I had made ("slight" accidents during the oil changes) and decided to temporarily wire up the LED strip lights I installed a few weeks ago. Blimey, my garage is actually properly illuminated and I can even work in there at night without extra lights. It's almost like I can see what I'm doing now...
I did spend sometime unearthing the radiator. It's rather well buried in the nose of the car, so it does take some unearthing.
Almost there, there is more digging to be done to get at the thermostat that I'll be changing at the same time:
<img width="1024&height=768&cropmode=none" src="https://sqw77a.dm2302.livefilestore.com/y3mnYwqOlkTEd1jP6b2u9Dyr5ZyvoGKkZnWc5-rHke75RmY0FkW_8q4VatQNS46cXC8hac1-4REjYSBOVsxGWGZKePnTP3jD2pPFQUa24uNrGO2S3KVuuEzBnN ZtYyHuvruSdsscnS9yqwMhD15wFiuB_025aB_wTdbtNIglGqmK 6c?width=1024&height=768&cropmode=none" height="768&cropmode=none" />
Look, we can almost see the radiator:
<img width="1024&height=768&cropmode=none" src="https://svw77a.dm2302.livefilestore.com/y3mGBNQfOQK1XLVHFjeZtxi6YS-Y0oc2WY5AEmnDQUkzoZ54d40UbGBhAKPAJCtPg_pkdVH9Mpchf xL8SSpSB3Ivb1BwqlxyPUIe4EKqqp-4yo0Jz1DW-MUr_0xhJxi-mss9DXcQW5Qbu9RprmqnOKdneOSg-CINHzKak-p9k7Klnc?width=1024&height=768&cropmode=no ne" height="768&cropmode=none" />
And we have found the culprit for the leak:
<img width="1024&height=768&cropmode=none" src="https://sfw77a.dm2302.livefilestore.com/y3miZ0d1x2K1PcDJ2BG6sg-u0ICjJRtNXkg0yuV0dEUEvdIpDnBPqT2PbjPL6gNcu9Ffdw7U5 WTIiRfiFjl4SZXoRddlHSKwUtDRLRJgxAI43HXnkh9lNoAZUCz Ylyh01Ke9uB6vhTPJDpllSl2ET-LAba4c1GGtr3v-gBQA0L14xY?width=1024&height=768&cropmode= none" height="768&cropmode=none" />
That's the hole for the connector for the overflow tank - seems to be a fairly common issue on these. I can't tell if that's the original glue (the connector that goes in the hole is metal) or if it's been "repaired" before. Either way, that radiator is scrap as is...
Plan for today is to dig out the thermostat which will require further dismantling and then attempt to replace the radiator. I'll probably have to improvise some of the foam that goes in between the top of the radiator and its mount. I might have to consult Home Depot Racing supplies for that.
04-26-2016, 11:12 PM
#10
Registered
Thread Starter
Join Date: Feb 2016
Location: Carson City, NV
Posts: 74
Likes: 0
Received 0 Likes
on
0 Posts
Well, the thermostat is in. What a f*ing palaver. No photos, but a couple of tips - according to the wisdom of the Internetz, there's a 50% chance you might need to loosen the exhaust air injection pipe to get enough wiggle room to turn the thermostat top cover to get it out. Do yourself a favour, don't take the chance and loosen it anyway as that makes the job much quicker. I found out the hard way...
The radiator is also in, which is another massive juggling act because you have to carefully insert the radiator with the fans mounted on its back between a crossmember and the a/c condenser. Try to get the car as high up as possible, this looks like a reasonably easy job on a lift and it's a demi-nightmare if the car is on jack stands with barely enough room to wiggle the thing in. I also made the mistake of not transferring the two top rubber mounts for the radiator before inserting the radiator (they brace the radiator against the top front mounting brackets) and now found out that once the Koyo is in, there is not enough space to put the top nuts on, so right now they serve as locating pins. Let's hope I didn't make another nightmare for myself with that, I don't really feel up to taking the radiator out again...
Other than that, the Koyo radiator is nice, shiny and a perfect fit. I still need to get some foam around the radiator before I can put the air guide back on, but it's beginning to look like I have a fighting chance to have a working car for the event on April 23rd.
Well, with one if - I had to cut off the original radiator hoses and the silicone replacements I bought had an incorrect hose for the top connector. I contacted the merchant but if I can't get a replacement in time I'm screwed...
Last edited by elford_tim; 04-27-2016 at 09:43 AM.
04-26-2016, 11:13 PM
#11
Registered
Thread Starter
Join Date: Feb 2016
Location: Carson City, NV
Posts: 74
Likes: 0
Received 0 Likes
on
0 Posts
Hopefully a set of Racing Beat silicone hoses overnighted in from SoCal at $humongous will help me put it together this weekend. The coilovers got delayed, they're supposedly leaving Ohlins today so they're not going to make it in time. Guess I have to figure out if I want to take it on the track on well used stock suspension or try to get the MR2 into usable shape.
04-26-2016, 11:14 PM
#12
Registered
Thread Starter
Join Date: Feb 2016
Location: Carson City, NV
Posts: 74
Likes: 0
Received 0 Likes
on
0 Posts
<Igor voice>
It liveth, mathter.
</Igor voice>
No pictures yet, haven't had time to sort through them but it's now back and running again with the new radiator and new radiator hoses. As usual the silicone hoses were a bit of a pain to install but the old "a couple of drops of dishwashing liquid" trick helped a lot.
I also ended up replacing most of the foam around the radiator. The window a/c weatherstripping from Home Depot is a pretty good alternative and should hopefully last longer than the OEM stuff. I have to go back and get more though as I didn't buy enough of the larger square section one and the thinner one is too small to fit between the undertray and the bottom of the radiator. I'll probably also upgrade to an aluminum undertray instead of the floppy plastic one as the plastic one has a bit of a reputation for altering its shape while driving.
Oh, and I also fitted a <a href="http://www.sylfex.com/products/AuxMod/">Sylfex AuxMod</a> to the radio so I can hook up my phone instead of having to carry a stack of CDs. Boy is taking that radio out fun. Also found that someone had been in there before and one of the side mounting bolts is missing. That'll explain the squeaking from the centre console then.
04-26-2016, 11:15 PM
#13
Registered
Thread Starter
Join Date: Feb 2016
Location: Carson City, NV
Posts: 74
Likes: 0
Received 0 Likes
on
0 Posts
Tires sorted, got a fresh set of Hankook R-S3s on it now in 245/40/18. It was either those or the Rival Ss, but those are 50 bucks more a corner...
To make life interesting, the weather forecast currently calls for snow over the Sierra Passes on Friday afternoon, just as I'm making my way over to Thunderhill. Yikes.
To make life interesting, the weather forecast currently calls for snow over the Sierra Passes on Friday afternoon, just as I'm making my way over to Thunderhill. Yikes.
04-26-2016, 11:15 PM
#14
Registered
Thread Starter
Join Date: Feb 2016
Location: Carson City, NV
Posts: 74
Likes: 0
Received 0 Likes
on
0 Posts
Some heavy boxes arrived today:
<img width="1024&height=768&cropmode=none" src="https://spw77a.dm2302.livefilestore.com/y3mwPWtjdMx1AQu40HhAmkYsTgGfu8bzLSL1o82PifPf2WETWV jhAwhV9iEw00UQN77PrS7-4zulh0GoUq_L2NvNkhay_xajEJXgz8Kb_lurYw0zBenSBQ4XO1 tDpoWGnPH7T9ySi3LLJasxN-mnL-YTuTxYWBCSSubdLvt5owLSoM?width=1024&height=768 &cropmode=none" />
No, I'm not daft enough to try and work through the night to put them on the car. I finally got a quote for getting the door fixed and that's enough of a reminder to not go a-wrenching when tired.
The trip to Thunderhill is going to get interesting, by now the weather forecast is calling for 3-5" of snow up at Lake Tahoe, more at higher elevations. So I can't even take the RX8 to work, got to leave it at home, come back and then take about a 2h detour to Thunderhill to avoid the higher passes.
04-26-2016, 11:17 PM
#15
Registered
Thread Starter
Join Date: Feb 2016
Location: Carson City, NV
Posts: 74
Likes: 0
Received 0 Likes
on
0 Posts
Well, I'm back from Thunderhill, unfortunately early but with the car still in one piece.
Overall it's good news but it looks like on the way down, the car decided to slice its water pump and alternator belt in half. I only noticed that about halfway through the day and then decided I'd rather not risk blowing up the engine if the belt breaks completely so I went home after the first time trials session.
The good news is that even without the suspension or any of my other typical mods (race seat etc), I managed to get very close to last year's best lap (1:39-something) by running a 1:40-something. Hey, I never said I was fast or competitive, I do this for fun...
Amusingly enough I though that the tires were rubbing for the first two sessions until I realised I forgot to turn off the stability control and it was kicking in in the hairpins.
Not bad for a car though in desperate need of a good alignment and on worn, leaky stock suspension.
I have to figure out what caused the damage to the belt - it might have just been old age but I'm not taking any chances.
04-26-2016, 11:19 PM
#16
Registered
Thread Starter
Join Date: Feb 2016
Location: Carson City, NV
Posts: 74
Likes: 0
Received 0 Likes
on
0 Posts
This brings us to today - it's sitting outside waiting for the new belts before I drive it again.
There's still more work to do anyway, the coilovers have to go on and I have to fit some additional temperature and pressure gauges. I'll do that over the next 4-6 weeks before the next event.
There's still more work to do anyway, the coilovers have to go on and I have to fit some additional temperature and pressure gauges. I'll do that over the next 4-6 weeks before the next event.
 05-02-2016, 10:27 PM
#18
Registered
Thread Starter
Join Date: Feb 2016
Location: Carson City, NV
Posts: 74
Likes: 0
Received 0 Likes
on
0 Posts
Still no idea what caused the damage to the belt, although I suspect I didn't quite tighten it enough and both belts were rather worse for wear. New belts on, no funny noises, so I dropped it off at one of the better local bodyshops to get the damaged door fixed. Should get it back Friday hopefully, with a bigger than expected bill. Ah well, still not too bad...
Also still waiting on the official results :/, unfortunately the clock is ticking on me having to submit results to Mazda Motorsports..
And here we have the culprit:
<img width="1024" height="768" src="https://rqw77a.dm2302.livefilestore.com/y3mwUxCFjREEcV770guptrMvzih72tpIKLO7q7ftj2chM7Iahp 9M6huXshe94vrnRO4EAAiddgNTt1WaApG72jg2Ejp-pqV9bgXQZJG6oux3TbpeXASE_rzUJsfMb09lO2DYrMeAnB-Upt9s2rq6LEGpQSIJW513F1etxUCG4rPn5M?width=1024& ;height=768&cropmode=none" />
Slightly narrower than it should be:
<img width="600" height="800" src="https://rvw77a.dm2302.livefilestore.com/y3m7Uy8aePSVlmvgjIFXK9sz0FY2U4dyesMBPZBaZ4bQdWVIFX ZIkxV6gsRO2TQHfrAx6HTqsWhszUkP96vQOrZI_sBx02vB3V5h v8Mn80QTRveCg2wNdZlX3VUb33NsIKdC0icJXb6-NBo9IMPBPN12dclJijyPo6JjiUXHMnRIeY?width=600&h eight=800&cropmode=none" />
And amazingly enough there were a few remains of the original belt to be found in other places in the engine bay:
<img width="600" height="800" src="https://rpw77a.dm2302.livefilestore.com/y3mCzM7N_zSyXZrVSA8FZ6MQVH5xAcg-PhqIH1VHrrndCE53bQp1_fMSnmc1JT4sImEmLuPDce6bIhUu1r kgqY36sve41Uw3h1Cg7CDd2YrcuRxlBNJEQHvvLxB8DsUlp6qI wVKZ_Ncp0Gzc_XXdwBiS2McbISkbW2P1otT0TIOTUE?width=6 00&height=800&cropmode=none" />
While I had it in the garage I replaced a fair number of broken clips on the fender liners. Looks much better now that the fender liner is in the place it's supposed to be.
 05-03-2016, 10:46 AM
#20
Registered
Thread Starter
Join Date: Feb 2016
Location: Carson City, NV
Posts: 74
Likes: 0
Received 0 Likes
on
0 Posts
Thanks for the kind words!
Next competitive event with my local SCCA region isn't until late June IIRC, but I'm hoping that I can get a day at another track in just for fun, something like Sonoma. I do need more seat time in the car and I'm still trying to track down the various "used car" problems like worn components so another day at the track would help me dial things in a bit better.
Next competitive event with my local SCCA region isn't until late June IIRC, but I'm hoping that I can get a day at another track in just for fun, something like Sonoma. I do need more seat time in the car and I'm still trying to track down the various "used car" problems like worn components so another day at the track would help me dial things in a bit better.
05-21-2016, 10:41 AM
#21
Registered
Thread Starter
Join Date: Feb 2016
Location: Carson City, NV
Posts: 74
Likes: 0
Received 0 Likes
on
0 Posts
Result were published a week or so ago. Looks like all the fast people showed up after I had to leave, I went down from a provisional 8th place to 15th overall out of 20. Still first in my class (CT-C).
On the more exciting news front, finally had the �hlins coilovers installed by a local performance shop as I simply couldn't find the time to do it myself. Plus the car had to go there for an alignment and corner weights anyway.
So far I'm pretty impressed, but I've only driven it for approximately 30 miles. Seems that the comments about the ride quality improving despite the higher spring rates were spot on. Now I just have to find a track event so I can test it properly before the next competitive event.
06-12-2016, 08:17 PM
#22
Registered
Thread Starter
Join Date: Feb 2016
Location: Carson City, NV
Posts: 74
Likes: 0
Received 0 Likes
on
0 Posts
Drove it yesterday and noticed that the passenger side window wouldn't budge. Like, at all. As I have a track day with some instruction booked at Laguna Seca on Tuesday I pretty much had to look into *right now*. First checked the switched, of course they checked out. Wiggling the switch on the passenger side produced lightly audible clicks but otherwise, nada.
So off comes the door card and the motor. Motor works fine with no load, so it's time to look at the regulator. At this point I look up and notice that there's a storm coming, the RX8 is parked outside and I don't really have the space to pull it inside to continue wrenching. So I better get this done before the storm arrives, and that's my excuse for the lack of pictures, too.
Looking at the regulator - a rather Heath Robinsion- ish device - I notice that it seems to be a little out of alignment - on side seems to be sitting deeper in the plastic door shield/mounting surface than the other. So I looked a bit closer with my fingers and the whole ******* thing disappears into the depths of the door, immediately followed by the door glass. Wonderful.
So off comes the plastic, I pull out the glass and try to pick up all the pieces of the regulator. That's roughly the same time I read the dire warnings in the shop manual to ensure that the cables never ever come off the drum. Yeah right, that's because it's a PITA to reassemble - I had to ask my wife to give me a hand and it still took us about 30 minutes to piece the darn thing back together.
I made sure that the plastic regulator housing is now clipped into its mount correctly, quickly bolt the motor back on before it changes its mind, then put bolt the regulator to the same piece of plastic card and yay!, working window regulator. Oh, and it's also starting to drizzle...
After greasing the window rubbers with a little silicon grease, the door glass goes in without a hitch, door card back on and ...
... still working. Phew. To celebrate I put some grease on the window rubbers on the drivers side, which also improves matters a little. I guess that counts as track prep.

 08-25-2016, 09:57 AM
#25
Registered
Thread Starter
Join Date: Feb 2016
Location: Carson City, NV
Posts: 74
Likes: 0
Received 0 Likes
on
0 Posts
Not much to report, mainly because there hasn't been much building going on. I'll try to post a couple of updates in the next few weeks - basically I've been to Laguna Seca twice since, had another Club Trials event with my local SCCA region that may or may not have resulted in a new club lap record for my class (still waiting for official confirmation) and washed it a couple of times  .
.
It's developed an annoying front brake judder that I need to fix, but I have another event on Saturday so I'll somehow have to ignore that for a few more weeks. One of the front rotors has about three times the allowable runout, plus the front brakes are dragging, so I'll have to try and rebuild the calipers and at least replace one rotor, if not both.
That said, I've been collecting some parts to improve matters, like this nice and shiny piece:

.It's developed an annoying front brake judder that I need to fix, but I have another event on Saturday so I'll somehow have to ignore that for a few more weeks. One of the front rotors has about three times the allowable runout, plus the front brakes are dragging, so I'll have to try and rebuild the calipers and at least replace one rotor, if not both.
That said, I've been collecting some parts to improve matters, like this nice and shiny piece: