Arca's Time Attack Build Thread (13b-REW Swap)

 01-08-2014, 11:15 AM
#76

Have you considered MIR fire suits? Fia compliant, cheap and can be tailor made.
I'm about to have one tailored for a ridiculously low price thanks to a partnership with a series i race with
I'm about to have one tailored for a ridiculously low price thanks to a partnership with a series i race with
 01-08-2014, 11:43 AM
#77

I already bought this one for 300 bucks though. If you wanted to get one of these new it would be like $1600 easy. The one I got belonged to the extra man on the pit crew so it had almost no wear at all.
01-08-2014, 11:47 AM
#78
2pcs suits aren't accepted here for obvious reasons.
MIR also has a car line, fia compliant of course.
I paid what you paid for your 2pcs suit for a custom tailored, new one. I feel lucky for once lol.
MIR also has a car line, fia compliant of course.
I paid what you paid for your 2pcs suit for a custom tailored, new one. I feel lucky for once lol.


 01-10-2014, 11:07 AM
#83
Well then we were doomed a long time ago because all you have to do is drive 3 hours north for that crap. Arizona actually has 2 ski resorts lol. Snow when you want it, beautiful weather when you don't, separated by just a short drive!
01-26-2014, 05:27 PM
#84
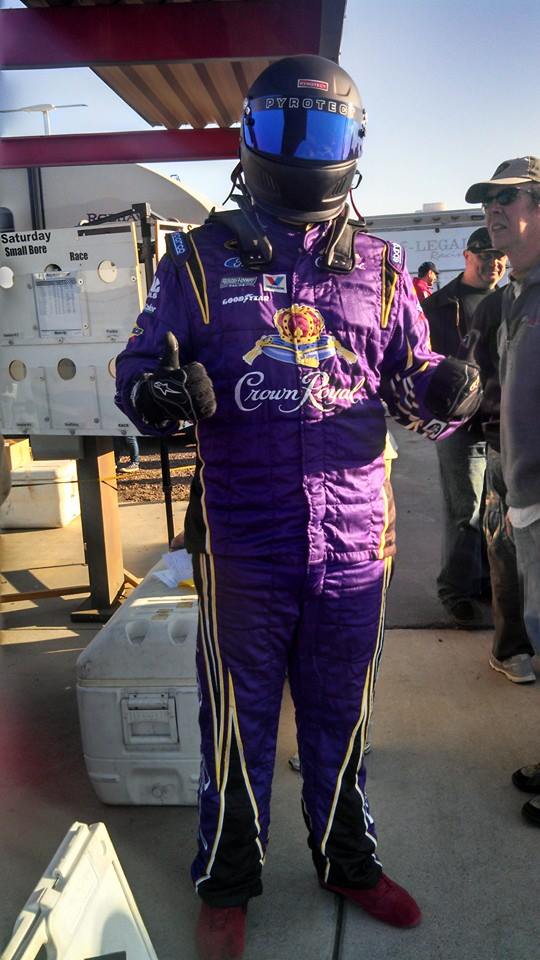
So I did the event at WHP East Track and Team Beer:30 (my dad and I) were the only ones in TT-E. Got a leg up on the other guys I guess. Also for time attack... I got second place. I my front tires corded during the first hot lap and my time was 2 seconds slower than what I was running all day. 1:07 vs. 1:09. Also no video, didn't get the memory card in time. Totally forgot about that.
The suit was a huge hit... was definitely hilarious walking around the pits. I constantly got compliments about how awesome it was, got asked to take pictures with various people and spectators, and also was asked a handful of times how I got sponsored by Crown Royal hahaha.
Good times.
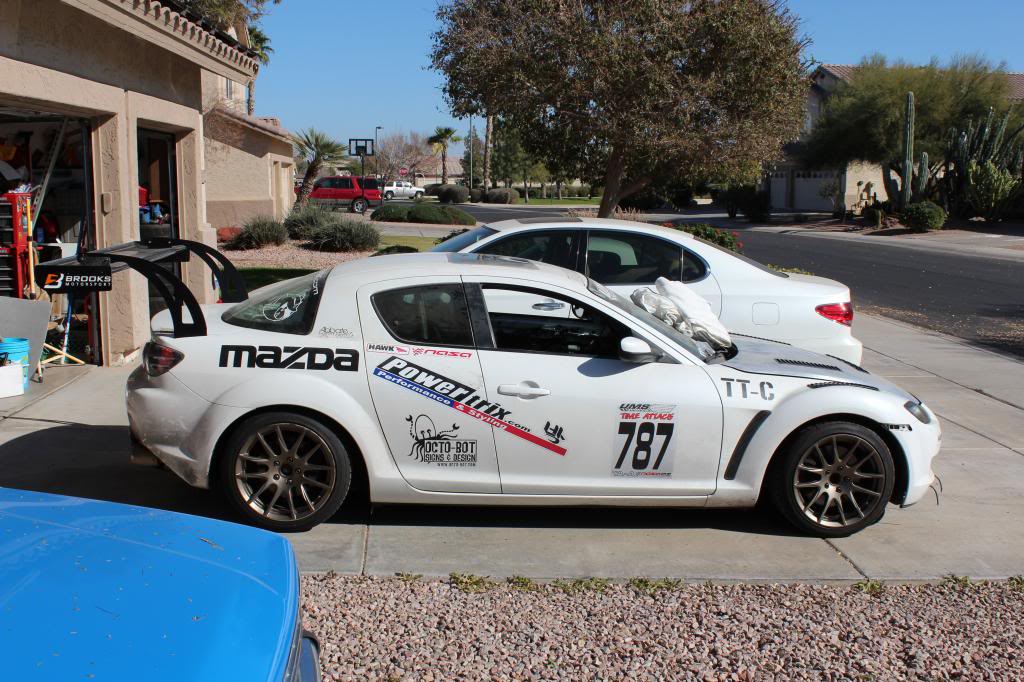
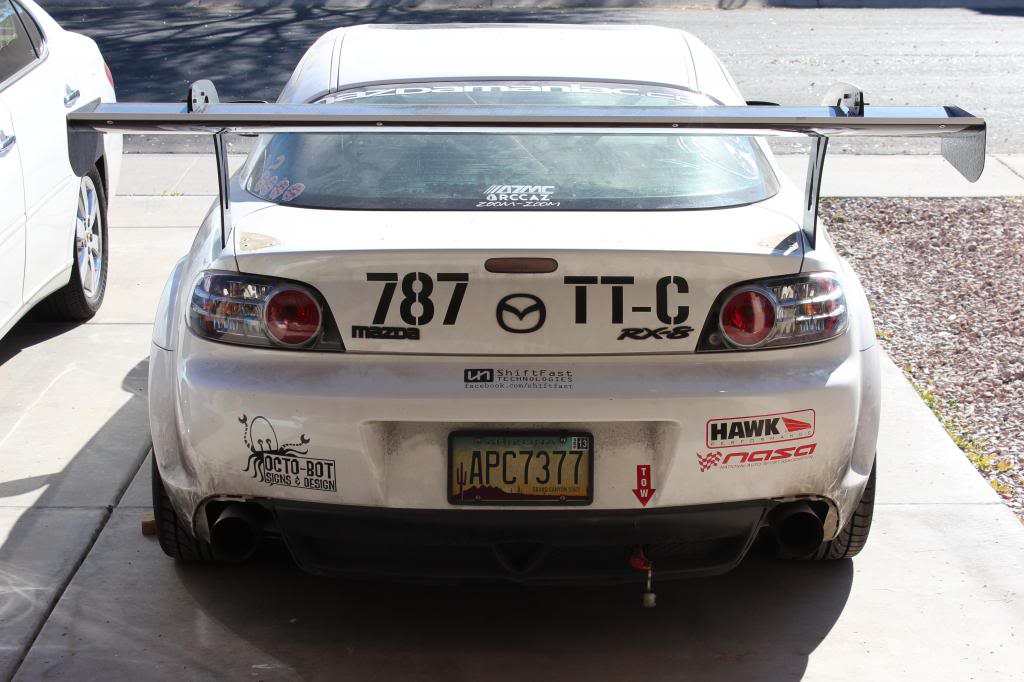
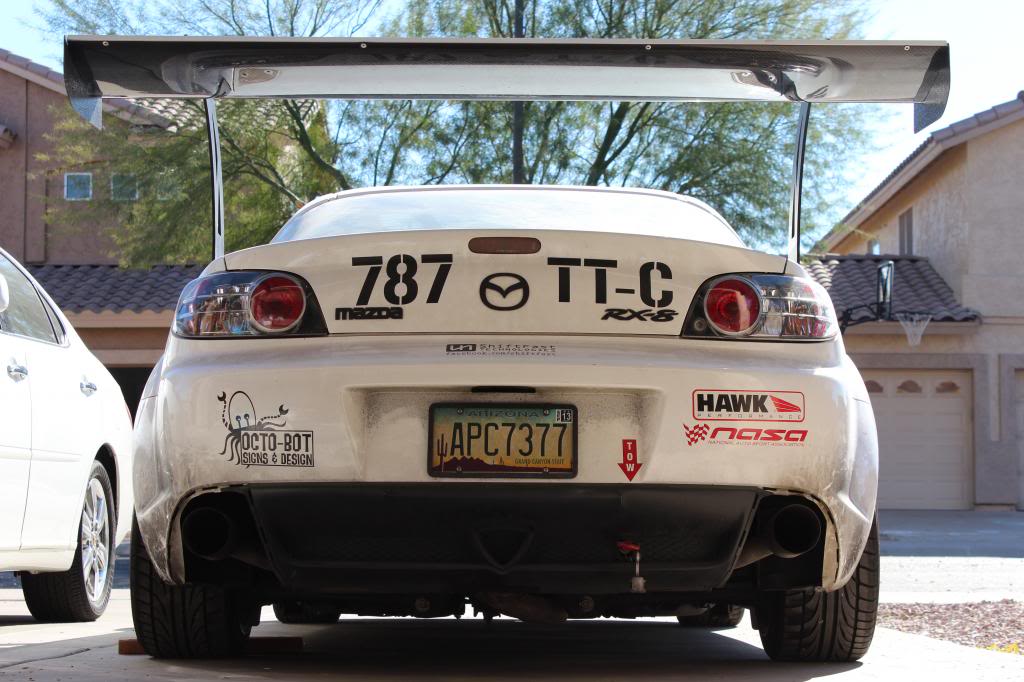
Took a couple nicer photos (non-cellphone lol) of the car rolled out in the driveway. The hood and bumper aren't secured they're just sitting there, and the splitter is not on. Also those are 17x9+38 wheels but I bought them with 235mm tires stretched onto them so they look dumb until I can get some 275/40R17 tires for street duty on there. Also the fender vents are just sitting on the fenders I haven't cut or attached them yet. Just wanted to see how they looked.

The suit was a huge hit... was definitely hilarious walking around the pits. I constantly got compliments about how awesome it was, got asked to take pictures with various people and spectators, and also was asked a handful of times how I got sponsored by Crown Royal hahaha.
Good times.
Took a couple nicer photos (non-cellphone lol) of the car rolled out in the driveway. The hood and bumper aren't secured they're just sitting there, and the splitter is not on. Also those are 17x9+38 wheels but I bought them with 235mm tires stretched onto them so they look dumb until I can get some 275/40R17 tires for street duty on there. Also the fender vents are just sitting on the fenders I haven't cut or attached them yet. Just wanted to see how they looked.
Last edited by Arca_ex; 01-26-2014 at 05:35 PM.
01-26-2014, 06:00 PM
#85
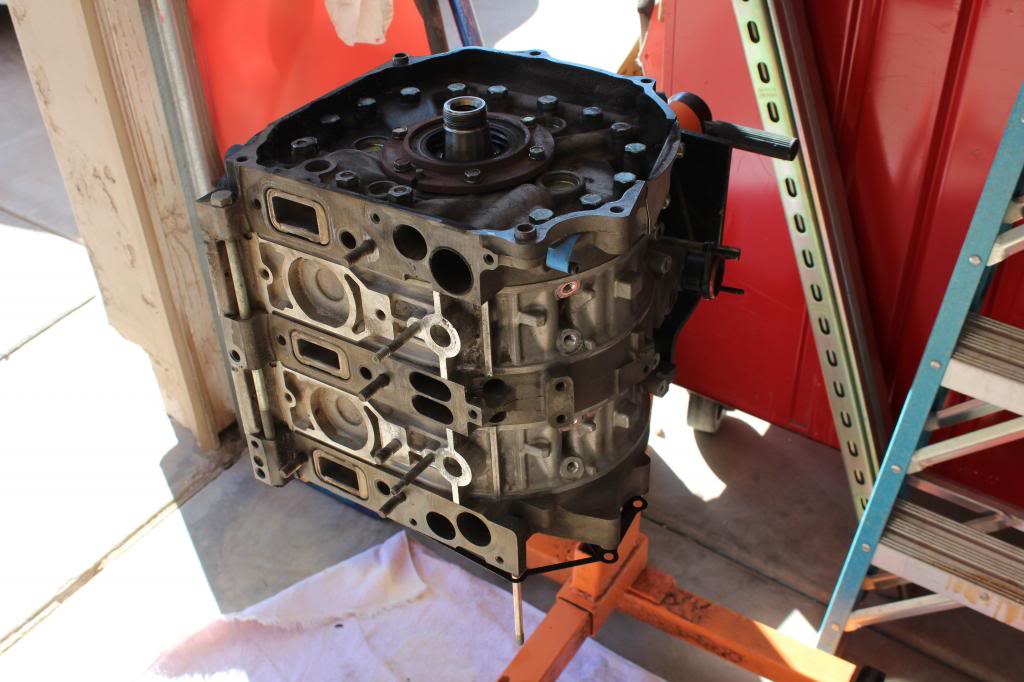
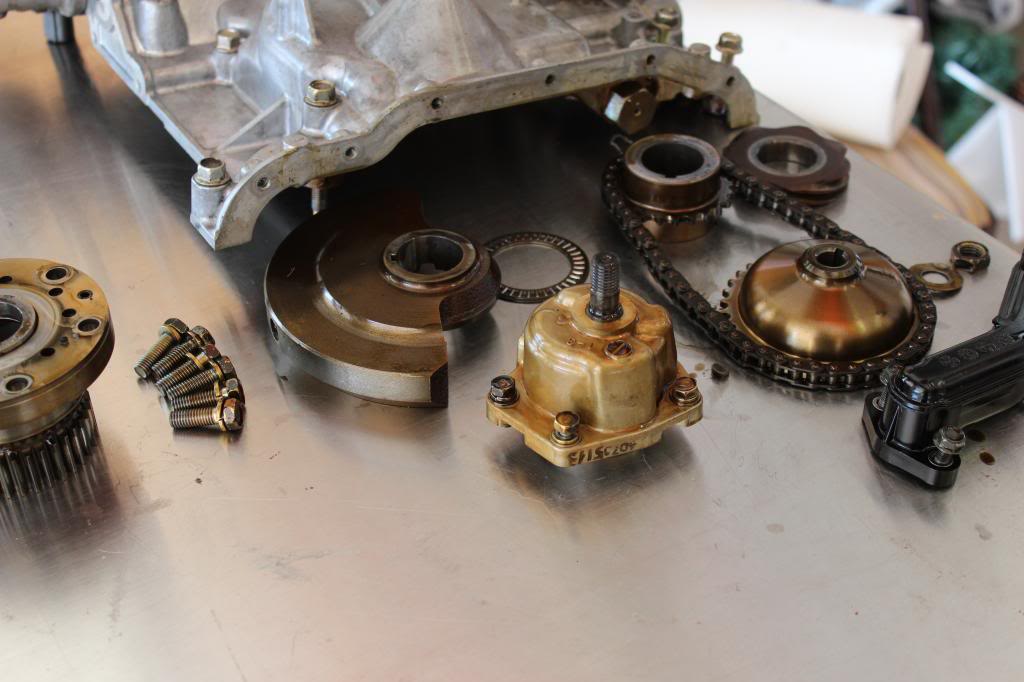
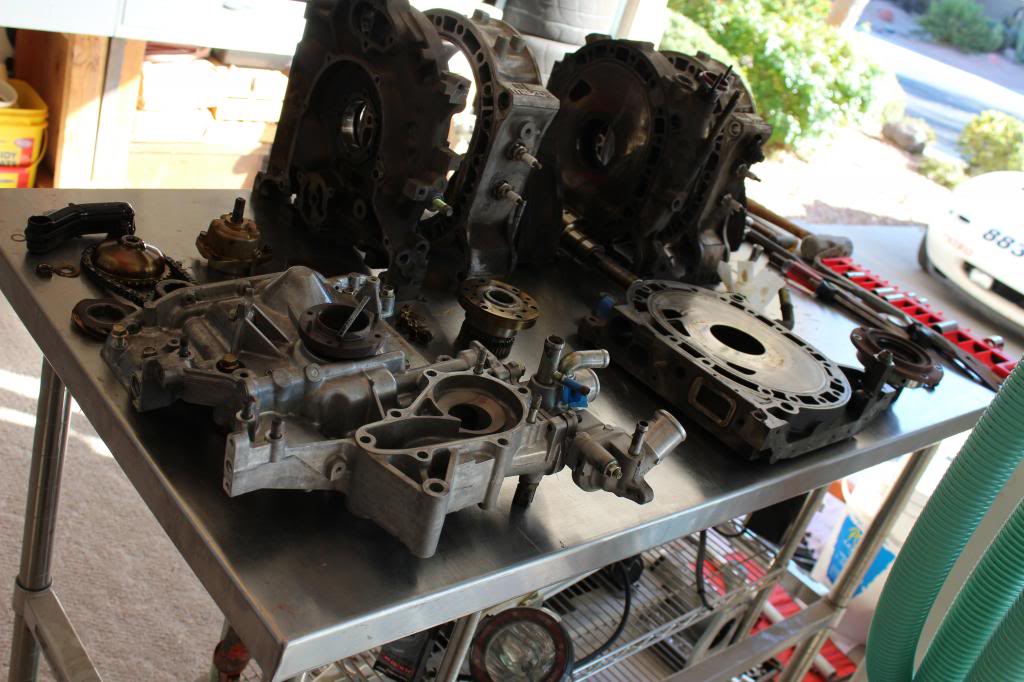
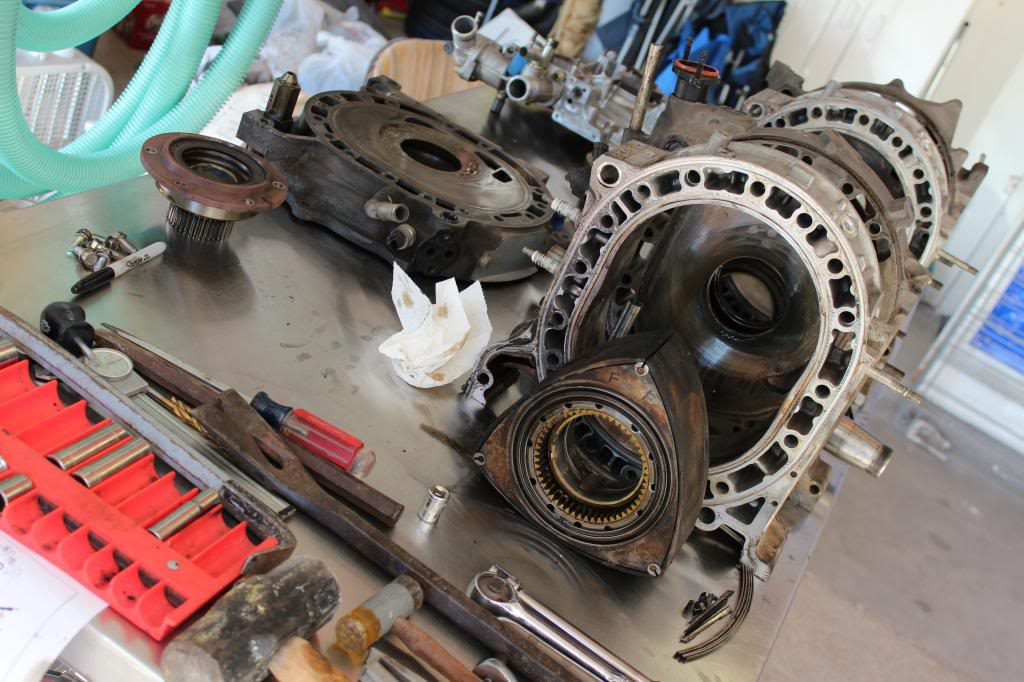
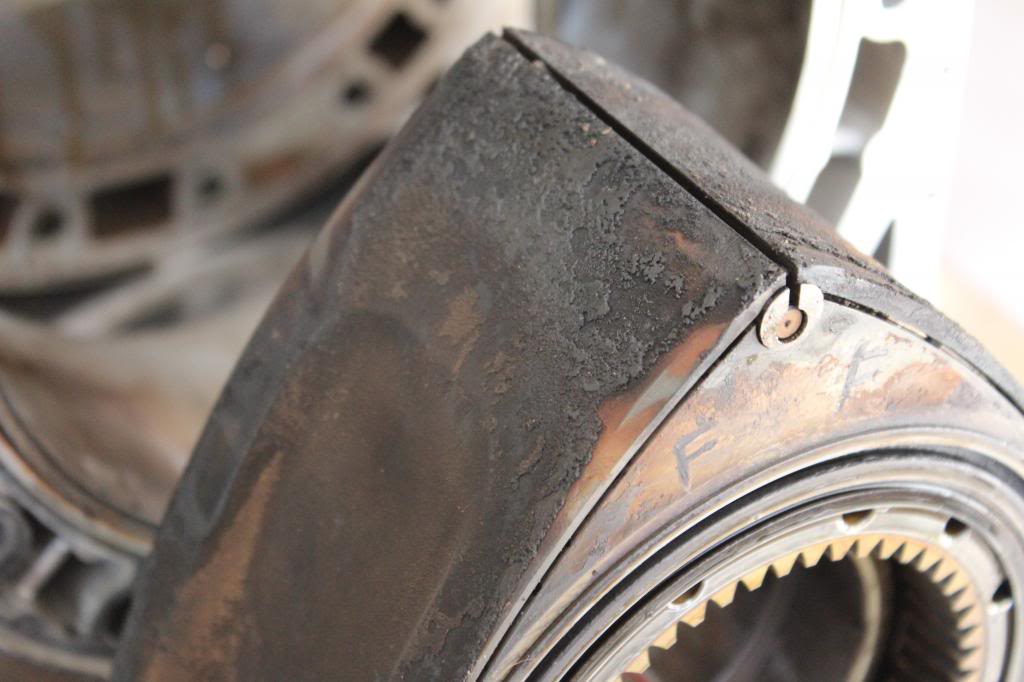
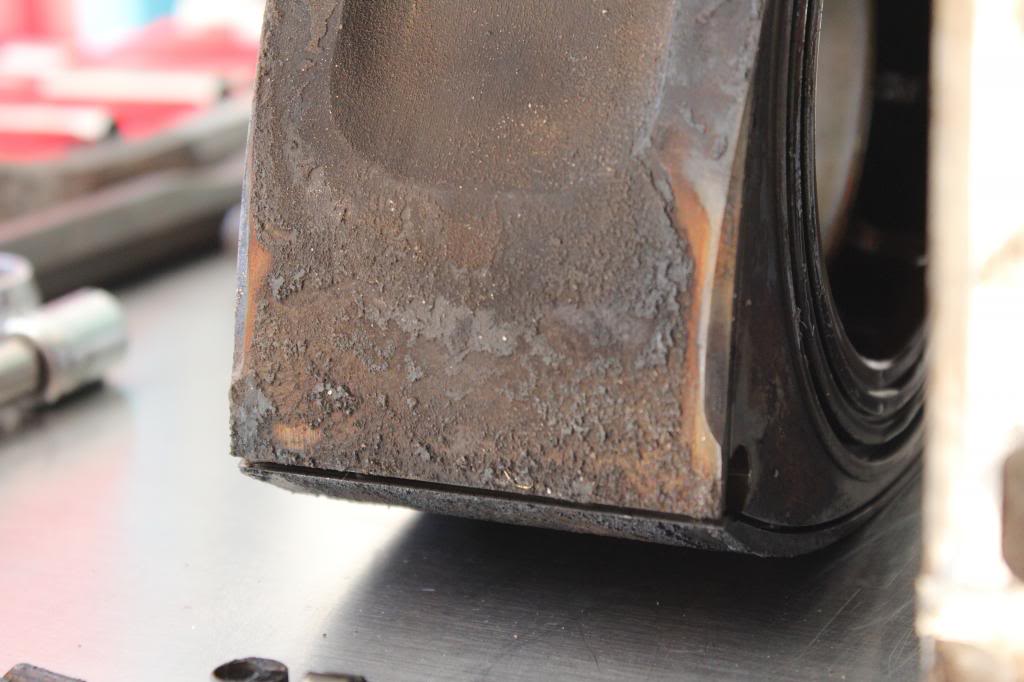
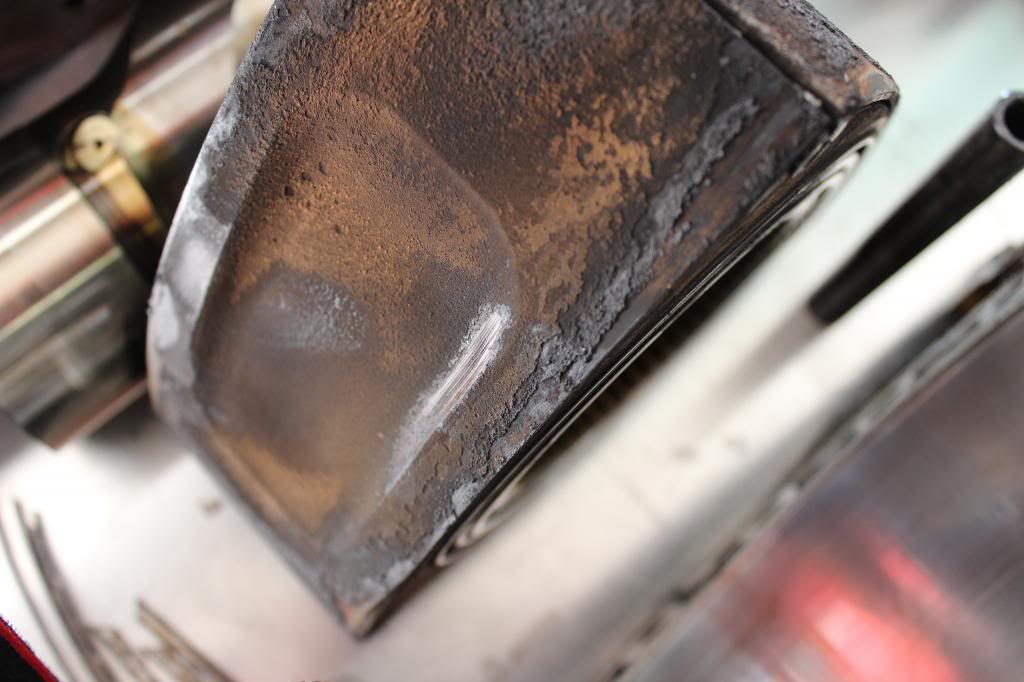
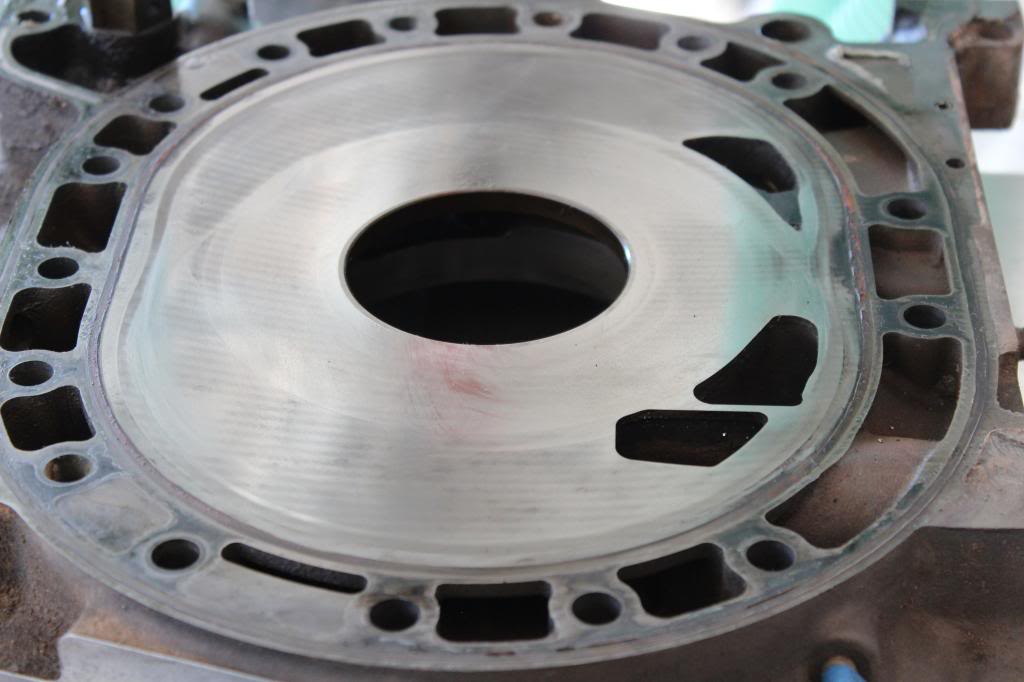
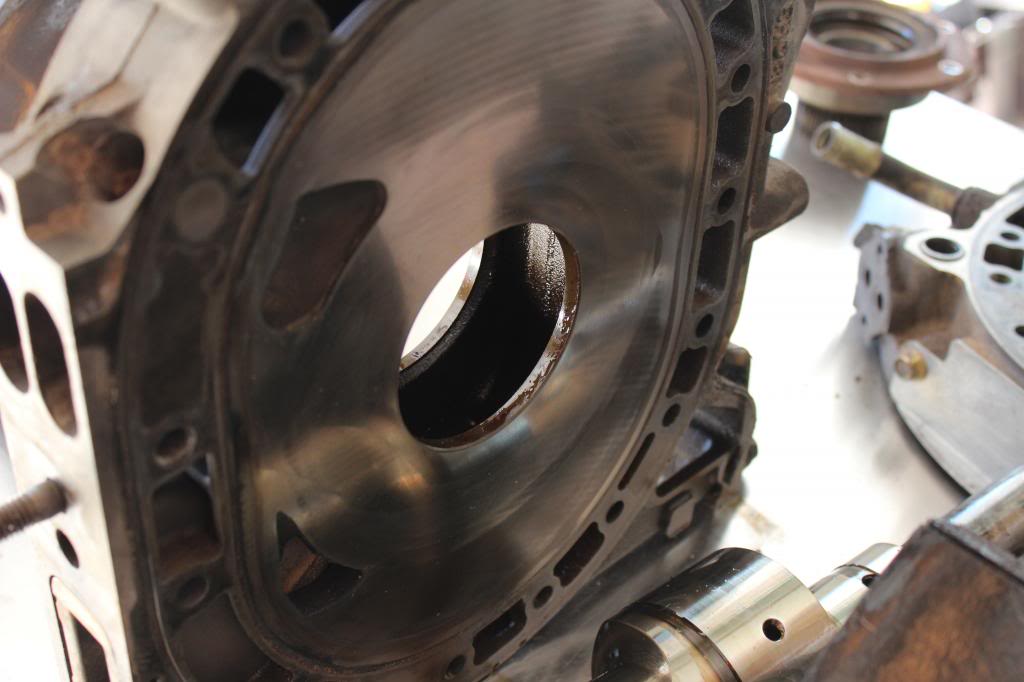
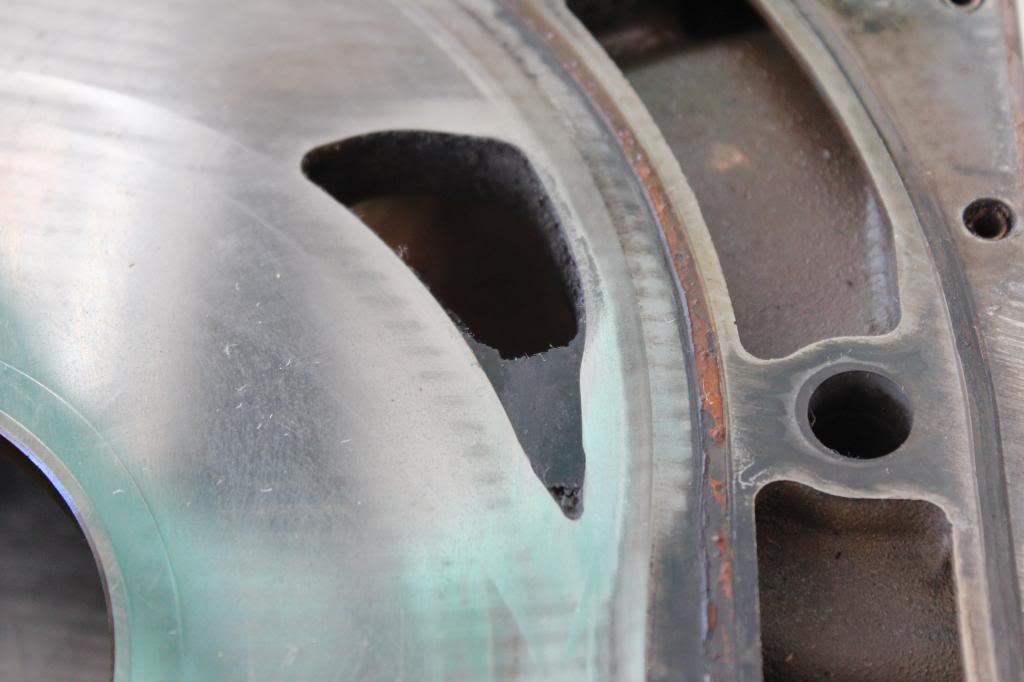
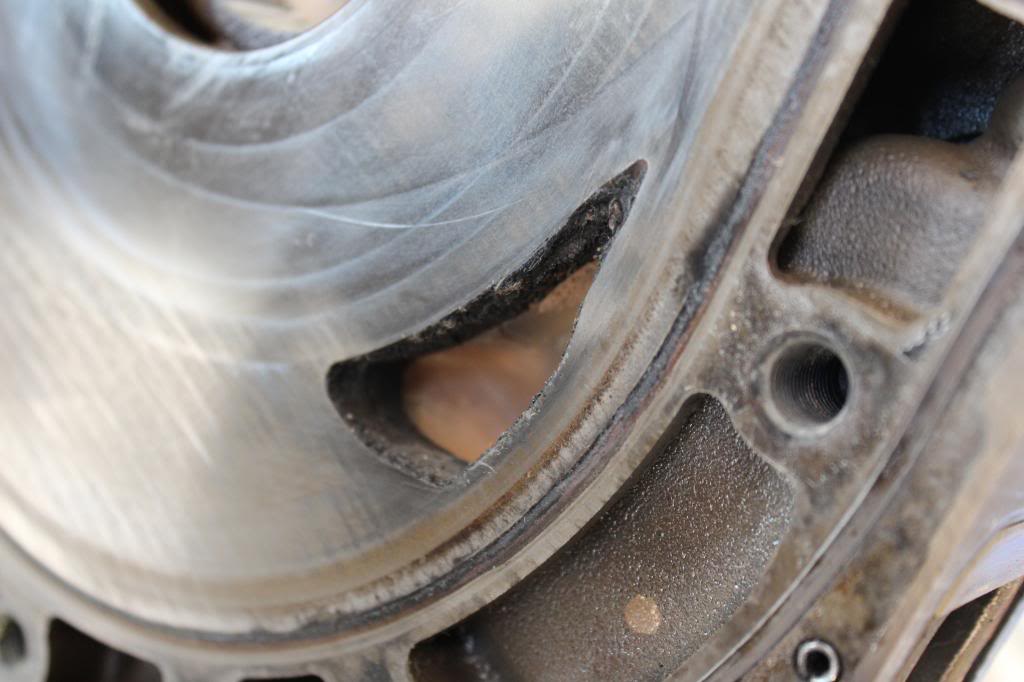
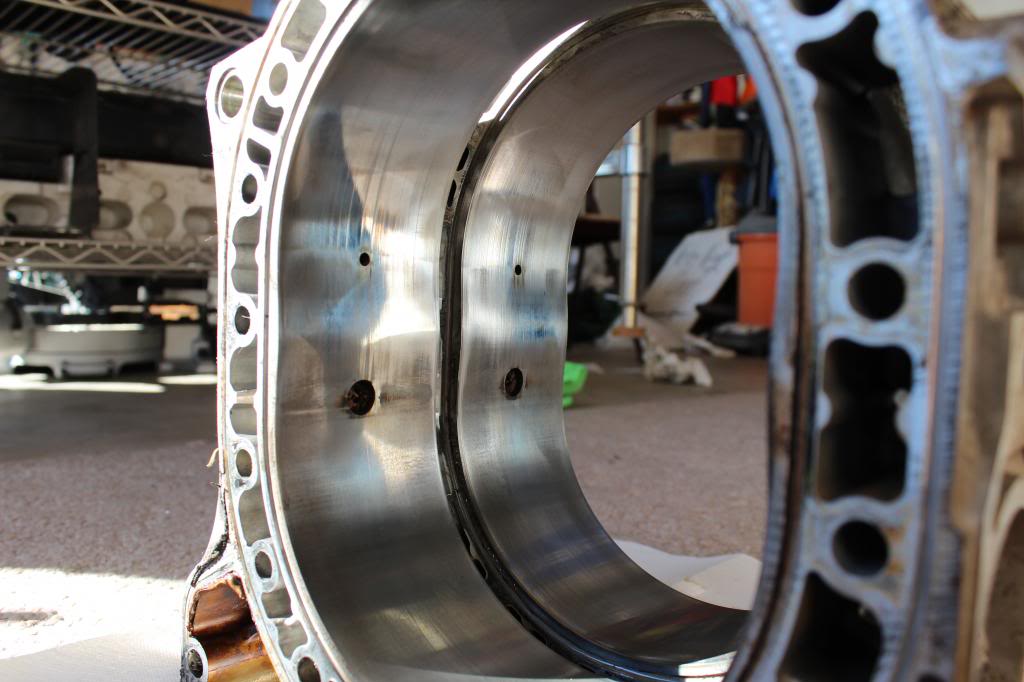
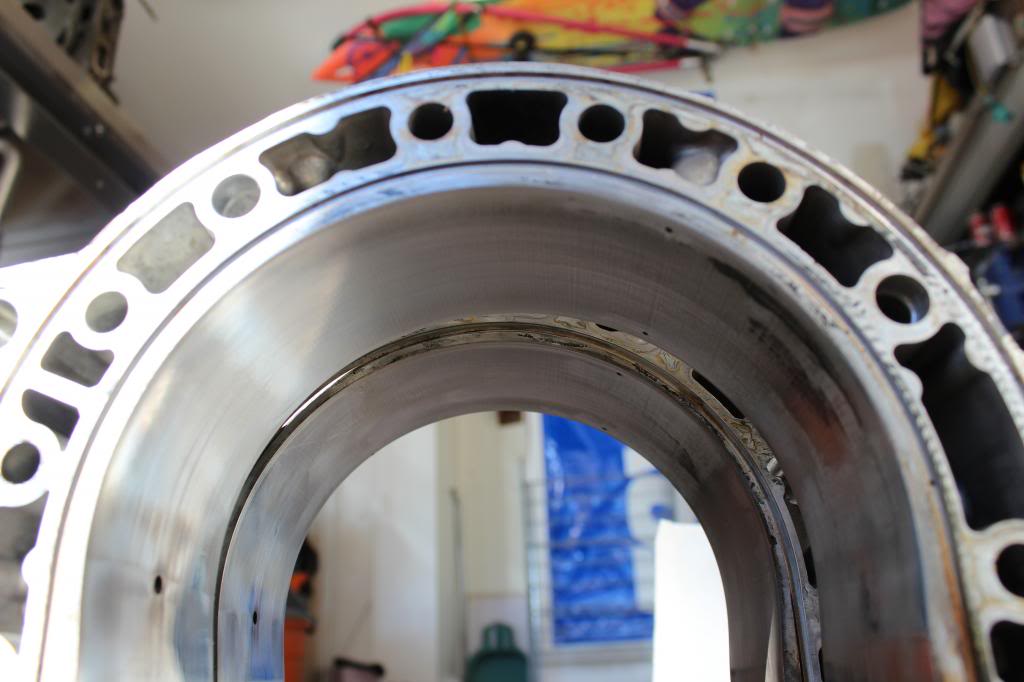
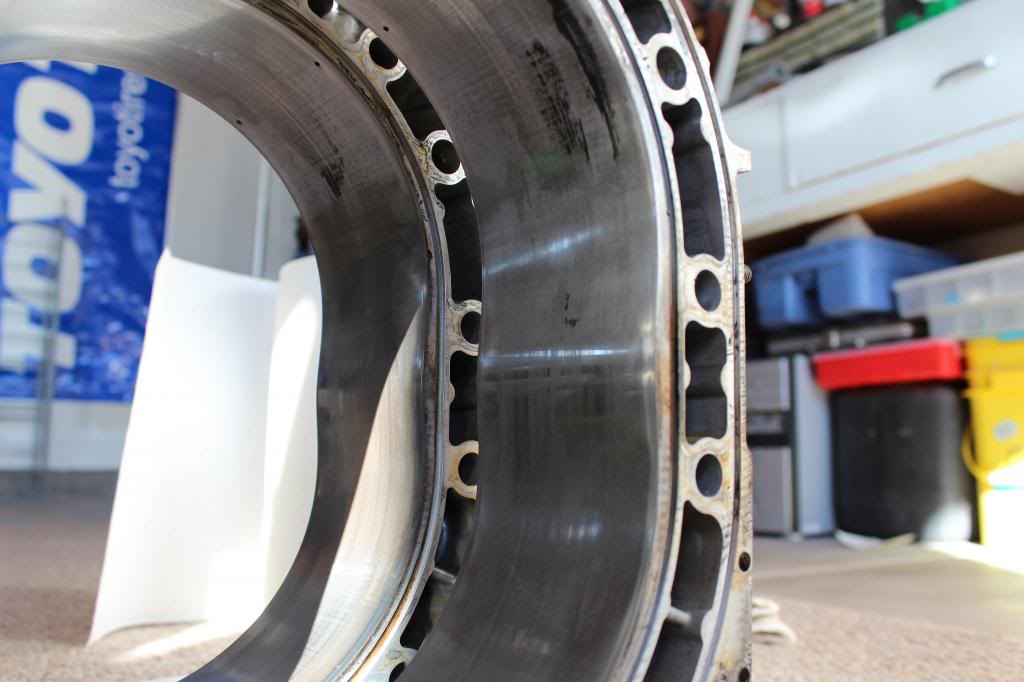
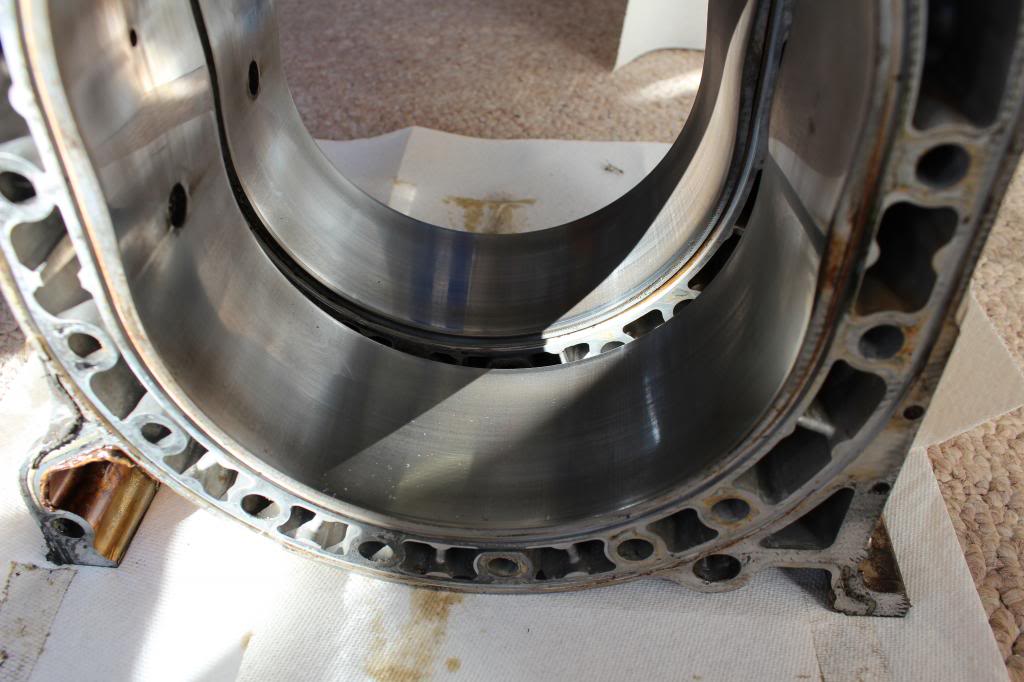
And now motor tear down time. Looks pretty decent to me, but I have extremely limited experience and would appreciate input. This is my first time tearing apart a motor, so be nice I'm just a kid hahaha. 104k miles on the motor, I acquired the car at 74k, third owner. First two owners didn't even know it consumed oil on purpose so it probably wasn't cared for very well. Was pulled because it lacked top end power and because of a pretty bad front main oil seal leak.
Found that most of the exhaust ports were just PACKED with crud, was probably why it didn't make good power up top, it couldn't breath. Also there was a TON of carbon build up. I used seafoam on this car probably about 4 times and after seeing this, I'm pretty sure it didn't do a whole lot at all... I'm lucky that it didn't chunk off and destroy the housings and irons.
Now it's time to send stuff out for machine work, order the rebuild kit from Mazdaspeed motorsports then when everything is ready, get this thing rebuilt and back in the car.
Also I just wiped down all the surfaces with a paper towel so far, I haven't really cleaned any of them that well. So some of the buildup may look like the hard parts are in tough shape but it's just oil and carbon and crap still on them.
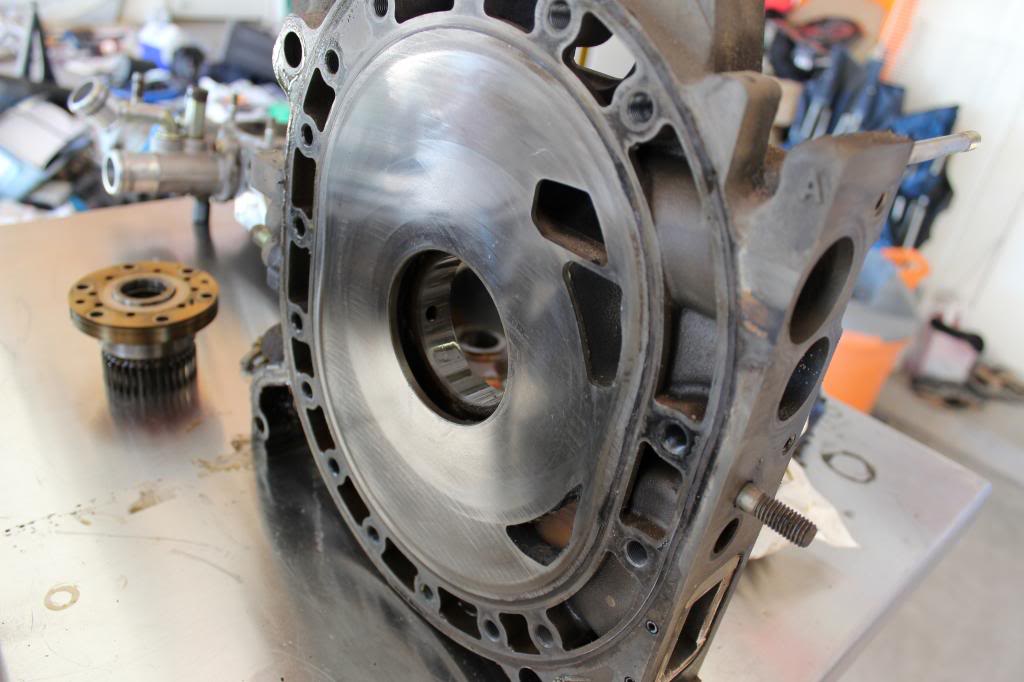
Next step is porting the irons, I have a local place that will be doing the lapping, and the housings will be sent out to Freelance Motorsports for some CNC action, I just have to submit the photos of the housings so they can either approve or deny my work request.

Loves me some of this... can't get it here on the West Coast, I'm down to my last 6 pack

Found that most of the exhaust ports were just PACKED with crud, was probably why it didn't make good power up top, it couldn't breath. Also there was a TON of carbon build up. I used seafoam on this car probably about 4 times and after seeing this, I'm pretty sure it didn't do a whole lot at all... I'm lucky that it didn't chunk off and destroy the housings and irons.
Now it's time to send stuff out for machine work, order the rebuild kit from Mazdaspeed motorsports then when everything is ready, get this thing rebuilt and back in the car.
Also I just wiped down all the surfaces with a paper towel so far, I haven't really cleaned any of them that well. So some of the buildup may look like the hard parts are in tough shape but it's just oil and carbon and crap still on them.
Next step is porting the irons, I have a local place that will be doing the lapping, and the housings will be sent out to Freelance Motorsports for some CNC action, I just have to submit the photos of the housings so they can either approve or deny my work request.
Loves me some of this... can't get it here on the West Coast, I'm down to my last 6 pack
01-27-2014, 10:53 AM
#87
I'll clean it when it's driving lol... The crap on the back is from the exhaust and just wipes right off. The brake pads I have are supposed to be non corrosive as well, it's been sitting for a year like this and no damage. Paint care isn't very high on my to do list.
01-27-2014, 07:08 PM
#88
One thing I was thinking of today, I had talked with Eric Meyer previously and was advised that having the rotating assembly balanced was an important piece to any build, but is it necessary with an original engine that I am just going to change bearings on? It's not like I'm mixing and matching parts from different motors or a reman. Does putting in new bearings and going to a lightweight flywheel + counterweight make balancing necessary? I don't plan on shifting above 9000 and will most likely be shifting at 8500 depending on how the dyno chart looks.
Thank you, I will definitely keep that in mind. So far the plan is to just follow the Mazda engine manual as best I can and use OE Mazda seals/springs/gaskets.
Thank you, I will definitely keep that in mind. So far the plan is to just follow the Mazda engine manual as best I can and use OE Mazda seals/springs/gaskets.

 02-01-2014, 01:02 PM
#91

One thing I was thinking of today, I had talked with Eric Meyer previously and was advised that having the rotating assembly balanced was an important piece to any build, but is it necessary with an original engine that I am just going to change bearings on? It's not like I'm mixing and matching parts from different motors or a reman. Does putting in new bearings and going to a lightweight flywheel + counterweight make balancing necessary? I don't plan on shifting above 9000 and will most likely be shifting at 8500 depending on how the dyno chart looks.
Thank you, I will definitely keep that in mind. So far the plan is to just follow the Mazda engine manual as best I can and use OE Mazda seals/springs/gaskets.
Thank you, I will definitely keep that in mind. So far the plan is to just follow the Mazda engine manual as best I can and use OE Mazda seals/springs/gaskets.
Be clean...measure everything...and it isn't difficult if you are meticulous
Let us know how it works out

PS: you would be surprised how much out of balance my rotating assembly was....It seemed way more than most FD assemblies I had seen balanced in the past.
Last edited by dannobre; 02-01-2014 at 01:09 PM.
02-01-2014, 01:20 PM
#92
At this point it's just a plan in my head. I'm going to get everything back together and be using 91 pump gas for now, and after that if it's justified I will go to E85. I will be using Maxima 2-stroke oil for the SOHN and as a premix just in case I decide to convert, it is compatible with gas and E85 (almost all 2-stroke oil and premix gums up when you mix with E85). Having stuff gum up in the fuel system due to incompatible premix is one of the biggest issues, or if you have been premixing for a long time.
Plans would be:
Second OEM bucket/pump assembly in passenger side
In tank pumps feed into 1Gal surge tank in trunk, I can have one fabbed up for cheap.
All fuel lines converted to -06AN.
Surge tank feeds single external Bosch 044.
Fuelab or equivalent filter.
Modified fuel rail to use -06AN fittings, converted to return style system.
AUS Injection has 550cc injectors I could use in place of the yellows, then use two yellows in the primaries where the reds used to be.
Aeromotive adjustable fuel pressure regulator
GM Flex Fuel inline sensor in return line that feeds back into the surge tank.
Zeitronix ethanol gauge that reads off of the flex fuel sensor so I know what the mix is.
Cheap way would be to have 3 maps on the Cobb, one for 91, one for mixed, one for E85 and switch them manually.
Expensive way would be to get an Adaptronic plug and play and take advantage of their flex fuel adjustments so it would make adjustments for ethanol content on its own.
After talking with a couple different people I have decided to skip balancing it. It's more money I don't have to spend right this second and would delay the build even further...
My reasoning is that since I'm going to be re-using all of the parts from my factory original engine, I won't be balancing it. If I were mixing and matching rotating parts then I would probably have it balanced. At 104k miles the e-shaft, rotor bearings and stationary gear bearings look pretty decent, and the rotors weren't banging into anything, so the factory balancing is good enough for me. I suspect that something else in the motor will fail long before balance becomes an issue.
Plans would be:
Second OEM bucket/pump assembly in passenger side
In tank pumps feed into 1Gal surge tank in trunk, I can have one fabbed up for cheap.
All fuel lines converted to -06AN.
Surge tank feeds single external Bosch 044.
Fuelab or equivalent filter.
Modified fuel rail to use -06AN fittings, converted to return style system.
AUS Injection has 550cc injectors I could use in place of the yellows, then use two yellows in the primaries where the reds used to be.
Aeromotive adjustable fuel pressure regulator
GM Flex Fuel inline sensor in return line that feeds back into the surge tank.
Zeitronix ethanol gauge that reads off of the flex fuel sensor so I know what the mix is.
Cheap way would be to have 3 maps on the Cobb, one for 91, one for mixed, one for E85 and switch them manually.
Expensive way would be to get an Adaptronic plug and play and take advantage of their flex fuel adjustments so it would make adjustments for ethanol content on its own.
I think that it makes a huge difference.. Having done it both ways...the balanced assembly is noticeably smoother reving...and that will equate to less wear and stress over time. I think the most important tolerances are the seal clearances and how carefully they are fit...so spend the time to hand fit them...not the Mazda factory pre-cut ones.
Be clean...measure everything...and it isn't difficult if you are meticulous
Let us know how it works out
Be clean...measure everything...and it isn't difficult if you are meticulous
Let us know how it works out
My reasoning is that since I'm going to be re-using all of the parts from my factory original engine, I won't be balancing it. If I were mixing and matching rotating parts then I would probably have it balanced. At 104k miles the e-shaft, rotor bearings and stationary gear bearings look pretty decent, and the rotors weren't banging into anything, so the factory balancing is good enough for me. I suspect that something else in the motor will fail long before balance becomes an issue.
 02-01-2014, 06:43 PM
#94
Shipped the housings off to Freelance Motorsports today, definitely excited to see those come back, all the pictures I've seen of their work so far looks good. It was $300 for both of them.
Thanks man, hopefully it turns out well lol.
Thanks man, hopefully it turns out well lol.
02-02-2014, 04:29 AM
#95
Registered

Have you seen the Radium Engineering FST-R surge tank with integrated regulator? Then you can stick with the return-less system - unless, that is, you were planning to change it for other reasons.
02-02-2014, 01:27 PM
#97
Have you seen the Radium Engineering FST-R surge tank with integrated regulator? Then you can stick with the return-less system - unless, that is, you were planning to change it for other reasons.
I want to go to a return style anyways so that I have a place to put the flex fuel sensor, it will be reading the fuel coming back from the rail so I'll know the ethanol content of the fuel being consumed, not what is pumping around in the surge system at the back of the car. And I wouldn't want to put it in the pressure line because it would be a restriction.
Not true. From what I've seen you can gain anywhere between 10-30WHP when switching to E85 on an N/A RX-8. You have to use about 30% more to have the same energy potential as gasoline, but it's rated around 105 octane. It's cheap race gas. You can advance timing without fear of detonation and that's where the power comes from.
Another awesome side effect is that it is really tough on carbon and gunk buildup, I've seen some of the RX-7 guys tear down motors that are run exclusively on E-85 and they are REALLY clean inside compared to motors run on gasoline.
The third thing that is really cool about it, is that it has much better evaporative cooling properties than gas. That means cumbustion events in the motor aren't as hot, which in turn makes the coolant temps run lower, oil temps run lower, and exhaust gas temperature goes down as well. On a track car this is excellent news, especially where I live in AZ since some of our events are in 100 degree weather.
02-02-2014, 09:03 PM
#98
Registered
Everything on their website is like twice as expensive as it should be. They make some awesome stuff no doubt, but I would never buy any of their products when I can have stuff like that custom fabricated exactly how I want it for a fraction of the cost. I got quoted $100 bucks for an aluminum 1 gallon surge tank (which is a much larger capacity than Radium's stuff) if I supplied the weld on A/N fittings of my choice, then I can hard anodize it any color I want.
 I love Radium's stuff too, and I've long wanted one of their catch cans, but I just simply can't justify spending that much money on something that only provides a marginal benefit to a largely-stock RX-8 like mine.
One question: why such a large surge tank?
02-03-2014, 01:56 AM
#99
I thought you might say that. I love Radium's stuff too, and I've long wanted one of their catch cans, but I just simply can't justify spending that much money on something that only provides a marginal benefit to a largely-stock RX-8 like mine.
One question: why such a large surge tank?
I love Radium's stuff too, and I've long wanted one of their catch cans, but I just simply can't justify spending that much money on something that only provides a marginal benefit to a largely-stock RX-8 like mine.One question: why such a large surge tank?
One situation where this would help is if both of the lift pumps fail somehow (lights on the dash switches go out), I could make it to the pits on what is in the surge tank instead of having to get towed.
If I'm adding capacity to the fueling system I might as well make it worth my while.
Last edited by Arca_ex; 02-03-2014 at 02:08 AM.
02-25-2014, 06:38 PM
#100
So, small update. Unfortunately ran into a delay... I shipped out the housings to Freelance on Feb. 1st to get CNC'd, they got there on Feb. 11th after the second delivery attempt, then on Feb. 18th I got an email with an update, they got 2 feet of snow the previous weekend and the roof to the shop collapsed so now they have to take some time to fix it and re-calibrate the tools since everything inside the shop got mega cold. Hopefully they will be shipped back to me this week.
I'm probably going to try to get the porting of the irons nailed out this week, then head over to a local company called Superfinishers to get the irons lapped flat. I haven't done much else of anything, just haven't had the motivation to work on it really.
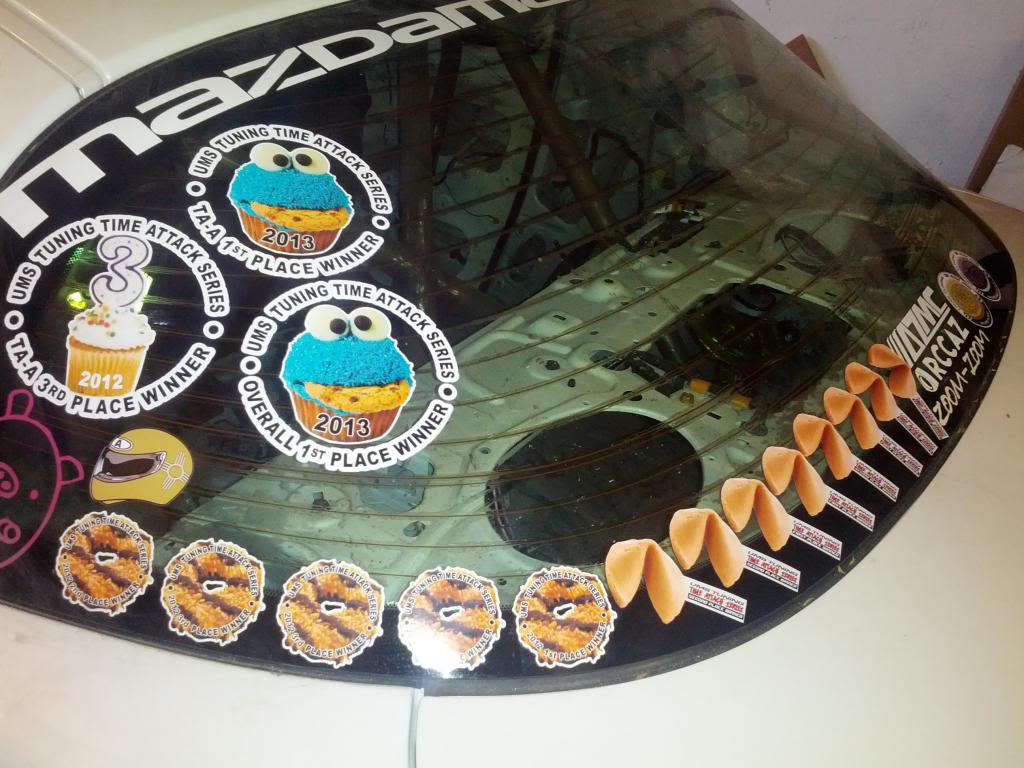
I got bored and put all of my Time Attack Podium stickers and Season Award stickers on the car. Most of these were won while I was driving the Miata, but I put them on my car because my Dad has his on the Miata since it's his car.
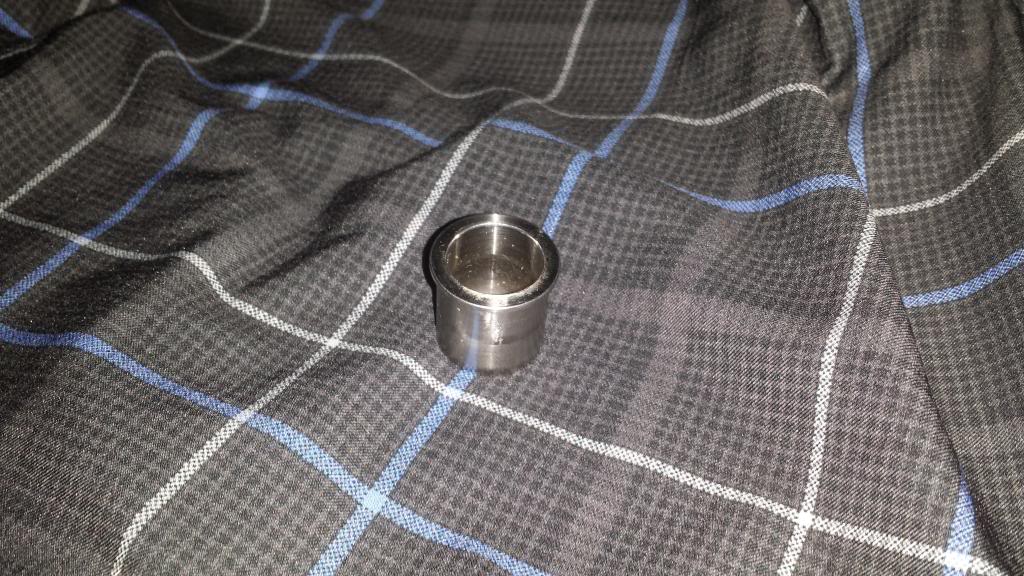
In one of those Facebook buy/sell groups this popped up, a Speedsource metal shifter bushing. Nabbed it for 10 bucks. Unfortunately after some research I found out they don't work with the AFE Short Shifter because the lower ball of the shift lever sits too low and comes into contact with the bottom lip of the metal bushing. I'm going to take some measurements and see if I can't take some material off of that lip and make it work.
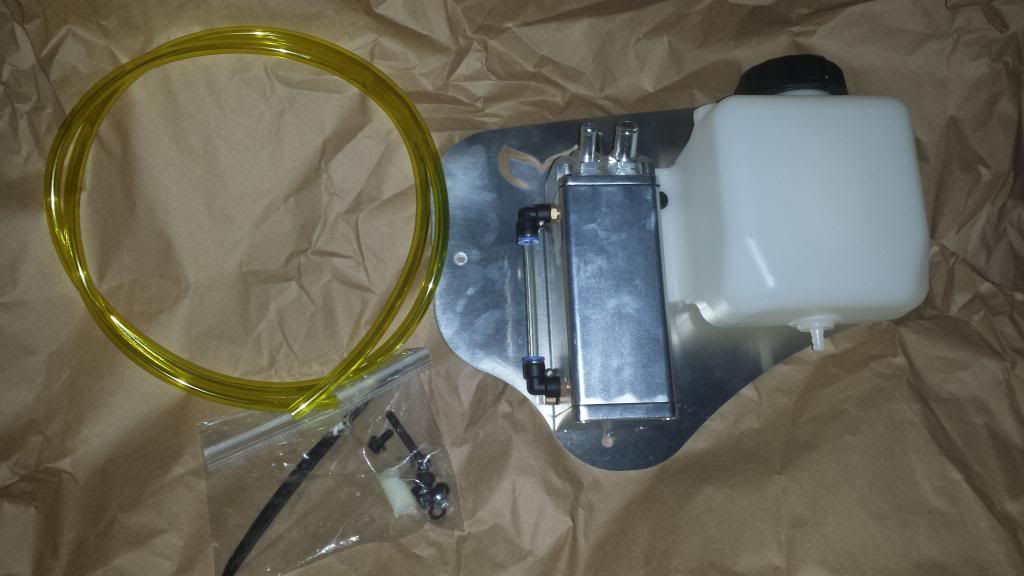
I also picked up the SOHN support kit from Epitroch, this will save me the hassle of trying to figure out a solution for the external tank for 2-stroke oil that will feed the SOHN. Nice kit, definitely recommend it to anyone with a SOHN adapter.
Here is a quick post that I wrote about it in another thread:
I'm probably going to try to get the porting of the irons nailed out this week, then head over to a local company called Superfinishers to get the irons lapped flat. I haven't done much else of anything, just haven't had the motivation to work on it really.
I got bored and put all of my Time Attack Podium stickers and Season Award stickers on the car. Most of these were won while I was driving the Miata, but I put them on my car because my Dad has his on the Miata since it's his car.
In one of those Facebook buy/sell groups this popped up, a Speedsource metal shifter bushing. Nabbed it for 10 bucks. Unfortunately after some research I found out they don't work with the AFE Short Shifter because the lower ball of the shift lever sits too low and comes into contact with the bottom lip of the metal bushing. I'm going to take some measurements and see if I can't take some material off of that lip and make it work.
I also picked up the SOHN support kit from Epitroch, this will save me the hassle of trying to figure out a solution for the external tank for 2-stroke oil that will feed the SOHN. Nice kit, definitely recommend it to anyone with a SOHN adapter.
Here is a quick post that I wrote about it in another thread:
I just got my kit today. It seems that USPS put a boot sized hole in the side of my box, but thankfully all the parts were there and undamaged! I'm completely amazed that the hardware didn't fall out of the box during transit with that big of a hole in the side.
For reference I ordered mine without the washer bottle since I don't have a window washer system because racecar. Props to Epitroch for being flexible on this, there are a lot of companies out there that refuse to work with out of the ordinary requests, thank you for not being one of those companies!
I will be mounting my catch can where the washer bottle goes, was very happy to kill two birds with one stone and have a new mounting solution for that thing as well as a nice and neat oil tank setup.
Quick review:
-The aluminum plate is thicker than I thought it would be, very sturdy.
-I did a quick test fit and all the holes line up perfectly.
-The oil tank and line and all hardware seem to be of very high quality.
-Everything you need is included in the kit, it even has some zip ties for routing the oil line.
-Instructions and documentation that come with the kit are EXTREMELY detailed and easy to understand, very nice!
-The hand written thank you note was a nice touch, don't see that very often.
I probably won't install it until I get the engine back in, but will have more info in my build thread when I do.
Anyways, definitely looking forward to more products from Epitroch. This kit at even the non-introductory price is a no-brainer and great value for anyone that is thinking of getting a SOHN adapter or anyone that wants a cleaner and neater solution for an external oil injection tank.

