
Installed: Tanabe Coilovers: Sustec Pro SEVEN's + TEAS


Thread Starter
Registered User
Joined: Apr 2005
Posts: 94
Likes: 0
From: Chantilly, VA - NoVA
Installed: Tanabe Coilovers: Sustec Pro SEVEN's + TEAS
(updated: 5/18/2007 - short video of the TEAS in action)
http://www.hawkgt.com/rx8/RX-8_-_Tan..._Pro_Seven.mpg ~39MB
(updated: 4/28/2007 - new photos and text below)
Sustec Pro SEVEN: http://www.tanabe-usa.com/coilovers/seven.asp
TEAS system: http://www.tanabe-usa.com/coilovers/teas.asp
Forgive my poor photography.
Below are photos for the installation of the Tanabe Sustec Pro SEVEN's and TEAS. Many thanks to Sam of J_OnDemand for the Tanabe's. I also have a few pics of the RPF1's I've just put on, thanks to the great deal from Rishie.
UPDATE 4/24/2007: Installation has begun on the SEVEN's. While the wheels are off stainless brakelines are being installed. Tomorrow the TEAS will be installed.
UPDATE 4/28/2007
The suspension installation is now complete.
INSTALLATION:
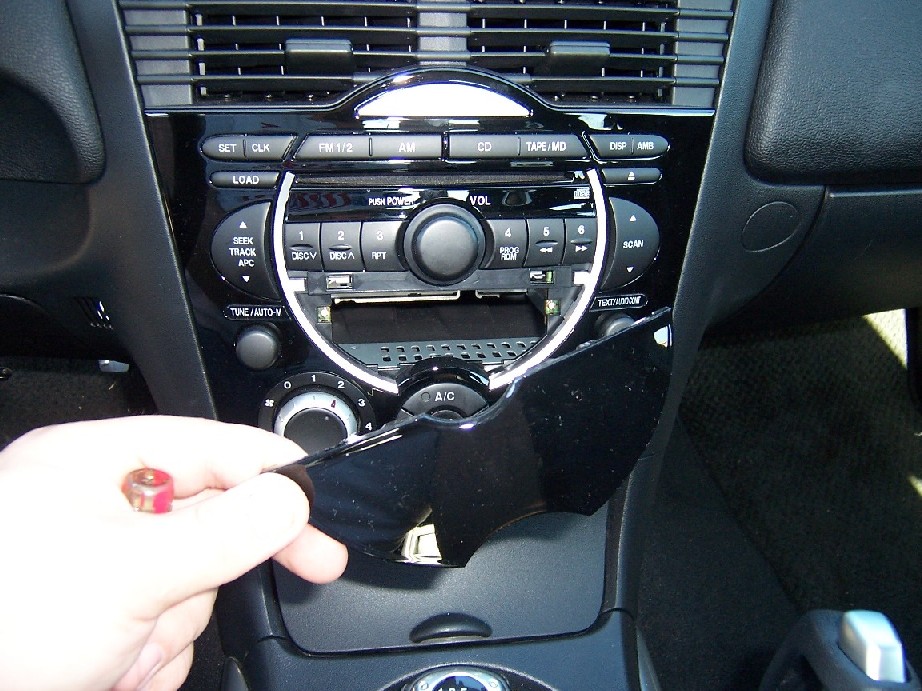
The installation went well. Something I didn't expect was that on the front the TEAS motors do not sit within the engine bay. They actually reside recessed within the large shock housing at the top. You can see the cable coming out of the existing hole above the shock. At first the mechanic thought he might have to make a notch to allow the cable to exit, but there is enough clearance for the cable to exit without any binding.
The ride height was another surpise. The minimum drop was about 1.25 inches and that is where the car sits now until the suspension settles a bit. I think it looks good where it is and still gives plenty of room for clearance.
FIRST IMPRESSIONS:
I'll get it out of the way and say I love them!
The ride is much stiffer than OEM even at the 1 setting. However, settings down around 1 do not cause a very loud thump when crossing a pothole or small/deep dip. Manual settings between 6-8 seem perfect for daily driving.
I currently have been trying 8 for the front and 6 for the rear. The car feels like it has no body roll. Responsiveness is incredibly enjoyable.
I'm really glad I chose to upgrade the suspension. The 8 has even more of a true sports car feel to it now.
I haven't yet fully played with the auto-speed settings yet, only the manual settings.
TEAS:
The TEAS unit only turns on when the car is running. When you start the car it seems the unit initalizes all shocks and sets them at 16 then returns to your previous saved settings. You hear very quick clicking of the rears when this occurs.
Changing the settings while driving is quite cool, though not recommended doing it manually while driving for obvious safety reasons. The response is immediate when settings are changed.
The auto-speed settings appear to work off of the manual settings. The manual settings are your baseline and the auto-speed settings add dampening. So for exmaple whe using the auto-speed settings I would start with manual settings of say 3 for the front and 1 for the rear. The auto-speed setting will bump up all dampening by +2 when the car hits 30mph. Then another +2 when it hits 40mph. So at 40mph the effective settings would be 7 on the front and 5 on the rear. If you were to up the manual dampening then the effective auto-speed dampening will increase likewise.
Once I work with the auto-speed dampening I'll post more on it. It's still quite new to me.
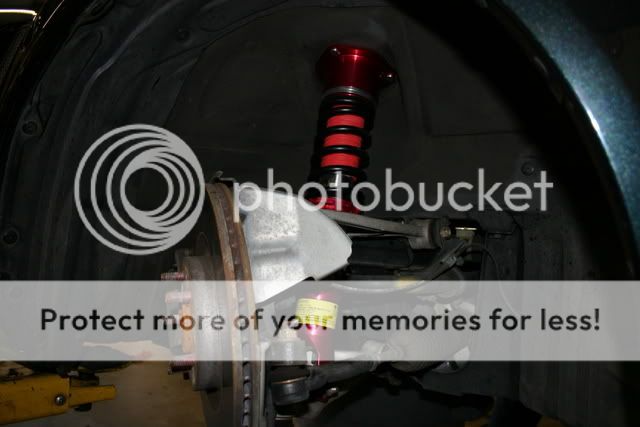
FRONT-RIGHT

FRONT-RIGHT : The TEAS motor sits within the hollow top portion of the shock. If the motor dies you'll need to drop the shock to get to it.
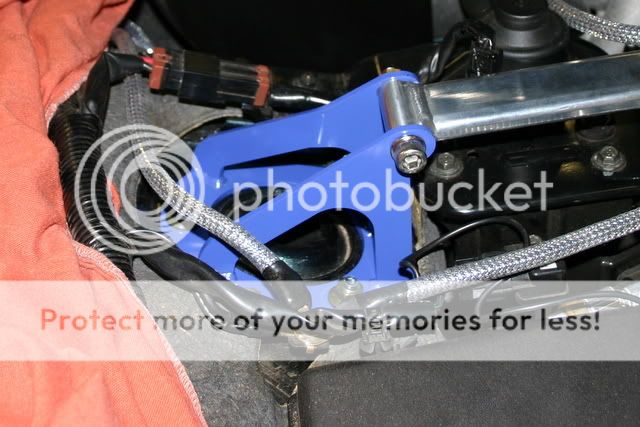
FRONT-RIGHT : (top view) I had expected the TEAS motor to mount above the hole and within the strut bar wounting area. The shock does not extend out of the hole at all. The TEAS motor wire nicely feeds through the hole without any binding.
(This angle is quite poor and I'll replace it with a better shot.)

RIGHT-REAR

RIGHT-REAR : (top view)
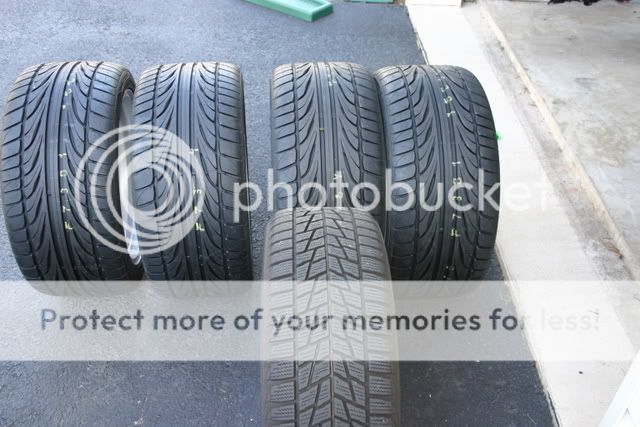
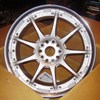
Comparison: RPF1 18x9.5 with 275/35/18 Falken's AND 225/45/18 Blizzacks

"Will work for daycare!" Pic of cheap labor swapping the wheels. For comparison that is a 225 Blizzak tire on the front and a 275 Falken on the rear.

RPF1's + Falken 275/35/18 installed (all-stock suspension)

RPF1's + Falken 275/35/18 installed + Tanabe Sustec Pro Seven suspension
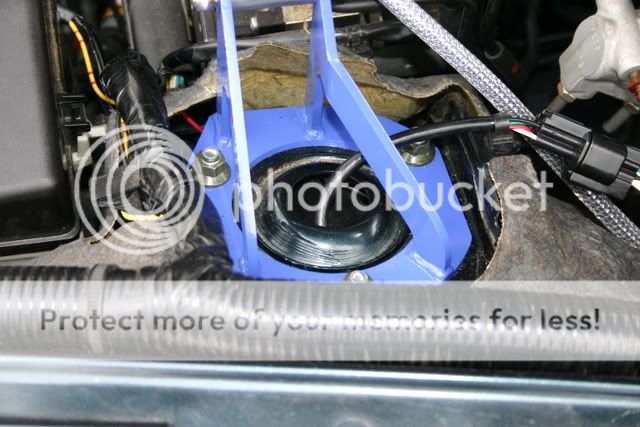
Top of left shock area. The cable coming out of the shock hole is the TEAS for this shock. The TEAS motor sits within the hollow top portion of the shock. If the motor dies you'll need to drop the shock to get to it.

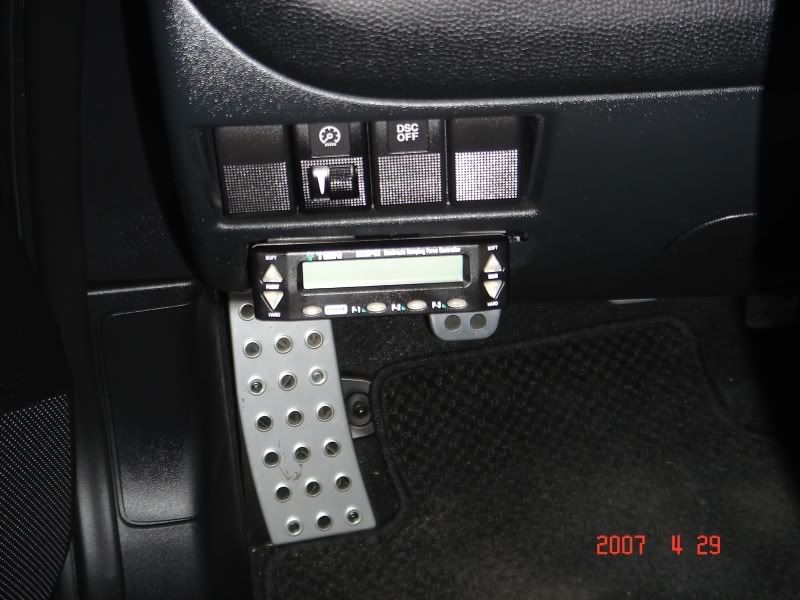
TEAS control unit within the cabin. It's a temporary location until I can take time to find one better. There is plenty of cable coiled underneath.
http://www.hawkgt.com/rx8/RX-8_-_Tan..._Pro_Seven.mpg ~39MB
(updated: 4/28/2007 - new photos and text below)
Sustec Pro SEVEN: http://www.tanabe-usa.com/coilovers/seven.asp
TEAS system: http://www.tanabe-usa.com/coilovers/teas.asp
Forgive my poor photography.
Below are photos for the installation of the Tanabe Sustec Pro SEVEN's and TEAS. Many thanks to Sam of J_OnDemand for the Tanabe's. I also have a few pics of the RPF1's I've just put on, thanks to the great deal from Rishie.
UPDATE 4/24/2007: Installation has begun on the SEVEN's. While the wheels are off stainless brakelines are being installed. Tomorrow the TEAS will be installed.
UPDATE 4/28/2007
The suspension installation is now complete.
INSTALLATION:
The installation went well. Something I didn't expect was that on the front the TEAS motors do not sit within the engine bay. They actually reside recessed within the large shock housing at the top. You can see the cable coming out of the existing hole above the shock. At first the mechanic thought he might have to make a notch to allow the cable to exit, but there is enough clearance for the cable to exit without any binding.
The ride height was another surpise. The minimum drop was about 1.25 inches and that is where the car sits now until the suspension settles a bit. I think it looks good where it is and still gives plenty of room for clearance.
FIRST IMPRESSIONS:
I'll get it out of the way and say I love them!
The ride is much stiffer than OEM even at the 1 setting. However, settings down around 1 do not cause a very loud thump when crossing a pothole or small/deep dip. Manual settings between 6-8 seem perfect for daily driving.
I currently have been trying 8 for the front and 6 for the rear. The car feels like it has no body roll. Responsiveness is incredibly enjoyable.
I'm really glad I chose to upgrade the suspension. The 8 has even more of a true sports car feel to it now.
I haven't yet fully played with the auto-speed settings yet, only the manual settings.
TEAS:
The TEAS unit only turns on when the car is running. When you start the car it seems the unit initalizes all shocks and sets them at 16 then returns to your previous saved settings. You hear very quick clicking of the rears when this occurs.
Changing the settings while driving is quite cool, though not recommended doing it manually while driving for obvious safety reasons. The response is immediate when settings are changed.
The auto-speed settings appear to work off of the manual settings. The manual settings are your baseline and the auto-speed settings add dampening. So for exmaple whe using the auto-speed settings I would start with manual settings of say 3 for the front and 1 for the rear. The auto-speed setting will bump up all dampening by +2 when the car hits 30mph. Then another +2 when it hits 40mph. So at 40mph the effective settings would be 7 on the front and 5 on the rear. If you were to up the manual dampening then the effective auto-speed dampening will increase likewise.
Once I work with the auto-speed dampening I'll post more on it. It's still quite new to me.
FRONT-RIGHT
FRONT-RIGHT : The TEAS motor sits within the hollow top portion of the shock. If the motor dies you'll need to drop the shock to get to it.
FRONT-RIGHT : (top view) I had expected the TEAS motor to mount above the hole and within the strut bar wounting area. The shock does not extend out of the hole at all. The TEAS motor wire nicely feeds through the hole without any binding.
(This angle is quite poor and I'll replace it with a better shot.)
RIGHT-REAR
RIGHT-REAR : (top view)
Comparison: RPF1 18x9.5 with 275/35/18 Falken's AND 225/45/18 Blizzacks
"Will work for daycare!" Pic of cheap labor swapping the wheels. For comparison that is a 225 Blizzak tire on the front and a 275 Falken on the rear.
RPF1's + Falken 275/35/18 installed (all-stock suspension)
RPF1's + Falken 275/35/18 installed + Tanabe Sustec Pro Seven suspension
Top of left shock area. The cable coming out of the shock hole is the TEAS for this shock. The TEAS motor sits within the hollow top portion of the shock. If the motor dies you'll need to drop the shock to get to it.
TEAS control unit within the cabin. It's a temporary location until I can take time to find one better. There is plenty of cable coiled underneath.
Last edited by dbullock; May 18, 2007 at 03:11 PM.

Thread Starter
Registered User
Joined: Apr 2005
Posts: 94
Likes: 0
From: Chantilly, VA - NoVA
That's a good question and one I can't answer yet. :-)
I'm not really interested in having it out for display, so my thought was somewhere low within the driver footwell. I'd like to be able to be able to glance at it and reach it while driving.
I think the TEAS unit is larger than TEIN's EDFC which might preclude both the change compartment and possibly the ashtray. I think I'm going to just have to spend some time toying around with different locations and velcro it some place.

Thread Starter
Registered User
Joined: Apr 2005
Posts: 94
Likes: 0
From: Chantilly, VA - NoVA
Thanks.. I'm sure I will. Though I have little reference to compare. The stock RX-8 handles better than anything I've ever owned. The new suspension+tires will be far better I'm sure. I'm really looking forward to it.

Hmmmmmm.........
Joined: Mar 2005
Posts: 3,564
Likes: 6
From: Melbourne, Australia
Awesome. Didnt realise the TEAS allowed to you change while in motion. Nice for the track so you dont have to come in.
Did you mean "do" or "do not" when you said "settings down around 1 do not cause a very loud thump when crossing a pothole or small/deep dip". ie was this a warning or a nice suprise.
Cheers
Andrew
Did you mean "do" or "do not" when you said "settings down around 1 do not cause a very loud thump when crossing a pothole or small/deep dip". ie was this a warning or a nice suprise.
Cheers
Andrew
Thread Starter
Registered User
Joined: Apr 2005
Posts: 94
Likes: 0
From: Chantilly, VA - NoVA
"do not". Setting 1 is the softest, while 16 is the firmest.
I'm not saying this as a warning or surprise but just an FYI. People often talk about the teeth rattling effect of some suspensions when going over bumps.
The range of adjustments for these shocks is very nice and can give you a relatively comfy ride. But keep in mind even at a setting of 1 these are still far stiffer than stock.
I have no doubt that at settings between 1 and 3 it will pass the wife and kids test. I'll still be slowing down more for bad bumps though, at least when they are in the car.
I'll be taking the car to VIR in June so we'll see how it handles there. I'll have a digital camcorder setup as well so hopefully I'll have some good video to share.
Hmmmmmm.........
Joined: Mar 2005
Posts: 3,564
Likes: 6
From: Melbourne, Australia
Cool thanks for that. I have an aftermaket setup already and it couldnt be much firmer than that as I was riding on 9kg front and 7kg rear springs. Which brings my next question. What spring rates do these come with?
Cheers
Andrew
Cheers
Andrew

hey dbullock,
I know that the top or bottom of the radio is that plastic... Maybe put it there? I know someone had a DIY for putting buttons but you can mod it instead for the unit. Would make it more flush with if it was there.
It looks a bit large for the area but worth a look.
DIY: https://www.rx8club.com/showthread.p...light=switches

What pointy ears?
Joined: Jul 2006
Posts: 301
Likes: 6
From: California
Originally Posted by dbullock
(updated: 4/28/2007 - new photos and text below)
...
TEAS control unit within the cabin. It's a temporary location until I can take time to find one better. There is plenty of cable coiled underneath.
...
TEAS control unit within the cabin. It's a temporary location until I can take time to find one better. There is plenty of cable coiled underneath.

Momentum Keeps Me Going
Joined: Sep 2002
Posts: 5,036
Likes: 5
From: Colorado
Looks nice! The idea of the front EFDC below the tower is great - lets you use any strut bar you want - even stock which is the worst. That controller box is huge though - too bad but then what can you do. How easy is it to read that b&W lcd - does it have a backlight or just reflective?
Thread Starter
Registered User
Joined: Apr 2005
Posts: 94
Likes: 0
From: Chantilly, VA - NoVA
I replaced the front strut bar because I thought the TEAS motor would be on top and within the engine bay. The stock bar covers about half the hole. I didn't know it would not be extending out of the hole. I went with the cheapest bar I could find and that was the Greddy bar. I might just put the stock bar back on.
I did see that install of a control unit where the cassette player goes. That is nice but I'd rather have it more hidden. The coin tray placement might be the best location. I think the TEAS is a bit taller than the EDFC, maybe not wider though. I could take exact measurements for the record though.
Also, the TEAS has vents on the top rear of the unit. The instructions specify that the vents must not be obstructed. I think I'll be scanning in the TEAS doc since Tanabe has not responded to my request for a PDF of it.
Thread Starter
Registered User
Joined: Apr 2005
Posts: 94
Likes: 0
From: Chantilly, VA - NoVA
Quick and dirty short video of the TEAS in action. I had the camera attached to the window and at an angle which is why the video border is at an angle. The TEAS is at the bottom left and you can see the speedometer in the upper right.
The TEAS is in auto mode and changes the suspension dampening based upon the vehicle speed. 30MPH is the lowest initial change. I have it set to change the speed at 30,40,50,60,70 and 80.
The values set for each bump in speed are relative to the previous setting. I begin at 6 for the front and 3 for the rear. 1 is the softest while 16 is the firmest.
Video download: http://www.hawkgt.com/rx8/RX-8_-_Tan..._Pro_Seven.mpg ~39MB

Dan
p.s. I've also added the video link the threads first post.
The TEAS is in auto mode and changes the suspension dampening based upon the vehicle speed. 30MPH is the lowest initial change. I have it set to change the speed at 30,40,50,60,70 and 80.
The values set for each bump in speed are relative to the previous setting. I begin at 6 for the front and 3 for the rear. 1 is the softest while 16 is the firmest.
Video download: http://www.hawkgt.com/rx8/RX-8_-_Tan..._Pro_Seven.mpg ~39MB
Dan
p.s. I've also added the video link the threads first post.
Last edited by dbullock; May 18, 2007 at 03:31 PM.

Thread Starter
Registered User
Joined: Apr 2005
Posts: 94
Likes: 0
From: Chantilly, VA - NoVA
In the weeks that I have used it I have really come to like that it is speed sensing.
I have played with the settings manually and found a nice stiff setting for high speed is murder at low speed. With a manual system I would be constantly changing the settings to suit my desire, so it really is a joy to ride in.
Best mod I have done to-date. Second would be the rims/tires.
I have played with the settings manually and found a nice stiff setting for high speed is murder at low speed. With a manual system I would be constantly changing the settings to suit my desire, so it really is a joy to ride in.
Best mod I have done to-date. Second would be the rims/tires.


drivelinestore.com
Joined: Jun 2005
Posts: 2,756
Likes: 0
From: OC